Seat Base Electric + EHU + Solar Install + Charger + DC-DC -- How We Done it --

Mine only had the starter battery, then 25mm2 cable straight to the inverter. I'm using that cable as the feed to the DC-DC charger.

The inverter works, tested it when I has hoovering out the back of the van. It's an Antares/Cotek 750w that you typically see in work vans - not going to power an airfryer though haha!!
 
@doncarlyon this looks like great progress but... the heat dispersion fins on the back of the renogy MPPT/B2B really need good air flow. I'd suggest drilling holes in the board for airflow, or better still if you cut a rectangle out and staple some black mesh just in from between the securing screwholes. Sorry to interfere :whistle:

Screenshot_20250504_140805_Chrome.jpg
 
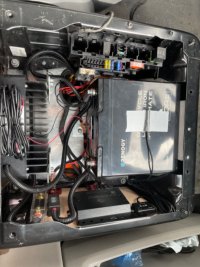
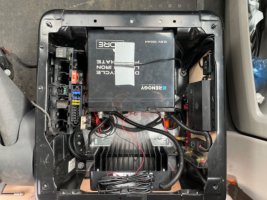
This is my layout, slightly different to most as in the battery position but, lots of airflow around everything! A Sportcraft swivel base is fitted above, and it’s a bit busy as I had to find positions to locate the existing factory fitted tow bar module, relay and fuses etc. which were all originally in the passenger double seat base (this also now has a swivel base!). I made an aluminium plate to mount to mount the battery and DC charger on and used a piece of plywood bonded to the right side to fix equipment to. The existing plastic VW fuse and relay bracket was easily modded to fit the left side and the existing factory fitted auxiliary battery wiring was adapted as well. A 16mm Tri-rated cable has been run from the battery midi fuse in the seat base to a fuse box in the rear which services LED spots, USB sockets, 12v sockets, fridge etc.

7FBF8061-523C-48FC-B745-16C8BB949CED.jpeg

D1AA70DA-68D7-45B3-BC65-4BBBBC16FF6C.jpeg

D05D811E-581D-4E33-B8AD-B7A2CC9A44B1.jpeg

30E4EECD-73F9-425A-8B58-153BABC76061.jpeg
 
This is my layout, slightly different to most as in the battery position but, lots of airflow around everything! A Sportcraft swivel base is fitted above, and it’s a bit busy as I had to find positions to locate the existing factory fitted tow bar module, relay and fuses etc. which were all originally in the passenger double seat base (this also now has a swivel base!). I made an aluminium plate to mount to mount the battery and DC charger on and used a piece of plywood bonded to the right side to fix equipment to. The existing plastic VW fuse and relay bracket was easily modded to fit the left side and the existing factory fitted auxiliary battery wiring was adapted as well. A 16mm Tri-rated cable has been run from the battery midi fuse in the seat base to a fuse box in the rear which services LED spots, USB sockets, 12v sockets, fridge etc.

View attachment 285613

View attachment 285614

View attachment 285615

View attachment 285616
I'm planning on installing a similar setup but I was hoping to get a renogy 1000w inverter in there as well, looks like I could fit it all in but it will be a squeeze! Do you have an inverter?
 
Hi, no inverter fitted!.. bought the Renogy charger with a view to a possible solar panel install in the future. Also have mains hook up to 13A socket's but, just getting started with it all really so I’m sure it will evolve in time!
 
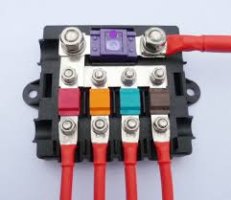
Use your midi fuses for the DC2DC, MPPT & fusebox main power. You can use an MRBF fuse straight on the leisure battery live which makes things easier.

View attachment 285674
It doesn't look like you have an inverter in your setup, I was planning on going from my leisure battery to a set of pos and neg bus bars then to ANL fuses on each wire out to my DC2DC/MPPT, 12v Fuse board and Inverter. Can you get Midi fuses to replace the lot?
 
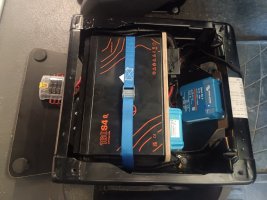
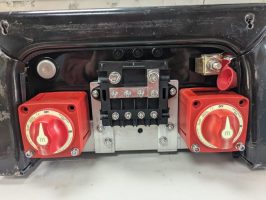
Here is my T5 passenger seatbase progress (please ignore the lifting rope). Engine battery/Leisure battery isolator and mega midi fuse box at rear. MRBF off battery. There will be a flap cover in front of that. Battery had to go in a very specific location due to braces on underside of Sportscraft swivel base. MPPT/Orion XS DCDC in front of battery, IP22 charger at very front (may move that to Drivers seatbase). Will use the mega fuse on busbar for an inverter. Shunt and Neg busbar on side. Slow progress due to other stuff going on.


1746427364662.png

1746427424652.png
 
Here is my T5 passenger seatbase progress (please ignore the lifting rope). Engine battery/Leisure battery isolator and mega midi fuse box at rear. MRBF off battery. There will be a flap cover in front of that. Battery had to go in a very specific location due to braces on underside of Sportscraft swivel base. MPPT/Orion XS DCDC in front of battery, IP22 charger at very front (may move that to Drivers seatbase). Will use the mega fuse on busbar for an inverter. Shunt and Neg busbar on side. Slow progress due to other stuff going on.


View attachment 285675

View attachment 285676
Looking good! So am I right to think you don't need any other fuses between battery and devices if you use the midi fuse box? You just use that in place of a pos bus bar and fuses? Im new to all this so appreciate any help
 
Looking good! So am I right to think you don't need any other fuses between battery and devices if you use the midi fuse box? You just use that in place of a pos bus bar and fuses? Im new to all this so appreciate any help
Thanks I wanted the main fuses and isolators easily accessible for intervention and monitoring heat on connections.

There will be a blade fusebox for the lights, usb & 12v sockets, waterpump all on their own blade fused circuits which will be in one of the side galley cupboards (it was under the seat but inaccessible under the previous Travelvolts design), which have a local chassis neutral connection.

On the midi/maxi busbar, the Maxi will be used for an inverter (when fitted), the midi fuses will be used for the Fridge, Diesel heater (when fitted), IP22 charger, previously mentioned blade fuse box, MPPT, Orion XS and possibly, if can work out how to do it, the front 12v & USB sockets as seems daft to run a wire out to the blade fuse box and back to the seatbase. The small hole underneath the mid/max busbar is to access the battery on/off button.

I did post up my wiring diagram but there are some minor updates on wire size and component choices I have made so will update that thread. This has all been thoroughly checked through by Roamer as part of the Design Consultation included with the battery purchase which I recommend.
 
Last edited:
Back
Top