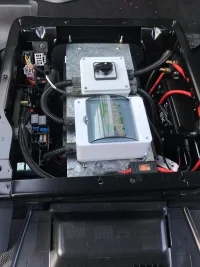
NS under seat is I believe finished. Under here is a 1500W inverter, my CTEK, a 100A isolator on the side of the seat base, my consumer which runs to uner the bonnet and a change over switch to select inverter or hook up supply. I have a confession, I need to make the change over shitch lower as it just fouls the pivot bar for the seat slide locking mechanism. I have a plan for that but for now I just leave the knob off. In the off side base I found a useful out of teh way location for the voltec shunt for the battery monitor. Cables pass through the relay bracket no problem.
You are using an out of date browser. It may not display this or other websites correctly.
You should upgrade or use an alternative browser.
You should upgrade or use an alternative browser.
Seat Base Electric + EHU + Solar Install + Charger + DC-DC -- How We Done it --
- Thread starter Dellmassive
- Start date

Have a look at @B@rrow post and maybe have a false floor to put the connecters under and mount DC/DC on top. @Dellmassive might have an idea on the fuses. What else have you got installed apart from the westfalia tow bar?Any tips on how to sort this mess out and fit battery/dcdc charger etc neatly
Thank you I will take a look, false floor sounds a good idea.Have a look at @B@rrow post and maybe have a false floor to put the connecters under and mount DC/DC on top. @Dellmassive might have an idea on the fuses. What else have you got installed apart from the westfalia tow bar?
I've realised they're probably the fuses for the electric sliding doors!
Does the plastic tunnel under the centre of the floor come off easily, was hoping to run my cables through it but the fixings baffled me!?
Bit further back than the seats but getting ready to carpet line now. most circuits pulled in to front of o/s rear quarter. Started today at 8.30 but twisted back at 9.15 so its been a slower day that I was hoping for. Not usual lower back but rib area, think its twisting and working above my head on trim clips. I want to get the carpet lining in asap as its going for leather soon ")


more messing about with the seat base . .
this version.
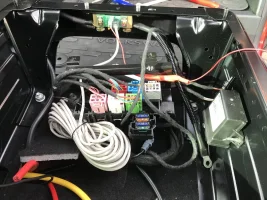
20A Renogy DC-DC
Fuse Bock
Victron quick connect
BM2 + Victron Smart SHunt
Poweroad PRLC-100 Lithium 100ah battery
Isolator switch.
all velcro`d in place with Anderson connectors for quick removal while testing.

+

+

+


heres a nice shot on the charge profile from 80% to 100%.


this version.
20A Renogy DC-DC
Fuse Bock
Victron quick connect
BM2 + Victron Smart SHunt
Poweroad PRLC-100 Lithium 100ah battery
Isolator switch.
all velcro`d in place with Anderson connectors for quick removal while testing.
+
+
+
heres a nice shot on the charge profile from 80% to 100%.
Hi, I am looking at all of the options for installing electrics on a T6 with a 110A AGM solution under the drivers side . Does anyone have a preference of a Victron Smart DC-DC solution over a Renogy solution ? I have looked at a C-Tek solution but understand there are limitations for the solar panel sizing. i am still undecided on installing an invertor If you have the EHU option and trying to justify it and how much power do I need ? When I read that people have installed them with occasional use, does an invertor become a nice to have option rather than an essential one ? . Thanks
Hi Steele, a few posts up you will see my take on things, but there are plenty of examples about , Under NS front (single) is 1500W inverter, Ctek split charge, 240 consumer unit and a change over; to select inverter or mains hook up to supply rear sockets. Under the osf seat is an agm 110Ahr battery, and the Victron shunt slotted into the front of the seat frame. Then on the side are master fuses for the supply to the rear distribution of the 12v and fused feed to the inverter. I personally done it all first time that way you can suss out where you want things to fit and not have to replan after. It did take several long evenings but worth it. I have only slept in it once but used both inverter on a layby and hook up on a site for making the obligatory cuppaHi, I am looking at all of the options for installing electrics on a T6 with a 110A AGM solution under the drivers side . Does anyone have a preference of a Victron Smart DC-DC solution over a Renogy solution ? I have looked at a C-Tek solution but understand there are limitations for the solar panel sizing. i am still undecided on installing an invertor If you have the EHU option and trying to justify it and how much power do I need ? When I read that people have installed them with occasional use, does an invertor become a nice to have option rather than an essential one ? . Thanks
I put the 12v dist, and isolator, plus 240 - 12v dc charger in the back too so I can charge liesure from hook up if needed. Only niggle is the battery was snug under the drivers seat so I had so trim the bottom webb to sit it in. Worst part of the job is humping the seats in and out trying not to damage anything in the process. I did scratch the drivers door card slightly so recommend overing with sheets. Seat runners are harder than plastic
Evening all. I really like this chat as I’ve referred to this so much when completing my seat wiring / electrics. One quick question based on @Skyliner33 set up here, similar to this I have the Victron BP. Instead of my Victron 230v to 12v battery charger positive going direct to the leisure battery positive I’ve connected this directly onto the Victron BP ‘IN’. Which in theory is no different to the leisure battery positive. Is this correct, or second to that is this ok? Or should I move it over to the battery positive terminal?@Skyliner33 - Panel van to........ to be decided.
Thats all gone now.
This is the work in progress:
View attachment 107665
That's ok, as you say it's the same as the battery POS terminal.Evening all. I really like this chat as I’ve referred to this so much when completing my seat wiring / electrics. One quick question based on @Skyliner33 set up here, similar to this I have the Victron BP. Instead of my Victron 230v to 12v battery charger positive going direct to the leisure battery positive I’ve connected this directly onto the Victron BP ‘IN’. Which in theory is no different to the leisure battery positive. Is this correct, or second to that is this ok? Or should I move it over to the battery positive terminal?
Just make sure the link cable is fat enough. From the battery to the BP.
Amazing, thank you for the quick response and confirmation. I’ve had this set up for a few months now and this evening added in the BMV 712 to my setup. When checking over connections etc I started questioning myself if this was actually correct. If my memory serves me correctly I believe the cable gauge between battery and Victron BP is a 25mm tri-rate cable, definitely big enough and all I had kicking around work which was going unusedThat's ok, as you say it's the same as the battery POS terminal.
Just make sure the link cable is fat enough. From the battery to the BP.
@Bill4750

 www.t6forum.com
.


My T6 Fit Out
Ok, after all usual paint treatments, Door Seals, golf steering wheel, Carista fun and LED DRL’s I had to get a little more serious with the rear Lined and insulated and added the mega drawer & some light
.
@Bill4750
My T6 Fit Out
Ok, after all usual paint treatments, Door Seals, golf steering wheel, Carista fun and LED DRL’s I had to get a little more serious with the rear Lined and insulated and added the mega drawer & some light
.
View attachment 131982View attachment 131983View attachment 131984View attachment 131985View attachment 131986View attachment 131987View attachment 131988


Very nice builds in this thread!
Here’s mine:
- Factory 2nd battery, towbar, cargo 12v sockets, webasto so quite a mess under left seat to start with
- Minimum effect to OEM electronics as a goal
- CTEK dc-dc charger
- 120W 12V stabilizer to provide stable voltage for leds in order to not burn them out early
- 2 dimmed led circuits with one button operation
- Votronic battery computer, shunt and switch unit to isolate leisure electronics, mainly to avoid stabilizer and dimmer quiescent current from draining battery when not in use
- Fixed 12V output for fridge
- 2 switched 12V feeds with bistable relays, one sourced from stabilized voltage, one from unstabilized
- Couple of USB charging ports
- Busbars for everything
After lots of tetris with the components, it was clear I totally could not fit everything under left seat, even with serious OEM electrics butchering. Right seat base was not an option, reserved for other stuff. But being a velle with slider on right I found plenty of space behind left side card and decided to install a bunch there - not great access wise but easy to fit everything securely and have some air around heating components as well.
Couple of work-in-progress pictures and the completed side card attached. Except I need to source nicer indicator light covers on rocker switches or to sand those silly white markers off. The rockers control bistable relays, button next to those is for roof light dimmers. On left side there’s a small dimmable night light with it’s button next to it, same led profile used in roof as well.
One day, I might need to saw a service hatch to access the fuses behind the side card though…
Finished mine today:
Drivers side:
Renogy 170Ah lifepo4.
Victron 30A DC-DC
Bluesea Master fuse holder
Victron Smart Shunt (500A)
Victron Smartsense
(Relocated existing LED light controller, tow assist controller and numerous fuses.)

Passenger side:
Bluesea 70A breaker (For master feed-Excluding inverter feed)
Bluesea 200A breaker (For inverter)
Victron Battery Protect
Victron 1200W inverter
Victron Smartsolar 75/15 MPPT
Bluesea Maxibuses,
Bluesea negative Minibus and compact fuse block.
Solar isolation switch and circuit protection
Bluesea Isolation Switch. (Externally accessible when seats reinstated)
Raspberry Pi 3b with Victron Cerbo Software with USB cables to all available VE ports.
Power supply for Huwawai 4G router.
Distribution box with protection for inverter output.
Drivers side:
Renogy 170Ah lifepo4.
Victron 30A DC-DC
Bluesea Master fuse holder
Victron Smart Shunt (500A)
Victron Smartsense
(Relocated existing LED light controller, tow assist controller and numerous fuses.)
Passenger side:
Bluesea 70A breaker (For master feed-Excluding inverter feed)
Bluesea 200A breaker (For inverter)
Victron Battery Protect
Victron 1200W inverter
Victron Smartsolar 75/15 MPPT
Bluesea Maxibuses,
Bluesea negative Minibus and compact fuse block.
Solar isolation switch and circuit protection
Bluesea Isolation Switch. (Externally accessible when seats reinstated)
Raspberry Pi 3b with Victron Cerbo Software with USB cables to all available VE ports.
Power supply for Huwawai 4G router.
Distribution box with protection for inverter output.
Jez8543
New Member
Custom 24v, 120 Ah Lithium battery pack from a Nissan Leaf under test.
2 x 100 watts solar panels on roof, mounted in the roof bars
Renogy charge controller with Bluetooth logging and a 2kw pure sine wave inverter on the back of the seat.
Sockets (240 with 2x usb) fitted in rear side panels and 2 x 8 port usb powered hubs, one on each side in the rear area.
Battery now fitted under the passenger seat but does now have a Perspex cover over the terminals.
12 v split charger and battery under driver seat for the webasto diesel heater.
Still a work in progress as I’d like to be able to fit the swivel seat mods
Jez8543
New Member
Because that’s where she sitsWhy under the seat? My wife asked earlier and I couldn't answer
Very nice. Any BMS for the DIY battery?Custom 24v, 120 Ah Lithium battery pack from a Nissan Leaf under test.
2 x 100 watts solar panels on roof, mounted in the roof bars
Renogy charge controller with Bluetooth logging and a 2kw pure sine wave inverter on the back of the seat.
Sockets (240 with 2x usb) fitted in rear side panels and 2 x 8 port usb powered hubs, one on each side in the rear area.
Battery now fitted under the passenger seat but does now have a Perspex cover over the terminals.
12 v split charger and battery under driver seat for the webasto diesel heater.
Still a work in progress as I’d like to be able to fit the swivel seat mods
View attachment 138564View attachment 138565View attachment 138566View attachment 138566View attachment 138565View attachment 138564View attachment 138565View attachment 138566View attachment 138567
View attachment 138568
View attachment 138569
Not seen those cells by before... Whats the to spec?...we do normally see calb cells.
Similar threads
- Replies
- 7
- Views
- 707
- Replies
- 5
- Views
- 1K
- Replies
- 25
- Views
- 2K
- Replies
- 4
- Views
- 496