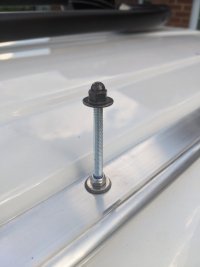
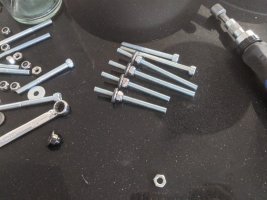
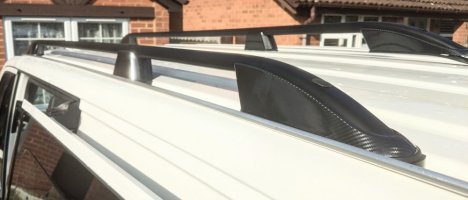
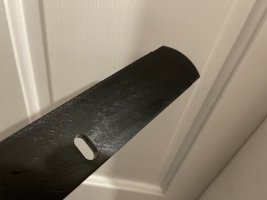
Q1) Yes, only tip is on point 5 is put two nuts on the thread this 'locks off' the nuts so that when you tighten the top final nut it doesnt turn the thread through the bottom nut. (speaking from experience!)
Q2) I used a socket set with a extension bit (bacho 1/4")
Q3) Should be fine, I think you are over thinking it, when you have cut it thread tighten the bolt on off to 'clean it up'
Q4) When you try to put on the last bolt (inside the rail) you have to tip up the socket set and lower it in to locate the nut on the thread. You will find that the nut held in the socket set could drop out into the rail and you then cant get it out without removing the whole rail (bit of nightmare). and old trick it so put a small bit of paper into the socket first then push the nut in, the paper 'jams' it in so it doesnt fall out when you turn it upside down.

Hope this Helps
 
This is exactly how it needs to be done - it is more hassle but if a job is worth doing it’s worth doing properly and nothing will annoy you more than water seeping into your pride and joy.
I used the same method as the OP last year on my T6 - it remains bone dry to this day
 
I agree with david173 The only thing I would add to that is before you cut the threads just wind a nut on first then once you've cut it, unwind the nut over the cut and it cleans it up
 
You have it right. Only comments I’d make are that instead of buying M6 bolts just get some M6 threaded bar, probably cheaper.
Also instead of using paper to hold the nut in the socket just use a dab of grease.
 
Morning all - looking for help please?

Issue - I have a leak on my T6 ever since I fitted some Roofbars that I got from VanStyle: Satin Black Aluminium Roof Rail Bars - VW T5 T6 03 SWB LWB - Vanstyle

I can see the fix in the thread but as I am slightly thick, I have some questions to clarify what to do please?

1. I have purchased some M6 100mm SS threaded bolts, some M6 (6mm) SS Nyloc nuts and some EPDM 16mm Rubber and SS roofing washers.
2. I am going to take the cross-bars and the roof rail bars off the van and take out the screws/washers that came with the bars.
3. I am going to cut 4 x M6 bolts to about 75mm for the 2 x Front and 2 x Rear holes with a hacksaw.
4. I am going to cut 2 x M6 bolts to about 95mm for the 2 x middle holes with a hacksaw.
5. Then concentrating on the middle first, I will then put a nyloc nut on the M6 bolt and screw the bolt into the hole up to about 20-25mm after putting a rubber washer on the end.
6. This should leave about 70mm of screw sticking up.
7. I will then repeat the above process for the rear and the front leaving about 45mm for the front and 55mm for the rear sticking up.
8. This would have used 6 x M6 bolts, 6 x Nyloc Nuts and 6 x Roofing washers. I will probably then spray some waterproof sealant around the base of each washer (just to make sure!)
9. I will then put the plastic roof rail spacers over each screw and then sit the roof rail bars on top.
10. I will then add another washer and nyloc nut to each screw and then tighten these to hold the roof rails tightly in place; this will use an additional 6 nyloc nuts and 6 washers

Total equipment needed = 6 M6 bolts cut to desired length. 12 M6 Nyloc nuts (1 into the van, 1 into the roof bars on each screw). 12 rubber/SS washers (1 in between van and nyloc nut, 1 in between roof bar and nyloc nut on each screw).

Q1 - Is the above the correct process to do this?
Q2 - My roof rails have a small space to get an allen-key/screwdriver in to tighten the original screws, now I will be tightening a nyloc nut - what would you use to tighten (socket, spanner?)
Q3 - how careful do I have to be when cutting the bolts, is there a knack to making sure you don't mess up the thread?
Q4 - what's the deal with people talking about paper/card holding the screws in place?

Grateful for any help or advice please - I essentially could do without water dripping out of my reading light and on to my stereo every time it rains heavily!
Hi
That’s about right all round. I’m not very practical so it may have just be me! But I found it a real trial and error process, getting the nylon nuts in place is easier said than done, torquing them a bit without threaded bolt moving a challenge, then the issue of getting nut in housing of roof rail and tightening! Mine are VW ones and the front and rear holes are offset close to almost unreachable so it was a real pain in arse. I put on loose first and used a little backward and forward play to get nuts on but of course at some point one has to tighten at least one of them. To make it more a pain there was no way to centralise them , i.e. a balanced half way house! They were literally at either furthest extreme.

once tightening with socket on extender I resalied the threaded bolt started to turn a bit as nut became tight, so I stopped there as in theory if it turned further in against first one on roof then the torque and hence washer pressure on that May have reduced a bit.

that said after a number of frustrating attempts they’ve been on for months now in heavy rain at times and no visible leak but then the van is lined so it may be getting in somewhere, who knows! But I’ve nothing at base of b pillars as before. I’ve not carried weight on top yep, normally kayaks, but hope the system is torqued enough to hold.

i also regularly try and clean out what’s left of drainage channel under spacers, keep debris build up to minimum so water has better chance of flowing away. I use a thin cable tie and push in where I can .

good luck
 
Fit two temporary preferably plain nuts not Nylocs to the end of the stud. Tighten them against each other to effectively create a bolt head. Use this ‘head’ to prevent the stud from turning while you tighten the Nyloc nut.
When tightened you can remove the two temporary nuts.
 
I used a dome head nut at the end of the rod, this meant that the rod cant turn (providing you put it on the right end) when you tighten the other nuts on
 
Awesome post. Did exactly what you all said … don’t think the rails are any more than decorative, but they won’t leak :)
 
Fitted my roof rails and awning rail today using this method and it all looks good. No rain forecast for a while so I may be in for a surprise later on but it certaintly looks watertight.

Does anyone else find the "feet" that go under the rails fit terribly? I definitely have mine in the right places but they don't seem to create a particularly level surface. Can't see it making a difference given that the fixings underneath are watertight.
I've just fitted a set of black swb rails from JK and I have to agree the plastic fittings that drop into the roof gutter aren't the best.

I did a test run fitting with the supplied Allen bolts before I used the M6 post method with the roofer washers to seal holes, looks ok from the pavement ;)

Just need to wait for a to test
 
  • Like
Reactions: alt
All ready to go, just waiting on the Omtec bars to arrive. Thanks for the helpful info on this post.

On my last van I used copious amounts of sealant and didn’t have an issue. However, this way is so much neater.

thanks

View attachment 81282
Hi there, what are the exact lengths of the threaded bars you used. I’m also waiting on the VW oem roof bars to arrive and definitely want to use this method. You had any problems since fitting them ?
 
Well, this is another pita job, but got there in the end! Leave lots of time for this one, not when rushing to prep for a weekend camping with the forum :rolleyes:

View attachment 123608

View attachment 123609

View attachment 123610
Awesome job Andysmee, I’ll be collecting my vw roof rails later today and just have a question regarding the fitting which I hope you could answer. After fitting the threaded bars and washers and tighten them in place .. when I place the rails and proceed securing them with the last nyloc nut, will this in any way cause the threaded bar to thread in or out if I over tighten and maybe even loosen the other nylocs’s seal to the roof?
Thanks.
 
Hi there, what are the exact lengths of the threaded bars you used. I’m also waiting on the VW oem roof bars to arrive and definitely want to use this method. You had any problems since fitting them ?
It's somewhere in this thread as it's where I got my measurements. That said, I had to cut off a bit extra so in all honesty you're better off doing a test fit and marking with a pen. You will have 4 matching lengths and 2 slightly shorter, assuming you're not fitting an awning rail underneath.
 
Awesome job Andysmee, I’ll be collecting my vw roof rails later today and just have a question regarding the fitting which I hope you could answer. After fitting the threaded bars and washers and tighten them in place .. when I place the rails and proceed securing them with the last nyloc nut, will this in any way cause the threaded bar to thread in or out if I over tighten and maybe even loosen the other nylocs’s seal to the roof?
Thanks.
No, because you lock the stud down first. The stud could only be tightened further by adding the nut on top of the rails
 
Awesome job Andysmee, I’ll be collecting my vw roof rails later today and just have a question regarding the fitting which I hope you could answer. After fitting the threaded bars and washers and tighten them in place .. when I place the rails and proceed securing them with the last nyloc nut, will this in any way cause the threaded bar to thread in or out if I over tighten and maybe even loosen the other nylocs’s seal to the roof?
Thanks.
I added two nuts to the threaded bar in the roof before putting the rail over to lock them in place, this stops the threaded bar tightening in when you put the last one on to tighten the rail down
 
I added two nuts to the threaded bar in the roof before putting the rail over to lock them in place, this stops the threaded bar tightening in when you put the last one on to tighten the rail down
Ok thanks, I was curious would the threaded bar screw in and maybe even loosen the seal when tightening the after rail nut. Another member kindly replied saying after tightening the first seal nut, the after rail nut would only further tighten the first one if over tightened and not the threaded bar. I guess I’ll carefully try with the one nut first and take it from there. Thanks for your response.
 
Got it done - thanks for all the help! - and have a tip of my own to add to the thread. I used roofing washers which are metal on top but rubber underneath and they are slightly raised so that as you screw the nut on top the metal part of the washer pushes down and splays out the rubber base to create and even better seal.

View attachment 79881

View attachment 79882
Hi there, picked up my Omtec rails from VW yesterday and have the same question as your previous one. The plates for these rails on the underside of the hole have that plastic frame/funnel which is meant to seal the included foam pads to the roof around the bolt. Did you cut them all out or what to make place for the washers. It’s not just a matter of drilling the hole wide enough for the nyloc nut on these plates. Thanks

4A578E44-3F64-49E0-8067-B177128F577D.jpeg

FB64641A-F91E-45CB-B185-4ECCFDFA0216.jpeg
 
Hi there, picked up my Omtec rails from VW yesterday and have the same question as your previous one. The plates for these rails on the underside of the hole have that plastic frame/funnel which is meant to seal the included foam pads to the roof around the bolt. Did you cut them all out or what to make place for the washers. It’s not just a matter of drilling the hole wide enough for the nyloc nut on these plates. Thanks

View attachment 142536

View attachment 142537
It depends on the nuts you use, but yes you might need to file a little to get the plate over the nut and washer to make it flush with the roof. The benefit is that you are not relying on that to make a waterproof seal, so it's more cosmetic than critical to success
 
Back
Top