I got an electric caulking gun from Ali Express. It gives a steady pressure, so you concentrate on steering it rather than working out your forearms. Nice deep even bead.
You are using an out of date browser. It may not display this or other websites correctly.
You should upgrade or use an alternative browser.
You should upgrade or use an alternative browser.
Leanne’s build thread
- Thread starter lebb2017
- Start date
Haha we did debate getting one of those. I had to pass over the mastic gun use to my brother as I wasn’t strong enough to squeeze the trigger one handed and keep it steady. So he did the squeezing and I went along with gloves on doing any little bits of fixing up.I got an electric caulking gun from Ali Express. It gives a steady pressure, so you concentrate on steering it rather than working out your forearms. Nice deep even bead.
Excellent work - you tried and learned something - I’m impressed by your attitude and determination.
If you decide not to fit any more windows, thats a good decision based on experience.
I‘ve probably got the skills, but not the courage or confidence, so am twice as impressed by this thread!
If you decide not to fit any more windows, thats a good decision based on experience.
I‘ve probably got the skills, but not the courage or confidence, so am twice as impressed by this thread!
Thank you for the kind words!Excellent work - you tried and learned something - I’m impressed by your attitude and determination.
If you decide not to fit any more windows, thats a good decision based on experience.
I‘ve probably got the skills, but not the courage or confidence, so am twice as impressed by this thread!
I’m just trying to save money - I don’t have the budget to pay out for lots of work to be done, unless I absolutely have to!
Washed the van just now and stuck some tissue all around the insides of each window to see if there were any leaks.
The passenger side is dry
But the drivers side not so much

What’s the thoughts on being an absolute cowboy (girl) and just squeezing some more sealant along the top?
Is that a no no… or am I being too simple.
As you can probably tell by my thread by now, my van will not have a professional look - it will be more “rustic”.
The passenger side is dry
But the drivers side not so much


What’s the thoughts on being an absolute cowboy (girl) and just squeezing some more sealant along the top?
Is that a no no… or am I being too simple.
As you can probably tell by my thread by now, my van will not have a professional look - it will be more “rustic”.
+1 for this advice.If you're having the other windows done by a converter I'd ask them to remove and reseal this one.
Thank you for the kind words!
I’m just trying to save money - I don’t have the budget to pay out for lots of work to be done, unless I absolutely have to!
Washed the van just now and stuck some tissue all around the insides of each window to see if there were any leaks.
The passenger side is dry
But the drivers side not so much
View attachment 201296
What’s the thoughts on being an absolute cowboy (girl) and just squeezing some more sealant along the top?
Is that a no no… or am I being too simple.
As you can probably tell by my thread by now, my van will not have a professional look - it will be more “rustic”.
11/10 for effort.
I fitted side windows myself in my first T6 which was a panel van>Kombi conversion. Hated every minute of it. In fact, I specifically bought a factory Kombi when it came to replacing it as I couldn’t face doing the job again. If I did ever buy another panel van I would get them installed by a company.
There’s no shame in trying, it not going perfectly and having to do it again, or get someone else to do it.
(I have to chant this in my head whenever one of my mods doesn’t go to plan)
Last edited:
If it was me I’d have a go at re sealing as I’m too tight to pay someone.
But……I’d mask the inside of the glass tucked up behind the lip of the metal work and also mask up the metal work and tuck the tape round the corner. I’d then fashion a little spatula to fit in the gap between window and metalwork then pump a good wallop of sealant into the gap and scrape the excess from the groove with said spatula. When the sealant starts to form a skin wizz off the masking tape and you shouldn’t be able to see the sealant that remains.
That’s the best idea I can come up with and not something I’ve done personally.
I was thinking on similar lines... the same tape idea, but using a slimmer nozzle on the sealant and then squeezing it down the gap. Then with a glass wipe over a flat head screwdriver, run it along the gap to push it in more + tidy it up. And same as you said, peel the tape off before it gets too stuck!If it was me I’d have a go at re sealing as I’m too tight to pay someone.
But……I’d mask the inside of the glass tucked up behind the lip of the metal work and also mask up the metal work and tuck the tape round the corner. I’d then fashion a little spatula to fit in the gap between window and metalwork then pump a good wallop of sealant into the gap and scrape the excess from the groove with said spatula. When the sealant starts to form a skin wizz off the masking tape and you shouldn’t be able to see the sealant that remains.
That’s the best idea I can come up with and not something I’ve done personally.
I've seen a video where someone does it like that. It was effective.
I think I will try that before paying out for remove & refit.
Sounds like a plan.I was thinking on similar lines... the same tape idea, but using a slimmer nozzle on the sealant and then squeezing it down the gap. Then with a glass wipe over a flat head screwdriver, run it along the gap to push it in more + tidy it up. And same as you said, peel the tape off before it gets too stuck!
I've seen a video where someone does it like that. It was effective.
I think I will try that before paying out for remove & refit.
1 failed attempt at extra sealant on the window, + 2 overpriced quotes for removal & refit = cheese wire time!
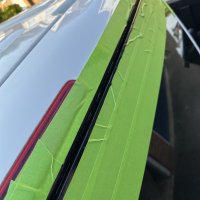


It’s half cut through so taped the window up in case it starts to fall!
This is the other corner just starting to work through.
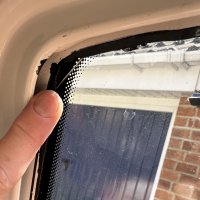
Will do another update later if this window ever comes off (without smashing it!) and I manage to get it back on!
Kind of fun, kind of not.
Took me 10 mins just to change a Stanley knife blade and put it back together


It’s half cut through so taped the window up in case it starts to fall!
This is the other corner just starting to work through.

Will do another update later if this window ever comes off (without smashing it!) and I manage to get it back on!
Kind of fun, kind of not.
Took me 10 mins just to change a Stanley knife blade and put it back together
I admire your tenacity and ‘have-a-go’ attitude.
Good skills.
Good luck.
Good skills.
Good luck.
Window is off, silicone scraped off & re-primed.
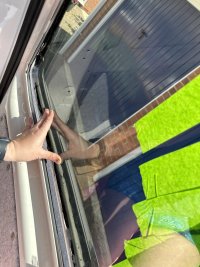
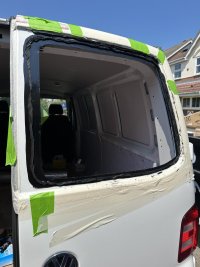
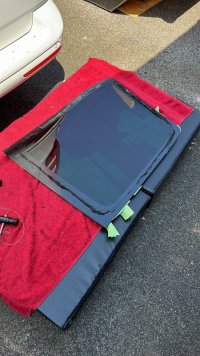
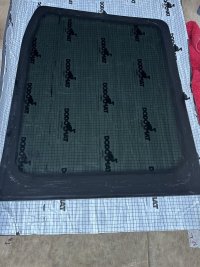
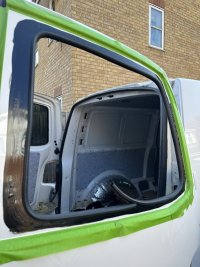
Spent far too long peeling off the masking tape that had basically melted in the heat and then having to use white spirit to get the remnants off.
Enlisting the husband for the first time - to help squeeze the bond out - and then finally stick this window back down.
Looking forward to a well deserved cider (or 3) later
Window is bone dry inside after pouring a jug of water over itAnd the window is back on.
Now for a well deserved cider & dinner
View attachment 201813 View attachment 201815

Yay. Go me. Of course the husband it taking full credit for the first time he’s helped with the van
Forgot to say thanks for this bit of advice! On the refit, I cut the nozzle much further down so the bead was much thicker. Worked a treat!My first one leaked as well :/. A friend of a friend came around and showed me how you cut the nozzle well past the suggested v or they leak he said!! Noticed the massive visible difference as soon as I started applyingevery days a school day..
So thanks
I think it also helped that the sealant was warm - I left it sat in the sun for a bit
Last edited:
Similar threads
- Replies
- 6
- Views
- 980

