You are using an out of date browser. It may not display this or other websites correctly.
You should upgrade or use an alternative browser.
You should upgrade or use an alternative browser.
Panadonkia - A Shuttle Conversion
- Thread starter Dieseldonkey
- Start date
Some extra pics during the build in this thread prior to he overheard locker being fitted.

 www.t6forum.com

T6 Shuttle Conversion
Hi, just looking for any advice regarding converting a T6 shuttle to a camper. Does the rear heater/air con unit and roof lighting cause an issue if removed to fit pop top etc. Anyone?
Thanks you so much for the info. It’s an ex mobility so no rear seats so will go for normal LWB rails. Would be good to see how you kept the rear heater in. I was going to set it up On the other side (European layout) but might not need to if it fits. Did you have issues getting a roof fitted to a Shuttle. Spoken to a load of fitters and most wont touch it or are charging £6,000+!
All left hand trim was kept, albeit covered with four way stretch carpet. The right hand sliding door panel was cut so that the top part containing the blind was kept in play. The lower part two thirds was cut away and replaced with carpeted ply. This allows the Evo furniture to fit and creates a space where my inverter is located.Hi Dieseldonkey,
Quick question pal.
Did you remove all the shuttle interior trim or keep it. I Like the shuttle trim.
Thanks,
James.
@Dieseldonkey be nice to see my Van's brother in the flesh one day, looks great.
L3hm4nn
New Member
Thanks. Appreciate the advice.All left hand trim was kept, albeit covered with four way stretch carpet. The right hand sliding door panel was cut so that the top part containing the blind was kept in play. The lower part two thirds was cut away and replaced with carpeted ply. This allows the Evo furniture to fit and creates a space where my inverter is located.
darrenmhaine
Member
Interesting solution to keep the blind in play. How did you marry the ply up with the remaining trim?All left hand trim was kept, albeit covered with four way stretch carpet. The right hand sliding door panel was cut so that the top part containing the blind was kept in play. The lower part two thirds was cut away and replaced with carpeted ply. This allows the Evo furniture to fit and creates a space where my inverter is located.
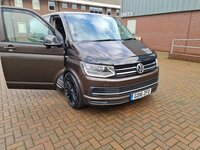
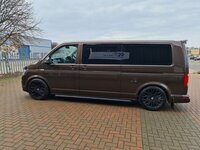
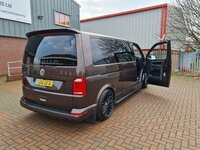
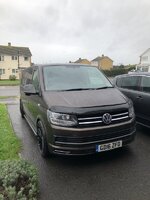
I do like the rdx spoiler....Got my new V5 back from the DVLA having past the post with respect to their requirements. So I'm now officially the owner of a motor caravan. It's been 18 months since I got a dose of campervan envy at a campsite in Norfolk. Happened to see an indium grey outfit and thought, mmmhm, that's a bit stylish. Thats when my T6 story kicked off. So sold my caravan and the car that towed it to said site and found a 16 plate, 150bhp, LWB, DSG, 9 seat T32 Shuttle with 7000 miles on the clock. In August 2017 the journey begain with what was essentially a vehicle best suited to being an airport taxi. Although I think there's a good chance my Shuttle was bought in to work the 2016 Commonwealth Games in Glasgow.
View attachment 31063
Theres been a lot of ups and downs along the way but pleased with the camper I've ended up with. Still a few things left to finish off but it's now fully usable for the friends and family holidays, cycle tours and day trips. Its properly flexible too. The bed on rails means I can get three bikes in the back. 2 of the original Shuttle seats can drop back onto the brackets in front of the rails. This gives me the option to have 6 seats. Alternatively, I can put the two extra seats in and have a large flat load area load with the bed down.
View attachment 31064
So the build list...
Carbon fibre, colour coded low profile roof with panoramic tent.
View attachment 31065
Devonports for the summer and repainted Design steels with winter tyres.
Vanstyle stainless side / safety bars.
View attachment 31066
RDX tailgate spoiler. Dubflecta wind deflectors. Mudflaps. Stainless rear bumper protector. Auto Vox reversing camera mounted in the spoiler. Window tints. B pillar vinyls. Chrome lower grille trim. Chrome mirror trims. Awning rail. Westfalia detachable towbar and electrics. Smart bed Evolution R with custom length rails. Evo Design 5.4 furniture kit in cream and stone grey with lacquered bamboo worktop and table.
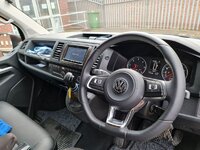
View attachment 31070 Webasto diesel hob. Webasto dual top loading fridge/freezer. Webasto Airtop 2000 STC diesel heater with Thermocall. Sink, tap and pump. Ablemail DC-DC charger. 110ah leisure battery. Swivel front seats. 8 LED interior spotlights. 240v mains hook up kit, distribution board and self switching supply relay. Sterling 1000w inverter. Van X matte black glove box. Hertz ECX 6 x 9 speakers in the rear overhead locker. Carpeted and insulated side panels. Leather steering wheel cover. Ply flooring with Altro covering. H&R anti roll bars. Private plate (Thanks to Mrs Donkey). Atera strada DL3+1 bike rack. Vango Galli awning. And a monkey.
View attachment 31071
View attachment 31068
View attachment 31069
Still to do.
Solar panel.
MFSW with paddle shift.
Front fog lights.
Panamerica style (hopefully, when it turns up) front bumper underrun protector.
Dash trim bits and bobs.
Front seats upholstered to match the rear.
Alpine MRX amp
Front speaker upgrade.
Sound deaden front doors.
Then, I'd like to say I'm never doing this again!!! But somehow I know this project will go on and on and on and........
And its all your fault. Yes....you lot. For being so sodding helpful when advice was sought. And suggestive with ideas. And posting temptation inducing pictures.
So a big genuine thank you to all the members who helped me out with advice along the way. Also thank you to the folk that run and administer the forum, for doing such a great job.
View attachment 31072
The top section of the door card with the blind was cut to give a straight edge.Because of its contouring it sits proud of the ply, but again, you could easily use four way stretch carpet to blend the blend the ply to the panel. Its another job I'll get round to doing. However, because its a third of the original height, you can't see this at all. The join is in behind the furniture.Interesting solution to keep the blind in play. How did you marry the ply up with the remaining trim?
That looks class!. been looking at this panel myself. Out of interest I see it comes with 3m of cable attached, was this enough to reach under the seat where you electrics are? Just as i'm not sure how I would extend it if it wasn't.Front fog/cornering lights now ticked off the list. Thanks to @zebra for his write up on how to do it, @superchargedpolo (Kylesku Campers) for the coding and @Pauly for the parts.
Today's job was fitting a 160 watt photon harvester. Its the last of the big ticket, semi essential item on the build list. Everything else now is just bling, ponce or luxury items that you start appreciating, only when you admit your middle aged.
Drilling a hole in £5000 worth of roof wasn't the most enjoyable experience, but the underside junction box is a snug and Sikaflex sealed fit. Design means it's invisible, no cables on show and it doesn't add another 20mm or so to the vans height.
Double sided high strength tape was used to give a seal around the edges and sikaflex used inboard to ensure any prospect of the panel taking flight, is arrested. Cables run to the underseat Ablemail 12-12-30 DC DC charger. Was happily releaved to see its little green light illuminate, indicating it's being fed electrons from the panel.
View attachment 39263
Mine runs from the roof down to a fuse panel located under the fridge which is mid ships in the van. Not sure it would reach to the drivers seat but easy enough to get hold of more cable if you need to extend.That looks class!. been looking at this panel myself. Out of interest I see it comes with 3m of cable attached, was this enough to reach under the seat where you electrics are? Just as i'm not sure how I would extend it if it wasn't.
I bought the same panel for my build based on @Dieseldonkey photos and info. It’s worked very well bonded on top of my flat Jerba pop top. The 3m cable won’t reach to the seat in a LWB and I would think probably not in a SWB either.That looks class!. been looking at this panel myself. Out of interest I see it comes with 3m of cable attached, was this enough to reach under the seat where you electrics are? Just as i'm not sure how I would extend it if it wasn't.
But in any case this wasn’t important for me because I cut the cable in the rear corner of the van and connected it to 5m solar cable using MC4 solar plugs. The positive side has an inline fuse at the break. This protects the panel as close to the cells as practical. I can get to the plugs through a carpet panel in that bit of roof at the back of the van.
The panel works well hooked up through a Renogy DC-DC unit
Thanks for that info, i'll look into getting some mc4 solar plugs to go along with itI bought the same panel for my build based on @Dieseldonkey photos and info. It’s worked very well bonded on top of my flat Jerba pop top. The 3m cable won’t reach to the seat in a LWB and I would think probably not in a SWB either.
But in any case this wasn’t important for me because I cut the cable in the rear corner of the van and connected it to 5m solar cable using MC4 solar plugs. The positive side has an inline fuse at the break. This protects the panel as close to the cells as practical. I can get to the plugs through a carpet panel in that bit of roof at the back of the van.
The panel works well hooked up through a Renogy DC-DC unit
Just off to but the same a WAV shuttle for great price and hope to navigate all the issues that you faced. Did you get a pop fitted in the end?Thanks you so much for the info. It’s an ex mobility so no rear seats so will go for normal LWB rails. Would be good to see how you kept the rear heater in. I was going to set it up On the other side (European layout) but might not need to if it fits. Did you have issues getting a roof fitted to a Shuttle. Spoken to a load of fitters and most wont touch it or are charging £6,000+!
Similar threads
- Replies
- 11
- Views
- 2K
- Replies
- 12
- Views
- 1K


