When I got the fog light bits off
@Pauly, he said ‘take some photos’, so I’ve finally got around to writing up the fog light install for my Beach. I’ve put links to other videos and threads which explain things better than I can.
Bumper removal
Described many times on the forum and best shown in the frequently mentioned Transporter HQ videos, links below:
Second one shows disconnecting the connectors for parking sensors/fog lights/washers. Although they make it look a little easier than it seems to be the first time! Mine took quite a pull to release which seems to be common from other threads. Put down plenty of protection for laying the bumper face down. Disconnect the battery.
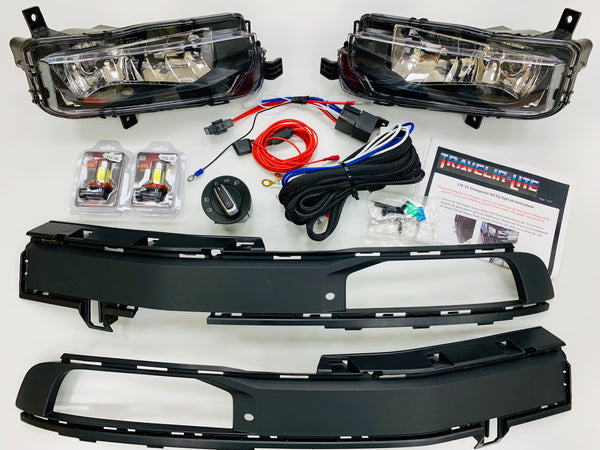
Bumper insert replacement and fog light install
Removing the bumper inserts (blue outline) is probably the most awkward part of this job as there they are covered by some bumper reinforcements (red outline) which are plastic welded to the bumper. This makes getting the inserts in and out a real squeeze, washing up liquid helps lubricate the whole thing.
View attachment 28615
Release the tabs around the outside and slide it out towards the centre of the bumper. The upper tabs under the reinforcements are the most awkward but stick with it and they’ll come.
View attachment 28616 View attachment 28617 View attachment 28618
Lube up the new ones and slide them in, again it’ll take some effort to get them all the way in. Once in place, the lamps themselves slot in very easily with a locating lug on one side and two T20 screws to hold in place.
View attachment 28619
Engine bay cable routing
Fit the connectors to the lights and route the cable across the bumper towards the driver’s side. If there are parking sensors already then just follow the cable routing. There are clips on the bumper to help retain the cable, but cable ties are needed too.
View attachment 28622 View attachment 28623
Route cables up the side of the engine bay where the other cables are routed towards the bulkhead. I used some sheathing to protect the cable. It’s easier to remove the top of the air filter box for access.
Removing lower dash
Next remove the lower dash below the steering wheel, this video show’s it best
Remove bonnet release lever, it pulls off easily. Peel back carpet to see a grommet where the bonnet release cable goes through the bulkhead. Use a cable rod to pull cable through from engine bay. Connect the earth lead to the earth stud here.
View attachment 28625
Connecting to the BCM
(Ensure battery is disconnected)
As you’ll have seen in the video above, the BCM is located under the dash behind the steering column. Get into the footwell and look up and you’ll see two large 72pin connectors, one white and one black.
Release the white connector by pulling the black lever upwards, this lifts the connector up.
View attachment 28626
There’s enough slack to pull it downwards a bit to make things slightly easier. Remove the cable tie/tape on the end of the connector. Remove the outer housing by pulling the tabs at the top on both sides outwards, the inner black connector will slide out easily.
View attachment 28627
Each cable position is numbered. The ones needed are 9 and 10. Insert the wires into their respective slots until they click.
(Note: I found something odd here, although it might just have been me screwing it up. In the manuals, right and left are from the driver’s perspective. Prior to connecting the cables, I got the multimeter out to confirm that the righthand fog light was cable 10 as per the wiring diagram. Later when testing the cornering function, they were the wrong way around. So, it’s maybe worth doing a function test prior to finally buttoning everything up. Pins can be released from the connector block by inserting a couple of straightened paper clips (or the tool if you’ve got one) into small holes on the bottom of the connector block which depress the barbs and release the cable.)
Depending on the set up, you may need a power source which will go to position 11 on the block and be routed to a steady positive connection in the fuse box (SC12 in the VW wiring diagram). Mine already had this in place so wasn’t needed.
Reinsert the connector block into the white housing and redo the taping/cable tie to secure at the top.
Reinsert into the BCM and secure by pushing down the black lever.
Now release the black connector from the BCM and open it up in the same way.
Run the switch wire from the light switch position through the dash to the connector and insert the cable into position 7 on the connector block. I used some cable sheathing to protect it.
View attachment 28628
Reassemble the white connector, as before, and reconnect to BCM. Route the other end of the switch cable up to where the headlight switch lives. Insert the cable into position 5 on the connector, the side of the connector is the retainer and needs hinging up to insert the cable.
View attachment 28629 View attachment 28630
Replace all dash trim and connect up new light switch.
View attachment 28631
Coding
Once everything is back in place some coding is needed to get everything working.
For module 09 (central electronics)
09-21-7 Fog lights installed
09-12-6 Cornering lights installed/active
Other additional options are:
09-21-2 Cornering lights work on turn signal
09-21-3 Both fog lights on when in Reverse gear
09-19-5 Fog light diagnostics
09-21-5 Fog lights disabled with hi beam
09-13-6 Fog lights with coming home lights (unticked)
Check out @Pauly’s coding guide in the downloads section and the following threads
VCDS Tweaks
VCDS Common Alterations Guide
Hope this proves useful to some. Not having done much beyond an oil change before, I found the thought of doing it far more stressful than the actual doing it! Thanks to
@Pauly and this forum for the wealth of knowledge and supplying all the bits.
 I have consulted your manuals but I cannot find anything.