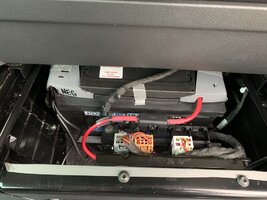
Hi @Dazwoods. The footwell lights and the glovebox light both connect to the courtesy light circuit. Look at the connector blocks pictured belowHi @Deaky I have just bought a T6 Kombi. It has had a comfort dash fitted. When I removed glove box and panel the footwell light and glove box wires are just tied up. No plugs or connectors. Any advice on where to connect. The footwell light should come on with the interior not sure when the glove box light should come on.

in one of the blocks, I think it’s the beige coloured one you can see, look for 3 wires, red/black (timed +ve), brown/red (switched -ve) and brown (permanent -ve). There are the courtesy light circuit
Connect the footwell light to red/black and brown/red they’ll come on when you open the door
connect the glovebox light to red/black and brown. There should be a switch on the side of the glovebox that turns the light on when you open it.