A bit more detail on the roof. Not long after having my roof fitted I was at campermart talking to someone from who told me a retrofit electric lift for Hilo would shortly be available. Despite a couple of years passing nothing has showed up. After seeing @Fish effortlessly opening and closing his at Oktoberfest I enquired with Vision Tech to see if I could purchase everything from them to fit myself but it was a no go.
I couldn't get it out of my head, I really wanted to fit this. After hours of research into actuators, loads of measurements I took the plunge and ordered some rams. First problem was getting brackets big enough off the shelf. None were available. The people I got the rams off were in the process of manufacturing their own. Over £100 per ram So I made my own from stainless steel as you can see further up. The lower bracket that were already fitted were OK to use.
First thing you have to do is connect the rams to the controller and synchronise them. The Rams have a hall sensor in them which sends out a pulse every time the motor turns so the controller knows how many times each motor has turned. If one motor is turning faster than the other the controller slows it down to keep the rams in sync.
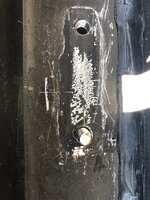
One of my biggest worries was what happens if the rams fail. My solution was to reverse the fixings of the bottom brackets. Originally they were bolted to a tapped hole in the roof cassette. I've drilled the thread out and fitted a nut and bolt. The bolt is accessible from inside so if the worst happens I can undo the bottom brackets while the roof is closed. The only issue to overcome in this scenario was the fact that the bottom brackets are sikaflex'd to the cassette to stop water coming into the van. I cleaned the sika off and replaced it with a rubber washer instead.

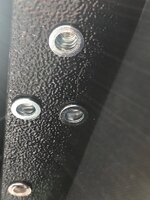
The upper brackets are bolted to rivnuts in the upper roof frame, easy to replicate but the frame is 4mm box section, squeezing the rivnuts in place took some force

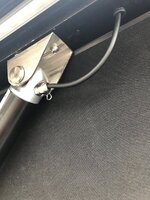
I routed the cable from the rams into the underside of the box section through a rubber grommet. Inside I drilled a bigger hole in the side of the box and fished the cable through to the inside of the roof.

I then connected it all up. You have to give the roof an initial push up as the rams start to extend. When the roof is down there isn't much pivot. You might be able to overcome this by using heavier duty rams. I went for 900N force, but it's a trade off with the lifting speed. It all worked well but there was a few issues I have had to overcome.
My metal working is not perfect and there is a couple of mm difference in my brackets resulting on one side not sitting flat when the roof was down. I've overcome this by removing the metal gland that the cable passes through and sikaflexing the hole up to seal it. This has gained 5mm and the roof now sits down as it did before. The other issue however is something that I hadn't though about.
With the roof lowered, the original gas rams will still be pushing against the brackets. The electric rams are pulling when the roof is down. I've fitted them so that when the roof is up they are fully extended. When it's down, the rams pull until they cant pull any more and the controller detects the amps that they are using and stops them at a set level. There is quite a bit of play in the scissor hinges, resulting in the roof being a couple of mm further towards the back of the van when it's down. This has meant that the securing bolts at the front of the roof are slightly out of alignment. I can still get them in so I'm not to fussed. There are a couple of solutions I may carry out
1, reposition the brackets so that the rams are fully retracted and at their mechanical stop when the roof is down -
2, reposition the threaded nuts in the roof so they better line up with the securing bolts
So, would I do it again...……..
I probably would to be honest, there isn't much advantage when lifting the roof, you still have to push it up a little, however once the rams have taken over I can leave the roof to it's own thing and it will stop automatically when the roof is up.
Dropping the roof is soooo much easier though. Press the down button and stop it just before it's fully down and pull the canvas in, drop it a little more make sure nothing is caught, push the down button again and the lid is pulled down nice and tight. This is much better than trying to balance the roof on my head while pulling the canvas in.
Plus.... its unique. Maybe the only synchronised ram electric lift HiLo ever.
I couldn't get it out of my head, I really wanted to fit this. After hours of research into actuators, loads of measurements I took the plunge and ordered some rams. First problem was getting brackets big enough off the shelf. None were available. The people I got the rams off were in the process of manufacturing their own. Over £100 per ram
First thing you have to do is connect the rams to the controller and synchronise them. The Rams have a hall sensor in them which sends out a pulse every time the motor turns so the controller knows how many times each motor has turned. If one motor is turning faster than the other the controller slows it down to keep the rams in sync.
One of my biggest worries was what happens if the rams fail. My solution was to reverse the fixings of the bottom brackets. Originally they were bolted to a tapped hole in the roof cassette. I've drilled the thread out and fitted a nut and bolt. The bolt is accessible from inside so if the worst happens I can undo the bottom brackets while the roof is closed. The only issue to overcome in this scenario was the fact that the bottom brackets are sikaflex'd to the cassette to stop water coming into the van. I cleaned the sika off and replaced it with a rubber washer instead.

The upper brackets are bolted to rivnuts in the upper roof frame, easy to replicate but the frame is 4mm box section, squeezing the rivnuts in place took some force

I routed the cable from the rams into the underside of the box section through a rubber grommet. Inside I drilled a bigger hole in the side of the box and fished the cable through to the inside of the roof.

I then connected it all up. You have to give the roof an initial push up as the rams start to extend. When the roof is down there isn't much pivot. You might be able to overcome this by using heavier duty rams. I went for 900N force, but it's a trade off with the lifting speed. It all worked well but there was a few issues I have had to overcome.
My metal working is not perfect and there is a couple of mm difference in my brackets resulting on one side not sitting flat when the roof was down. I've overcome this by removing the metal gland that the cable passes through and sikaflexing the hole up to seal it. This has gained 5mm and the roof now sits down as it did before. The other issue however is something that I hadn't though about.
With the roof lowered, the original gas rams will still be pushing against the brackets. The electric rams are pulling when the roof is down. I've fitted them so that when the roof is up they are fully extended. When it's down, the rams pull until they cant pull any more and the controller detects the amps that they are using and stops them at a set level. There is quite a bit of play in the scissor hinges, resulting in the roof being a couple of mm further towards the back of the van when it's down. This has meant that the securing bolts at the front of the roof are slightly out of alignment. I can still get them in so I'm not to fussed. There are a couple of solutions I may carry out
1, reposition the brackets so that the rams are fully retracted and at their mechanical stop when the roof is down -
2, reposition the threaded nuts in the roof so they better line up with the securing bolts
So, would I do it again...……..
I probably would to be honest, there isn't much advantage when lifting the roof, you still have to push it up a little, however once the rams have taken over I can leave the roof to it's own thing and it will stop automatically when the roof is up.
Dropping the roof is soooo much easier though. Press the down button and stop it just before it's fully down and pull the canvas in, drop it a little more make sure nothing is caught, push the down button again and the lid is pulled down nice and tight. This is much better than trying to balance the roof on my head while pulling the canvas in.

Plus.... its unique. Maybe the only synchronised ram electric lift HiLo ever.

 With the multiflex board in the van you can't lift up the lid on the fridge unless the multiflex board is slid forward around 30cm. Then we loose living space in the van.