You are using an out of date browser. It may not display this or other websites correctly.
You should upgrade or use an alternative browser.
You should upgrade or use an alternative browser.
What Have You Done To Your Van Today?
- Thread starter Daneeyre
- Start date
-
- Tags
- mod modification mods retrofit
Needs some purpleAudi came out with Kyalami Green as a choice on their Q3's a year or so ago. It really stood out from most of the boring colours these days.
View attachment 291596
Made it look like a Urus.Audi came out with Kyalami Green as a choice on their Q3's a year or so ago. It really stood out from most of the boring colours these days.
View attachment 291596
Changed the Air Filter & Pollen Filter..
Air filter wasn’t in too bad condition, as for the Pollen filter that was a different ball game!!
Aircon should be a bit better now, it’s fine anyway but that pollen filter was real bad..
Air filter took about 5 minutes & the Pollen filter about 10-15mins.. getting the filter out was most difficult


Air filter wasn’t in too bad condition, as for the Pollen filter that was a different ball game!!
Aircon should be a bit better now, it’s fine anyway but that pollen filter was real bad..
Air filter took about 5 minutes & the Pollen filter about 10-15mins.. getting the filter out was most difficult


May find a paint code identifiable with your Clan List of tartans - Wikipedia
Can dress up in suitable attire to match! Mind, nothing worn under the kilt ! It should be in fine working order. Kilt - Wikipedia
That'll go well with the track suit worn by the average buyer.Audi came out with Kyalami Green as a choice on their Q3's a year or so ago. It really stood out from most of the boring colours these days.
View attachment 291596
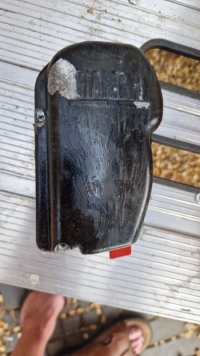
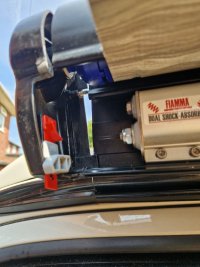
Well that was a fun little job replacing the left hand cap on the Fiamma F45s!Just ordered 10 of the required screws for the F45s Fiamma end cap, All details attached, £7.49 delivered by RM.
Only need 3, plenty of time to lose the spares...
The newer recommendation has Torx head rather than the crosshead I now have to try to remove... joy!
View attachment 291137
View attachment 291138
2 out of 3 screws seized solid, bought a screw extractor selection box, crap!
Drill out the screw caps with a selection of hss bits, gently prize off the old cap.
A pair of small mole grips was sufficient to remove the remaining screw Stubbs.
Unlike @moomin-j ,I didn't have an available 17 year old to support the awning roll, but 'top tip' here is to extend the Fiamma all the way and on full leg height, before you begin. There's nowhere for the empty roll to go then.
I used copaslip (because I had it), but there is an alu slip product which I didn't get.
End result, good for another 4 years.
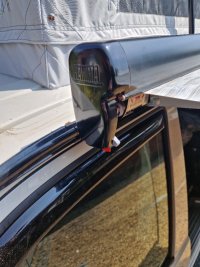

Think I’m going to put a blob of grease on the screw heads and some sort of stick on film over the end cap for protection on mineWell that was a fun little job replacing the left hand cap on the Fiamma F45s!
2 out of 3 screws seized solid, bought a screw extractor selection box, crap!
Drill out the screw caps with a selection of hss bits, gently prize off the old cap.
A pair of small mole grips was sufficient to remove the remaining screw Stubbs.
Unlike @moomin-j ,I didn't have an available 17 year old to support the awning roll, but 'top tip' here is to extend the Fiamma all the way and on full leg height, before you begin. There's nowhere for the empty roll to go then.
I used copaslip (because I had it), but there is an alu slip product which I didn't get.
End result, good for another 4 years.
View attachment 292151
View attachment 292154
View attachment 292155
View attachment 292156
The rear cover screws were fine on mine but I replaced them with the new Torx screws anyway and bit of Copacabana grease too!Think I’m going to put a blob of grease on the screw heads and some sort of stick on film over the end cap for protection on mine
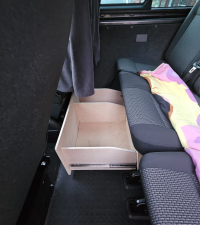
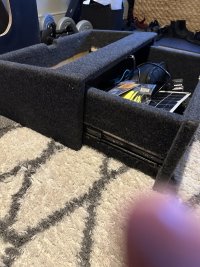
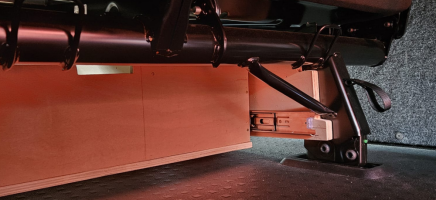
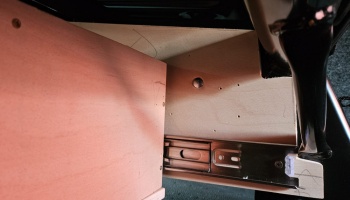
That's interesting! Are the slide rails mounted to the seat legs or to another 'box' it slides into?Under construction
First tests before drawer has been glued, carpeted etc...
View attachment 292241
Unfortunately need to take it out and modify a bit.
Need to also find and fit some latch, locker or so ...
I've just got a plastic box there and that looks really neat!
That's interesting! Are the slide rails mounted to the seat legs or to another 'box' it slides into?
I've just got a plastic box there and that looks really neat!
There are two side panels (it gives massive flexibility with slide rails location) made of plywood 18mm (drawer 12mm).
Because of tests purposes fitter with just single bolt atm to seat legs.
It still requires some shape correction (at least to get some better access to seat mechanisms) and have to shorten a bit drawer as can't close it.
If you can get the screws to move, I would take them out and coat the threads as it’s these that corrode rather than the heads.Think I’m going to put a blob of grease on the screw heads and some sort of stick on film over the end cap for protection on mine
Good idea on a protective film, I’d love to see how you get on if you do it.
Absolutely love that - might have to steal the idea!!There are two side panels (it gives massive flexibility with slide rails location) made of plywood 18mm (drawer 12mm).
Because of tests purposes fitter with just single bolt atm to seat legs.
It still requires some shape correction (at least to get some better access to seat mechanisms) and have to shorten a bit drawer as can't close it.
View attachment 292252
View attachment 292253
I have a Caravelle Executive with sliding bench seat. It has3 little plastic removable doors from new and internal runners inside the pockets. Only one that is the middle pocket has a tray that slides could not find any others even on line. The spaces are very convenient for tools or ropes and such. First the little plastic removable doors started to flex and then not remain shut followed by the only sliding tray provided edges snapped and so no sliding tray. No longer use the space because not suitable for heavier gear as acceleration and braking forces cause the small cargo areas to burst forth with stashed goods or just sliding the seats back and forth does the same. I very much like your efforts of utilising the under seat storage capability as so little effort has been provided by the manufacturer to provide space for even the most small amount of everyday equipment such as tyre pumps wheel braces or spanners and all the self maintenance gear one might carry in even the smallest of cars. I have resorted to carrying stuff in small crates that just get in the way weather in the boot or the passenger space and then their is the safety aspect of securing down, not always done properly. So stout stable draws on runners such as yours is a very excellent and worthwhile project! perhaps i aught to consider doing something similar for the Caravelle Exec it would make life far more comfortable!Under construction
First tests before drawer has been glued, carpeted etc...
View attachment 292241
Unfortunately need to take it out and modify a bit.
Need to also find and fit some latch, locker or so ...
Absolutely love that - might have to steal the idea!!
 Thanks bud - happy to hear that. Please feel free - there are no copyrights
 Glad you have been inspired by that drawer
What I can suggest is please ensure the plywood boards are straight. Didn't notice before mine ones were arched which makes difficulties later on
slopingbob
Member
I have a Caravelle Executive with sliding bench seat. It has3 little plastic removable doors from new and internal runners inside the pockets. Only one that is the middle pocket has a tray that slides could not find any others even on line. The spaces are very convenient for tools or ropes and such. First the little plastic removable doors started to flex and then not remain shut followed by the only sliding tray provided edges snapped and so no sliding tray. No longer use the space because not suitable for heavier gear as acceleration and braking forces cause the small cargo areas to burst forth with stashed goods or just sliding the seats back and forth does the same. I very much like your efforts of utilising the under seat storage capability as so little effort has been provided by the manufacturer to provide space for even the most small amount of everyday equipment such as tyre pumps wheel braces or spanners and all the self maintenance gear one might carry in even the smallest of cars. I have resorted to carrying stuff in small crates that just get in the way weather in the boot or the passenger space and then their is the safety aspect of securing down, not always done properly. So stout stable draws on runners such as yours is a very excellent and worthwhile project! perhaps i aught to consider doing something similar for the Caravelle Exec it would make life far more comfortable!

Thank you so much for your kind words!

Yea, that's the shame there is nothing (at least I didn't find anything) on the market. A few days ago I was carrying a small shopping bag behind the seat. Despite the gentle driving everything was "flying" around in the car.
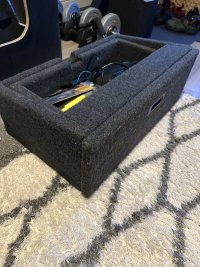
Got inspiration from two threads below:
and
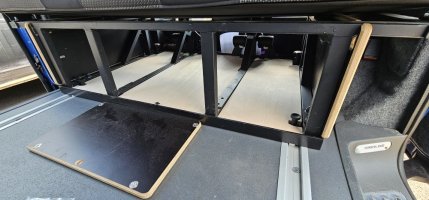
Please can someone help me out, I have just ordered my new Kombi but I really hate seeing the seating metal work exposed underneath. I have the single/double combination with a second bulkhead.
Is there any way I can box/hide add drawers etc to the rear seats to make it look better? With two little ones I expect to be picking toys up every time I stop!!
Yours hopefully
Is there any way I can box/hide add drawers etc to the rear seats to make it look better? With two little ones I expect to be picking toys up every time I stop!!
Yours hopefully
- Danbo
- kombi seats kombi storage storage
- Replies: 63
- Forum: Interiors, Seating, Lining
Especially the second one can be interesting for you - there is (as I guess) some proposals for Caravelle
One of my next projects will be perhaps some central console between two front seats

