You are using an out of date browser. It may not display this or other websites correctly.
You should upgrade or use an alternative browser.
You should upgrade or use an alternative browser.
What Have You Done To Your Van Today?
- Thread starter Daneeyre
- Start date
-
- Tags
- mod modification mods retrofit
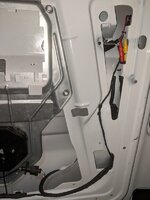
Andy - How do you find the picture quality please? I ask as I've been thinking about one of those to fit to a towbar mounted bike rack. I was thinking of a plug and socket power connection for the mirror as I had thought to remove it when not in use but just maybe it could be left on permanently. That said, I think I would be looking to use an ignition switched power source.Just done a test fit on the wireless reversing camera in my barn door trim, as recommended here Aftermarket Rear View Camera
Need to remove the temporary woodwork in the van to get to the D-pillar before fitting permanently
Thanks, will post a full guide when I've finished. Plenty of room in the trim so not tricky if you embrace the dremelWow! That IS discreet and very tidy! I like that a lot
I'll need to assess it a bit more. It's basically a standard definition camera, but the original thread has a reviewAndy - How do you find the picture quality please? I ask as I've been thinking about one of those to fit to a towbar mounted bike rack. I was thinking of a plug and socket power connection for the mirror as I had thought to remove it when not in use but just maybe it could be left on permanently. That said, I think I would be looking to use an ignition switched power source.
I fitted the (very expensive) Fiamma Rain Guard, which works mostly well. There are still gaps at the brackets though. Unfortunately, one of the brackets is right above the kitchen window.

So, some 25mm foam rubber cord from Ebay:
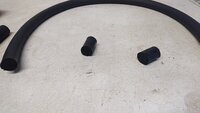
Cut and jammed into the gaps. Not a perfect solution, but seems to stop the rain so far. Square / rectangle foam might have been better, but a lot more expensive than the round stuff.
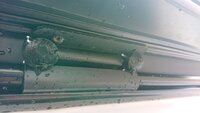

So, some 25mm foam rubber cord from Ebay:

Cut and jammed into the gaps. Not a perfect solution, but seems to stop the rain so far. Square / rectangle foam might have been better, but a lot more expensive than the round stuff.

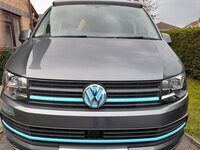
Took Doris to the local garage to have the Travelin-Lite after market fog light kit fitted. Really pleased with the kit, really amazed by the contrast between the LED fogs and the crappy H4 headlights !!
There is a slight gap, 1-2 mm between the lens and the new plastics ? Dont know if this is standard but the garage mentioned it and said it was the closest they could get it.
There is a slight gap, 1-2 mm between the lens and the new plastics ? Dont know if this is standard but the garage mentioned it and said it was the closest they could get it.
Fitted Travelin-Lite number plate leds. Bit underwhelmed as I fitted them before the school run and had a bulb out light on the dash. But then found they weren't connecting inside the frame. I had to bend the pins outwards and even then you can't screw the frames tight or the lights go out. No instructions. But working now
Finished off the wiring on the Renogy DC-DC charger and did a bit of testing today. Everything is working as it should, all the LED’s are visible by looking under the front of the drivers seat which is a bonus. It should also be possible to change a fuse without needing to remove the drivers seat should that ever be required.Made a bit more progress with the leisure setup changes today. Spent a fair bit of time head scratching trying to work out the optimal way to get everything to fit without having to change the existing cable from the starter battery. It had been cut to length for the CTEK with very little wiggle room to relocate. Coupled with the way the cable entry works on the Renogy this limited my options. I also ideally wanted to be able to see the LEDs on both the Renogy unit and on the fuse panel and be able to change a fuse if necessary without having to remove the driver seat. Once I figured out where to put them, i then spent longer than it should have taken making a suitable mounting board. I need to make a longer cable to feed the leisure battery but didn’t have any 16mm cable so will wait for that to arrive before finishing it off.
View attachment 91543
As part of the testing, I attached my fold up 50W solar panel just for the hell of it to see if it would charge even though there was no sun. It recognised it was there because the voltage output was over 15V but that is about all it did. It did prove the unit is doing what it should and turning solar on if the voltage threshold is reached. A bigger panel might have provided a little charge. I have a 180W panel waiting to go on the roof.
I also had a bit of a play with the Bluetooth app to see what it does. Functionality is limited although it does show the basics. There is another app which allows configuration of the charger which I’ll play with another time. Haven’t decided where I’m going to mount the Bluetooth module yet, there is so much cable on it i could put it anywhere in the van
I also managed to source a rubber cover which should fit the positive battery terminal properly. Just waiting for it to arrive so i can put that in place rather than using the yellow plastic thing which I’ve had to modify to make it fit (which it does badly). Fortunately not using the van just now so haven’t bothered to fit the drivers seat until i get that fitted.
Some pictures:

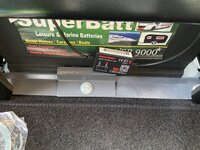
Clamp holding battery in position. Battery tray is screwed to the seat base so battery is nice and secure. BM2 has been moved and fixed to top of battery since i took the picture.
The app display with engine running and solar connected (small 50W panel, no sun):

App display with solar connected with engine turned off (same solar panel same conditions):

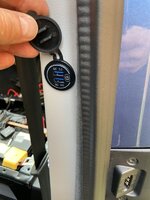
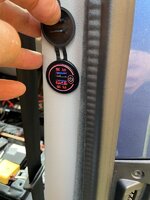
The USB sockets I fitted in the B pillars. They have a touch controlled on/off button. I chose these so i could turn them off so there is no parasitic drain from them. They light up when they’re on. Not sure I’m going to leave the covers on them, will decide later.
Fitted the Oem Logo roofbars and also Travellin-Lite additional door seals and a internal windscreen barrier.
Definitely sounds like a Golf
Definitely sounds like a Golf
I am struggling with my sounds-like-a-golf seal on the drivers door, it won't shut first time without slamming it. Hoping it will soften up but not done it yet.
Mine took a month or so to loosen up.
Hi CAB - what size awning did you put up? I used the Fiamma 45s on my Cali - painted the brackets black first. I got the rain guard to fit ok and it does span the sliding doorI fitted the (very expensive) Fiamma Rain Guard, which works mostly well. There are still gaps at the brackets though. Unfortunately, one of the brackets is right above the kitchen window.
View attachment 91980
So, some 25mm foam rubber cord from Ebay:
View attachment 91978
Cut and jammed into the gaps. Not a perfect solution, but seems to stop the rain so far. Square / rectangle foam might have been better, but a lot more expensive than the round stuff.
View attachment 91979
Last edited:
Mine is the same. If it doesn’t soften up or squash down or whatever I’ll be taking it off. Passenger side is fine, just drivers side which needs slamming.I am struggling with my sounds-like-a-golf seal on the drivers door, it won't shut first time without slamming it. Hoping it will soften up but not done it yet.
Just the standard shorter one, F45S, was done by the convertor.Hi CAB - what size awning did you put up? I used the Fiamma 45s on my Cali - painted the brackets black first. I got the rain guard to fit ok and it does span the sliding door
We have a rear kitchen layout so the bracket is right above the rear quarter sliding window. A standard conversion layout wouldn't have the same issue.
Ah, yes, window will be under the bracket or end of rain guard runJust the standard shorter one, F45D, was done by the convertor.
We have a rear kitchen layout so the bracket is right above the rear quarter sliding window. A standard conversion layout wouldn't have the same issue.
Finished off the wiring on the Renogy DC-DC charger and did a bit of testing today. Everything is working as it should, all the LED’s are visible by looking under the front of the drivers seat which is a bonus. It should also be possible to change a fuse without needing to remove the drivers seat should that ever be required.
As part of the testing, I attached my fold up 50W solar panel just for the hell of it to see if it would charge even though there was no sun. It recognised it was there because the voltage output was over 15V but that is about all it did. It did prove the unit is doing what it should and turning solar on if the voltage threshold is reached. A bigger panel might have provided a little charge. I have a 180W panel waiting to go on the roof.
I also had a bit of a play with the Bluetooth app to see what it does. Functionality is limited although it does show the basics. There is another app which allows configuration of the charger which I’ll play with another time. Haven’t decided where I’m going to mount the Bluetooth module yet, there is so much cable on it i could put it anywhere in the van
I also managed to source a rubber cover which should fit the positive battery terminal properly. Just waiting for it to arrive so i can put that in place rather than using the yellow plastic thing which I’ve had to modify to make it fit (which it does badly). Fortunately not using the van just now so haven’t bothered to fit the drivers seat until i get that fitted.
Some pictures:
View attachment 92065
Clamp holding battery in position. Battery tray is screwed to the seat base so battery is nice and secure. BM2 has been moved and fixed to top of battery since i took the picture.
View attachment 92066
The app display with engine running and solar connected (small 50W panel, no sun):
View attachment 92067
App display with solar connected with engine turned off (same solar panel same conditions):
View attachment 92068
The USB sockets I fitted in the B pillars. They have a touch controlled on/off button. I chose these so i could turn them off so there is no parasitic drain from them. They light up when they’re on. Not sure I’m going to leave the covers on them, will decide later.
View attachment 92069View attachment 92070
Nicely done @Big.mac
Can I ask where you got your USB sockets from?
Finally, put my plate on the van! (Also gave it a hose down as it was getting embarrassing!)
View attachment 92234
Lovely mate!..... Yuck, Washing; Mine is fooking filthy already!
Similar threads
- Replies
- 0
- Views
- 723

