TallPaul's Caravelle - MTB wagon!

So I'm back from my Alps trip now, body/mind/bike are just about recovered!! :D
Where are you booking in for the ACC retrofit?
I've got it booked in at VW Retrofit in Redditch in a couple of weeks.

After doing a lot of digging they seem to be the only ones offering the follow to stop function on a DSG van, at a reasonable price. Tbh if I don't get the follow to stop option it's not the end of the world, it's nice to have for heavy traffic crawling along at 5mph though.

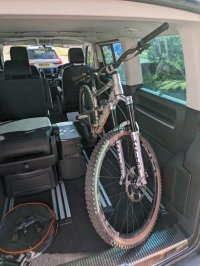
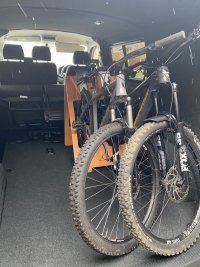
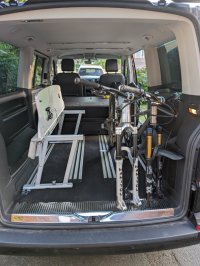
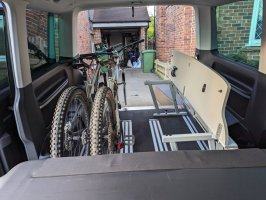
The rear bench seat and multiflex board are due to be collected this weekend, once they're out the way I can really start to look at the layout. I did a 'test' last night with just the middle row out (still a proper workout removing those seats!), there's a good amount of room for my 2 bikes. I'm unsure yet whether I'll put them both the same way or top and tailed, and if I'll have room for a sliding tray or not.
PXL_20230718_191308220.jpgPXL_20230718_191426602.jpg
 
I've been doing a load more thinking, and pondering and test fitting of bikes and I think I'm getting there with how I can get the bikes inside.

The biggest issue is my biggest, longest bike - getting this in with both wheels on is causing a headache! The roof lining of the 'velle slopes down for about 6 inches before the tailgate, and with the combination of 170mm forks and 800mm 35mm rise bars, with the wheel turned 90 degrees the bars hit on the headlining. A problem further exacerbated by the fact I've decided I want a drawer to put the bikes on, due to them being hard to roll in without getting caught on each other, and for mud containment. Plus it looks cool. :cool: Which means I'll be losing around 40mm or so of height.

So to fit in the bike it's got to move further back and/or have the wheel turned only 45 degrees which then means space for the kitchen pod in front of the bikes is limited - so much so that I wouldn't be able to fit any fridge in the gap!

So, a change of ideas, slightly. I was initially trying to keep the bikes within the first 2 seat rails, allowing the 'velle table to move along it's rails, and for the bed to be 3ft wide (going over the seats and the table.

I've ditched that plan and now the bed will be around 28" at the widest point, with the bike area extending sideways to about the mid point of the van (still TBC). Along with the removal of the caravelle table, this will mean I have the full length of the van behind the front seats and between the kitchen pod and the 2x rear seats to roll a bike into as the rear wheel will sit alongside the kitchen pod. No turning of the front wheel required! In turn, this lets me build a slightly bigger kitchen pod in one direction, and gives a bit more room for the bikes.

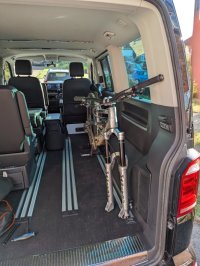
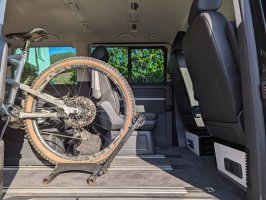
A couple of pics from the last few days testing stuff out...

PXL_20230723_173405438.jpg

PXL_20230723_175730440.jpg
PXL_20230723_173505332.jpg


On another note, with the factory tints the bikes are clearly visible inside on a sunny day so I'll need to sort that out. Currently thinking rather than tints I'll be fitting rear window storage bags so will only need to worry about the rear and sliding door window, and I'll be fitted a proper curtain set on these so can just draw them when I'm away from the van for extended periods with the bikes inside.

PXL_20230723_173310398.jpg


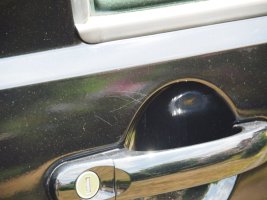
And lastly, I'm going to (at some point) have the van professionally detailed, polished and ceramic coated. It's got the usual swirls all over, plus a few deeper scratches, oh and the sides are absolutely covered in tar spots (hard to capture but it's covered). Oh and the bonnet might be beyond saving, as well as some hefty scratches it's got the usual 1000 and 1 stone chips!

P7261233.JPG

P7261234.JPG
P7261235.JPG
P7261237.JPG

Wheels, paint etc will wait until later this year tbh as it's all cosmetic. I'm waiting on some rail fasters to be delivered then I'll get on with mocking up the fork mount position for the 2 bikes to go in with the front wheels off. That'll confirm exactly how much room I have for the kitchen pod, and therefore the fridge, sink, hob etc...
 
Nice van, if it helps i use a bike stow (2bike) stand in my van (swb kombi) I have to fold the rear seats up out the way but it does a great job holding the bikes securely
 
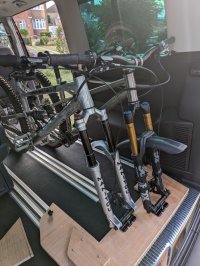
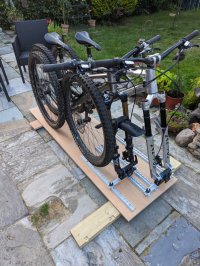
Mocked up the wheels off bike placement tonight with some offcuts of 18mm ply from another project and the rail securing bolts that were delivered today.

PXL_20230728_175301592.jpg

PXL_20230728_185254272.jpg


PXL_20230728_185309648.jpg


Bikes, in! Well... Sort of.

In that configuration they'll only go in that way and the pedals on the left side bike (when looking into the boot) are protuding into where the bed vertical supports will need to go.

A bit of head scratching later and having the bikes the other way around when I'm carrying both will work perfectly, as I'll never be riding both and so one can have the pedals removed. Also, with a bit of fine tuning of the final position I'm sure I can get the pedals to clear. If I'm only carrying one then it'll go in the right side position.

Another option will be to have the bars turned slightly which will allow a tad more room on the right side, meaning I can shift the bikes over a few cm. A few cm is the difference between fitting and not fitting!

I'll do some more testing of positions tomorrow, with angled and other positions. Good news is though that they'll go in and there's room for everything I want (with a bit of fine tuning).

Oh and I 100% want a drawer - putting these 2 in side by side without one is a massive pain!
 
Last edited:
Progress on the build today, cut all bar a couple of the pieces needed for the drawer, bed platform support/drawer uprights, and assembled the drawer temporarily to help with fitting.

It's all being built with 18mm hardwood ply.

The drawer will have a section on the rear to enclose it, I'll line it with something so I can just brush out all the dried mud.
PXL_20230812_154600378.jpg

PXL_20230812_154611840.jpg


It's a good job I have a van, I've got plywood bloody everywhere!
PXL_20230812_160635368.jpg
 
Last edited:
More progress, although not that visible! I've been doing a few hours here and there after work and at the weekends.

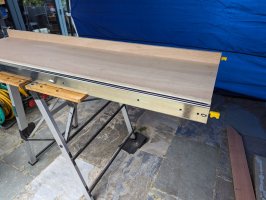
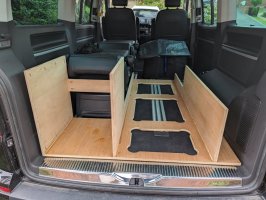
Finished off the base (standing to the right of the drawer) with some sections cut out to save weight. Sanded down and finished, routed etc most of the other bits.

Drawer with 2 uprights - the right side will be for a storage area and the left side will form the right hand upright of the bed base.
I'm pretty much at the stage where I'll be putting the base and uprights together fully, with pocket hole screws and wood glue, then a few coats of varnish. Plus some right angle brackets for safe measure. I've attached the uprights and drawer to the rails to make sure it's all perfectly aligned, I'll then mount the uprights to the base and then remove the drawer and rails.

PXL_20230823_174411397.jpg

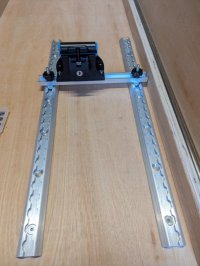
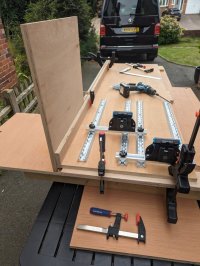
I had a couple of deliveries this week too, my unwin rail, t track, and Rockymounts droptop fork mounts.

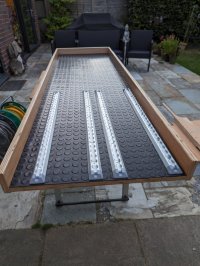
I'll have 2 unwin rails per mount, mounted front to back, then a t slot rail between these, with the fork mount on this. This allows me almost complete free reign as to where to mount the fork mounts, to allow for different sized bikes etc.

So I can have the mount here...
PXL_20230823_174440899.jpg

Or here...
PXL_20230823_174614847.jpg

Or anywhere!

I'm drilling the holes for the mounts at the moment.
 
First section glued and screwed, with more clamps than a BDSM party!

PXL_20230826_124913487.jpg

PXL_20230826_124925380.jpg
Stored overnight in the van while it dries, rain this afternoon so I'll continue tomorrow. Unfortunately I don't have a big enough indoor space to work on something this big.
PXL_20230826_131127081.jpg
 
Last edited:
Glued and screwed the right side drawer upright, and the left side bed upright, plus the cross member today

PXL_20230827_134622233.jpg

PXL_20230827_134630357.jpg


I'll cut the right side storage end tomorrow, and start assembly of the drawer. Got a few holes to drill for the rails and the end section to dowel.
 
Did you route out that bottom plate or is it a hole cutter and careful saw work?
 
Nice Caravelle with a good spec. My last Caravelle had the aux heater and it was great. In the winter I would use the remote to start it and by the time I had breakfast it was warn and defrosted. Also great for camping.
 
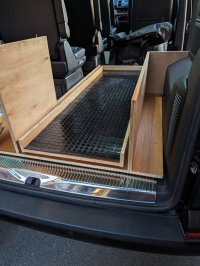
Loads of progress over the weekend and today, everything is now glued and screwed together, with a couple of coats of varnish. The drawer liner is ready to be glued in place, then I'll cut a section of the same rubber mat for the right side storage area. Once that's done it's ready to be fitted for good and the drawer installed, along with the rails and fork mounts.

The bed platform will be removable as I wouldn't be able to fit as one piece, it'll be secured with barrel nuts in the uprights with 6mm counter sunk screws through the bed platform. That's the next job once this bit is done.

PXL_20230904_183305212.jpg

PXL_20230904_183324847.jpg

PXL_20230904_183906824.jpg

PXL_20230904_184116345.jpg

PXL_20230904_184127205.jpg

Once all the rear section is done I can start thinking about building the kitchen pod! The first step will be to buy the fridge...
 
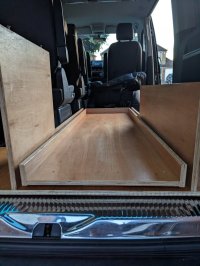
Drawer is done.

I'm going to leave the right side storage bit open, as well as the bit under the bed as I don't know exactly what I'll need to put there, I may end up putting a drawer or 2 in the left side, or maybe some storage boxes, or something else.

Literally all that's left to do now is secure the base section down fully into the van and then attach the drawer slides to the frame and to the the drawer.

PXL_20230905_184128539.jpg


The bikes won't be going anywhere!
PXL_20230905_184236533.jpg
 
And, done! For now...


I really need to give the van a wash and its going to need a full treatment with tar remover, fallout remover, clay bar etc. The windscreen also has some terrible smearing when it was a bit dewey the other morning so that'll need polishing out too.

Hopefully I'll get around to starting on the bed platform this weekend too - I mean it's just 3 bits the same size/shape, with about 18 holes to cut with the holesaw, then to join together with the circular saw, then route all the edges on both sides, then drill the mounting mounts to the uprights, then make the holes for the supports, make the supports, attach the hinges... Can't take much time, right? :D


Looks amazing. Great work. The bed platform? Sounds like a typical half hour job :)
 
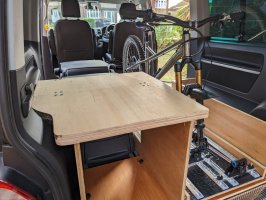
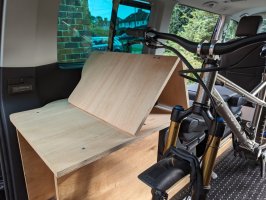
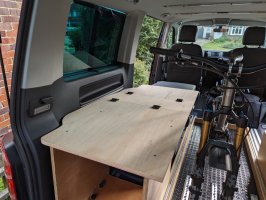
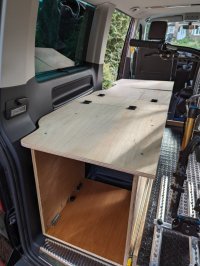
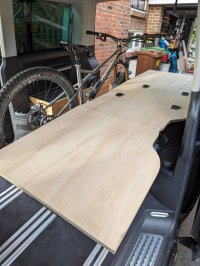
Progress on the bed platform, I cut and shaped the 3 sections last week, making sure they fit the curves of the Caravelle interior shape and that they were identical in size. I'd taken a trace of shape the multiflex board before selling it so had that to go off.

PXL_20230916_124415984.jpg

The base section was drilled and countersunk to fit the barrel nuts in the vertical sections.

Then earlier this week, whilst laying awake at night, I had an 'oh shit!' moment. Confirmed the next day that because my bikes handlebars overhang the bed platform a bit, I wouldn't be able to fold them out as the handlebars would be in the way.

Now, you may ask 'why didn't you just turn the bars to clear the bed platform?' Well, in doing this I'd make the bikes slightly longer, which would in turn affect the space I have for the kitchen pod, and would mean I wouldn't be able to fit the fridge in! Did I mention that every little change or adjustment in this set up affects something else?! :rofl: :rofl:

One option would have been to leave the sections as is, and when I want to fold out the bed, slide the bike drawer out and then fold out the bed. However, this would mean getting out the van, opening the tailgate, sliding the drawer out, getting back in the van, folding out the bed, getting out the van, pushing the drawer back in, closing the tailgate and finally getting back in the van. Which, when it's pissing it down with rain and I'm all warm and cosy in the van, is not something I'll want to be doing.

So my solution to this problem was to split the middle section so that it could fold out in 4 sections rather than 3. I worked out what size they would need to be, folding a particular way - I needed to raise the left side bike by a few cm but it would work.

Then, I cut the middle section the wrong way around. Doh!

However on checking I found that if I mounted the hinges the other way, it not only cleared the bars but cleared them without needing to raise the bike!

So this is the set up - I need to order 2 more hinges then I can mount the 3rd section. I'll drill the holes tomorrow with the existing hinges. Once that's done I'll work on the supporting legs.

This solution also means the sections don't catch on the interior panels on the left side and makes room for a window bag. I'll also be changing the position of the first set of hinges, one is too far inboard - I'll dowel and sand down the holes to get rid of them.

The bed platform is a full 2m long, and 66cm (26") wide - narrower that I would have liked but for just me it's perfectly fine.

I'll be sleeping with my feet towards the rear of the van so won't bump my head on the bike!

PXL_20230923_154608750.jpg

PXL_20230923_154649256.jpg

PXL_20230923_154710651.jpg

PXL_20230923_154737917.jpg

PXL_20230923_154930495.jpg
PXL_20230923_154946599.jpg
 
Last edited:
It's been a while since I've updated this, unfortunately there's not been a huge amount of progress - thanks to only being able to work outside and the wet autumn/early winter we had meant that most weekends were a wash out.

The bed system above has been scrapped, I wasn't happy with a couple of areas - with the help of quite a few YouTube videos, along with searching for the right parts, I've come up with a sliding & folding design using aluminium profile which should be a lot sturdier and easier to deploy. I've not yet ordered the bits for that so more to come on that at a later date...

Just before Xmas I ordered the fridge as I needed this to build the front kitchen pod, as everything revolved around the fridge.

I also discovered tinkercad which had helped massively allowing me to do CAD (computer aided design) along with CAD (cardboard aided design) to let me get everything designed before cutting it out.

My initial design was this:
image.png

With the storage to the right of the fridge, big enough for food cans, it meant it was tight on the left side and there would be some wasted space on the left.

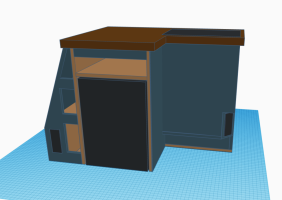
So, a slightly revised design:
image.png

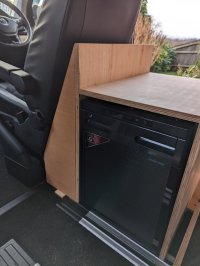
Storage on the left, enough room for food items and the heater duct vents which are being redirected from the factory parking heater outlet to the 2 rectangular black things on the unit.

What you can't see here is the complex design of the area around the vent, which looks a little like this:
image.png

I've got 2 intake duct scoops that will go in this, then onto 2x runs of 60mm ducting ending in the 2 vents.

One I had the design to a decent level I started work on the unit, here's the progress of of today:

1000006308.jpg

1000006309.jpg

1000006310.jpg


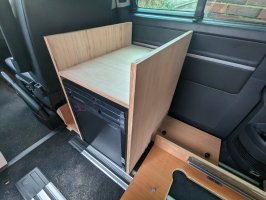
The base and main uprights around the fridge are are screwed together temporarily so that I could get the right location for cutting the parts that will follow the vent to make an airtight fit.

You can see the space I'm dealing with, that's my main bike and where it sits with it in the drawer.
 
Last edited:
Here's some shots of the vent redirection area - primary reason to have this is that if I didn't there would be roasting hot air being directed right at the wooden unit and the fridge right behind it.

1000006311.jpg

1000006312.jpg

There's another bit that goes on the outside next to the door, then 2 horizontal bits that are shaped to follow the curve of the interior panel just above and below the vent. Everywhere the unit touches the van will be sealed with BBQ gasket tape so should make for an airtight seal.

These are the 2 ducts I'm using:
1000006313.jpg

Each one will have a run of 60mm ducting going to a vent on the unit, one on the front of the unit by the drivers seat and one on the right at the rea on the sliding door aperture.
 
Back
Top