Solar Sheds & Other Non-T6 Solar Projects - How We Done It -
@Pete C requested it, so here it is . . . . .
Lets Post here any NON - T6 related ECO Power or Solar setups etc....
***************************************
SHED:
Solar Panel: 1x 160w RENOGY flexible (stuck on roof ) 2x 160W semi-flexible, photonic universe (stuck on roof )
charge controller: Victron smartsolar 100/20 (75/15, 100/30 options + various PWM`s)
DC-DC charger: Redarc bcdc1240 - charging dis-similar batterys from main battery bank ie Lifpo4 or old SLA,
EHU Charger: NOCO G1500(15A) if needed,
battery bank: 2x110Ah deep cycle Leisure + others,
Inverter: Victron Phoenix Inverter 12/350,
other: Raspberry Pi running Victron Venus system monitor + 2x USB links,
other: SONOFF USB/12v wifi switch/timers via APP,
other: WIFI Router 12v powered, set as an access point,
other: 12v LED garden/shed lighting via SONOFF`s,
other: PowerLine adapter to get internet over mains wiring,
other: 240v mains supply if needed.
***************************************
just copy/paste/edit the list and add your own details in.
***************************************

.


***********

 sonoff.tech

 play.google.com
**********
.

..
we run a Solar Shed that powers 12v LED ambient lighting and a victron Inverter for 240v powered stuff.
we also have mains 240v for big loads.
12v/USB timers run from APPS on the smartphone to control the lighting etc.
.

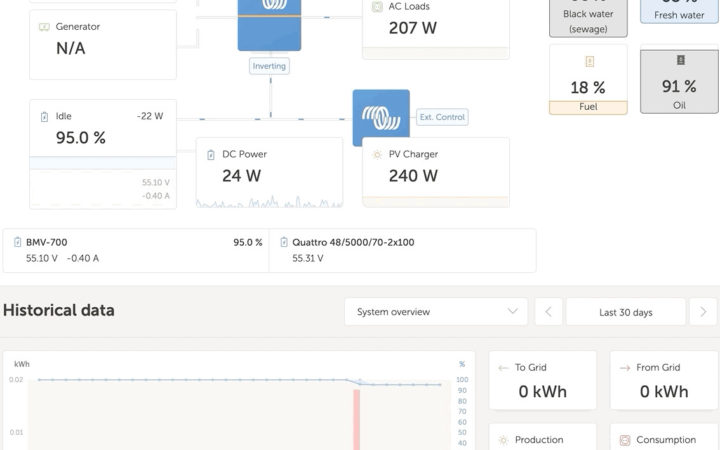
Stats for nerds:
Victron Venus web display running on Raspberry Pi:

And Victron VRM Portal data logging.
This morning:

and last 7days:

Defiantly caught the solar bug . . . . . . Grid-tie inverter next to harvest the wasted solar production after the battery bank is full.
.
@Pete C requested it, so here it is . . . . .
Dell,
What do the batteries in your shed power ?
I too have a solar powered shed - perhaps we should have a separate thread for sheds
Pete
")
Lets Post here any NON - T6 related ECO Power or Solar setups etc....
***************************************
SHED:
Solar Panel: 1x 160w RENOGY flexible (stuck on roof ) 2x 160W semi-flexible, photonic universe (stuck on roof )
charge controller: Victron smartsolar 100/20 (75/15, 100/30 options + various PWM`s)
DC-DC charger: Redarc bcdc1240 - charging dis-similar batterys from main battery bank ie Lifpo4 or old SLA,
EHU Charger: NOCO G1500(15A) if needed,
battery bank: 2x110Ah deep cycle Leisure + others,
Inverter: Victron Phoenix Inverter 12/350,
other: Raspberry Pi running Victron Venus system monitor + 2x USB links,
other: SONOFF USB/12v wifi switch/timers via APP,
other: WIFI Router 12v powered, set as an access point,
other: 12v LED garden/shed lighting via SONOFF`s,
other: PowerLine adapter to get internet over mains wiring,
other: 240v mains supply if needed.
***************************************
just copy/paste/edit the list and add your own details in.
***************************************
.
***********
eWeLink Bring Your Home To Life - SONOFF Official
eWeLink, a universal smart home app that supports over 2000 hardware brands, allows you to manage home appliances remotely
sonoff.tech
eWeLink - Smart Home - Apps on Google Play
eWeLink is designed to seamlessly control and manage smart devices.
eWeLink-Smart Home
One app, countless devices eWeLink is the app platform that supports multiple brands of smart devices including Sonoff. It enables connections between diversified smart hardware and integrates popular Smart Speakers such as Amazon Alexa, Google Home. Moreover, eWeLink works with IFTTT, serving...
apps.apple.com
**********
.
..
we run a Solar Shed that powers 12v LED ambient lighting and a victron Inverter for 240v powered stuff.
we also have mains 240v for big loads.
12v/USB timers run from APPS on the smartphone to control the lighting etc.
.
Stats for nerds:
Victron Venus web display running on Raspberry Pi:
And Victron VRM Portal data logging.
This morning:
and last 7days:
Defiantly caught the solar bug . . . . . . Grid-tie inverter next to harvest the wasted solar production after the battery bank is full.
.
Last edited: