You are using an out of date browser. It may not display this or other websites correctly.
You should upgrade or use an alternative browser.
You should upgrade or use an alternative browser.
Fitting the OEM Auxillary Heating Ductwork
- Thread starter DaveyB
- Start date
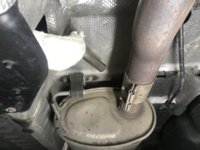
Thanks Richard. So, just ends where it does above the vehicle exhaust. I thought it would have been better exiting lower by the sill then the nasty CO had a chance of escaping!
That is how I normally advocate fitting exhausts but obviously VW have faith in the floor pan and its integrity. I am used to boats and the fact that there is nowhere for exhaust to go if there is a leak within the confines of the hull keeps your mind on CO and CO2 leakage along with LPG.
The chances of any appreciable gas entering the interior must be minute - I should think that CO2 exhaled by humans inside the van must extremely high compared to any possible gases entering from underneath. You are right to query it though - I thought long and hard about it when I first saw the setup.
The chances of any appreciable gas entering the interior must be minute - I should think that CO2 exhaled by humans inside the van must extremely high compared to any possible gases entering from underneath. You are right to query it though - I thought long and hard about it when I first saw the setup.
I am going to fit a CO alarm anyway. £17 for a life, I think it’s worth it.
Kasha Luna
New Member
Excellent posts. Thanks for your honest efforts.
Hi Kasha, I noticed your from New York. I have never seen a T4, T5 or T6 Transporter in North America, have you got one?Excellent posts. Thanks for your honest efforts.
OK, I'm looking to fit a heater under the van as well, what info do I need to provide to make sure I get all the parts I need?
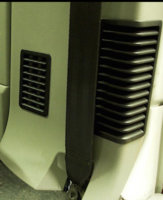
What colour options are there for the interior trim parts, my van is a 2017 model, and is light grey plastic on the B pillar.
I found a sticker on the back of the glove box that says 'Moonrock'
In fact it looks pretty much like the pic on post #1
What colour options are there for the interior trim parts, my van is a 2017 model, and is light grey plastic on the B pillar.
I found a sticker on the back of the glove box that says 'Moonrock'
In fact it looks pretty much like the pic on post #1
I might have a spare one if your interested?Could anyone that have the vents in the B pillar please measure how far up the trim the grills are please. Some have the moulding marks on-site as a cutting guide but unfortunately mine hasn’t.
View attachment 35564
BournemouthT6
New Member
B-Pillar Vent
I have to admit, this was the more scary of the cuts to make. I removed the drivers seat to give me a bit more room; if you can I’d also recommend removing the seat base - i couldn’t due to all of my leisure electric bits.
I also removed the seatbelt top and bottom mounts as well as the inertia reel. It just gives more room and makes sure you don’t snag it when cutting.
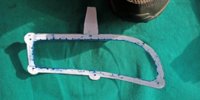
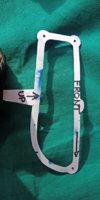
In order to figure out where the vent piece goes I used some putty to stick it to the metal work, then installed the b-piller trim over the top, and fished through the holes in order to line it up. Removed the trim, drew round the base of the duct.
View attachment 18317
(Please ignore the spray glue deposits I had to rip off the carpet trimming to do this job)
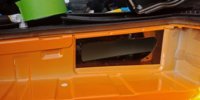
Start cutting. Again I used a holesaw to cut out the corners, then a multi tool with metal blade, and a file.
Once all cut and shaped, poke the main duct up through the bottom of the van.
Pop some paint on the cut edges.
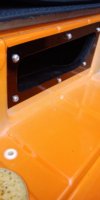
Screw the top frame guide piece on, then clip on the b-pillar vent guide.
View attachment 18320
View attachment 18321
My top tip is to remember to refit the seatbelt inertia reel before you put this vent guide on, because otherwise, like me, you’ll have to take it back off to get to the bolt.
View attachment 18322
View attachment 18318
View attachment 18319
Hi Dave
Excellent install... I Have a question how did you mark out the B pillar hole to make sure it was in the right place for the top part and then making sure that meets up with the B pillar vents once there fitted?
Thanks
Shaun
I'm about to do this as well.
It's a shame there isn't a pattern we could use to mark out the holes needed.
I'm thinking of drilling a reasonably large hole somewhere near the middle then gradually cut the hole larger until it fits.
It's a shame there isn't a pattern we could use to mark out the holes needed.
I'm thinking of drilling a reasonably large hole somewhere near the middle then gradually cut the hole larger until it fits.
Hi Dave
Excellent install... I Have a question how did you mark out the B pillar hole to make sure it was in the right place for the top part and then making sure that meets up with the B pillar vents once there fitted?
Thanks
Shaun
The way I did it is probably not the best way of doing it. If I were to do it again I would core a big hole roughly in the middle, insert the bottom pipe, then slowly and gently cut up to the sides of that.
I'm about to do this as well.
It's a shame there isn't a pattern we could use to mark out the holes needed.
I'm thinking of drilling a reasonably large hole somewhere near the middle then gradually cut the hole larger until it fits.
I'm about to do this as well.
It's a shame there isn't a pattern we could use to mark out the holes needed.
I'm thinking of drilling a reasonably large hole somewhere near the middle then gradually cut the hole larger until it fits.
I used the duct that is going to be bolted in to get an idea where to cut. It only fits snugly in one place, drew round the inside and marked the holes. Core drilled a large hole in the center then fitted the lower piece and felt the edge through the hole. My marks were within a couple of mil from where it needed to be. I must admit that was the most daunting part of the install!!
The problem with making a template for someone else to use is if the user gets it wrong it will no doubt be the person that provided the templates fault!!
Yes, Printer scaling can cause issues with pattern replication as well, if your printer isn't set correctly, all bets are off.
I thought about using engineers blue to mark the outline, smear onto part, press against metal, remove, imprint left where any part touched (hopefully).
This is on my to do list for this weekend.
Hope the weather stays fine.
I thought about using engineers blue to mark the outline, smear onto part, press against metal, remove, imprint left where any part touched (hopefully).
This is on my to do list for this weekend.
Hope the weather stays fine.
Need a bit of help guys. I previously saw a photo of the inside of a T6 (think it was a proper VW photo as opposed to someone here) and it showed an additional duct that ran from the oem hot air outlet and up to the bed area of the pop top to divert the hot air up there. It was removeable too. Anyone know where I could buy such a thing?
First proper night in the van since I fitted my propex and I’m freezing all night in the pop top bed and my wife and kids are too hot below in the rock and roll bed. I thought the hot air would have rose to the pop top but it seems it isn’t doing it enough. Wondering now if I could rig something up at night to divert more heat to me than them
First proper night in the van since I fitted my propex and I’m freezing all night in the pop top bed and my wife and kids are too hot below in the rock and roll bed. I thought the hot air would have rose to the pop top but it seems it isn’t doing it enough. Wondering now if I could rig something up at night to divert more heat to me than them
I haven’t seen or heard of an OEM part for this; it’s not on the parts pictures that i’ve got.Need a bit of help guys. I previously saw a photo of the inside of a T6 (think it was a proper VW photo as opposed to someone here) and it showed an additional duct that ran from the oem hot air outlet and up to the bed area of the pop top to divert the hot air up there. It was removeable too. Anyone know where I could buy such a thing?
First proper night in the van since I fitted my propex and I’m freezing all night in the pop top bed and my wife and kids are too hot below in the rock and roll bed. I thought the hot air would have rose to the pop top but it seems it isn’t doing it enough. Wondering now if I could rig something up at night to divert more heat to me than them
Perhaps it was a Heath Robinson item.
Similar threads
- Locked
- Replies
- 5
- Views
- 3K
- Replies
- 51
- Views
- 12K

