Nope didn't even know that was a thing! Completely new to all this, so am i right in assuming that is instead of a fuse and cuts off the connection if it senses an increase of heat in the cables?? Do you have a link to one??Have you got one of the thermal cutoffs that you can reset? I could only find a 60A or an 80A I think so pretty sure I plumped for the 60A, will need to check. If so I may need to up mine so its not just hot all the time.
You are using an out of date browser. It may not display this or other websites correctly.
You should upgrade or use an alternative browser.
You should upgrade or use an alternative browser.
Renogy DCC50S + 100Ah Smart Lithium Install
- Thread starter Rapt0rUK
- Start date
I went with midi fuses, partly because they are cheap and available adn also because there is some talk of reliability.Have you got one of the thermal cutoffs that you can reset? I could only find a 60A or an 80A I think so pretty sure I plumped for the 60A, will need to check. If so I may need to up mine so its not just hot all the time.
You really want this to be well protected because of the currents involved.
@mrdanielmh
yep looks good,
I dont have much faith in those thermal trip switches when pushing high amps tho, I've used them and they get hot. (i use MIDI fuses now)
id put a fuse on the EHU charger next to the battery. (to protect the outgoing battery cable)
My REnogy DC-DC, the battery and Fusebox are all under the passenger seat. The Drivers side has the 240v Consumer unit and a single gang mains socket to supply a free standing Victron 10A battery charger. I ran a Victron battery charger extension cable across to the battery and so have a plug in solution like you say. I can just unplug the battery charger and use it on the car or whatever. It will also easily reach the van battery so its possible to charge the starter battery on EHU if required.I've also got the DCC50S and a Smart Lithium battery
I had planned on putting all the electrics on a kind of sled that would slide into bottom cupboard at the back of the van but seeing as you lot have made such a neat install under the drivers seat it seems a waste to not use the space!! I'll definitely be doing this also. I have got big enough solar extension leads to get to the front seat. It's just a case of mounting the fuse box in the kitchen somewhere and where to place the battery charger. I went for the Victron 12/15 IP65 charger with a little holder and plan on taking it out if I need it for another battery. I'll probably place a plug from the consumer unit just behind the drivers seat for the charger to plug in to.
That would be annoying if I had to do it though as the Solar should charge the starter battery back through the Renogy DC-DC.

I've got 3 kids so had to convert the passenger captain seat to a double and the storage will be useful so dont want to put anything in there (apart from obvious stuff like kit).
But definitely going to have a look at some setups you lot have on here and copy. The more I think about it, the more sense it makes. There are two small sticking points which are:
But definitely going to have a look at some setups you lot have on here and copy. The more I think about it, the more sense it makes. There are two small sticking points which are:
- Where will the mains charger go. Most probably in a little cradle inbetween edge of kitchen and seat. Not sure how far I want the charging cables to run, although I guess they'll only be 15A max (have the Victron 12/15 IP65).
- I will be getting an invertor, where will this go? Most probably similar place on the end of the kitchen as the cables really don't want to be that long for this
@Dellmassive so the clamp meter arrived, nifty bit of kit so thanks for the pointer on that!
So I followed your suggestion and got the following measurements:
Alternator to Starter Battery (assuming I got the right cable!) 67.5A

+Ve cable from starter battery to Renogy box 55A

Renogy charger to Li battery +ve 53A

And finally from Li Battery -ve to ground block 55.6A

Are those differences within tolerance?
Granted I only had it running for 5-10 mins but no noticeable heat on the battery or earth block. The +ve wire from charger to battery was fractionally warmer but only just noticeable, certainly wouldn't describe it as warm.
The new busbar arrives tomorrow so will try and get that switched over and then let it run for a good 15-20 mins and check everything again.
Assuming no heat and similar clamp meter readings am I all good?
So I followed your suggestion and got the following measurements:
Alternator to Starter Battery (assuming I got the right cable!) 67.5A
+Ve cable from starter battery to Renogy box 55A
Renogy charger to Li battery +ve 53A
And finally from Li Battery -ve to ground block 55.6A
Are those differences within tolerance?
Granted I only had it running for 5-10 mins but no noticeable heat on the battery or earth block. The +ve wire from charger to battery was fractionally warmer but only just noticeable, certainly wouldn't describe it as warm.
The new busbar arrives tomorrow so will try and get that switched over and then let it run for a good 15-20 mins and check everything again.
Assuming no heat and similar clamp meter readings am I all good?
Few updates today, I swapped over the 240v earth block for a proper 100A busbar and also took advice from a knowledgeable friend and decided to improve the security of the battery by strapping in properly.
Seat base came back out again and added 2 pieces of aluminium angle to create a secure cradle for the battery which I could tension against with straps.

Also changed the orientation of the battery making it more central and relocate the fuse box as suggested to be accessible without removing the seat.


The fuse box is recessed back under the seat quite a bit so hoping to for one of those removable blanking plates on to the rear of the seat base to cover everything up neatly.
All wired back up, much more secure and working well so far.
Next up with be to add the facility for a portable solar panel...
Seat base came back out again and added 2 pieces of aluminium angle to create a secure cradle for the battery which I could tension against with straps.
Also changed the orientation of the battery making it more central and relocate the fuse box as suggested to be accessible without removing the seat.
The fuse box is recessed back under the seat quite a bit so hoping to for one of those removable blanking plates on to the rear of the seat base to cover everything up neatly.
All wired back up, much more secure and working well so far.
Next up with be to add the facility for a portable solar panel...
Last edited:
Tidy job, should be much more secure and easier to maintain.Each length was about 38cm long and I went for 20 or 25mm angle from memoryThat looks excellent! I'm going to copy you exactly for this as it looks so good! If you can remember, how wide is your angle? I have some in the shed but its fairly short so suspect it may not be long enough
I can't take credit for it, a friend's idea, he sent me pics of his which he did the same!
Last edited:

I meant it when I said I was going to copy you!

I have made a slight deviation and added a panel on the side to mount the negative bus bar and Victron BMS shunt. I plan on adding a panel for positive side on the other side, going to mount fuses and Smart Battery Protect.

This is a few from the side. I just made it from some 3mm ply, added a strip of 3mm cutoff on the back at the bottom and screwed in at the top, its solid.
How did you mount the rear panel? Can't find anything to screw it to, have you just restrained it with the orange battery straps?Each length was about 38cm long and I went for 20 or 25mm angle from memory
I can't take credit for it, a friend's idea, he sent me pics of his which he did the same!
I'm having my fusebox located in the kitchen but would like a battery cutoff on a rear panel like yours.
So I made a template for the rear panel with card first and got it just the right size that it sits perfectly in the space and wedges behind the rear seat bolts. I positioned the battery the right distance back to brace the wood. So it's not actually fixed but as soon as the battery is in it can't go anywhere and once the straps are tightened, it definitely can't go anywhere!How did you mount the rear panel? Can't find anything to screw it to, have you just restrained it with the orange battery straps?
Like what you've done with the busbar, mine is on the timber baton carrying the Renogy box at the moment but where you have it looks a better spot...
Thought I'd update with my copy ") .
.
This is without the battery in.

This is showing the hidden battery "isolator", it only isolates from Charge controller to battery currently. I've left Battery Protect to "switch" supply to fusebox. They are hidden away mainly to stop the kids playing with them. But also due to the wooden panel being up against the battery had to have on the side as they aren't surface mount. The switch is the toggle for the BatteryProtect.

This is showing the Positive side to the power. It was a squeeze to get everything in and couldnt get it looking nice without some kinked cables. The cables from battery -> BP -> fuse holder are what I got from Travelvolts so assume they're good enough (10mm2, AWG8?). It's all been fused with 60Amp fuses. I'm not going to get anywhere close to that but will keep an eye. I may replace anyway to match the rest which is AWG4.

This is the finished build. The yellow cable is Cat5 from the RS485 connection on the solar charge controller. This will be shortened in due course and is currently connected to a small IoT device which I will probably stow in the seat base somewhere.


Thanks @Rapt0rUK for the inspiration, I saw your build post saying how you wanted to give back to a community, well for me you have!
.This is without the battery in.
This is showing the hidden battery "isolator", it only isolates from Charge controller to battery currently. I've left Battery Protect to "switch" supply to fusebox. They are hidden away mainly to stop the kids playing with them. But also due to the wooden panel being up against the battery had to have on the side as they aren't surface mount. The switch is the toggle for the BatteryProtect.
This is showing the Positive side to the power. It was a squeeze to get everything in and couldnt get it looking nice without some kinked cables. The cables from battery -> BP -> fuse holder are what I got from Travelvolts so assume they're good enough (10mm2, AWG8?). It's all been fused with 60Amp fuses. I'm not going to get anywhere close to that but will keep an eye. I may replace anyway to match the rest which is AWG4.
This is the finished build. The yellow cable is Cat5 from the RS485 connection on the solar charge controller. This will be shortened in due course and is currently connected to a small IoT device which I will probably stow in the seat base somewhere.
Thanks @Rapt0rUK for the inspiration, I saw your build post saying how you wanted to give back to a community, well for me you have!
Rapt0rUK, did get your portable solar stuff working?
Hi, not yet, haven't invested in the portable panel yet but it all looks pretty straight forward. When the time comes I just need to connect to the solar input on the Renogy box.Rapt0rUK, did get your portable solar stuff working?
Will post back here when I do eventually get round to it!
Rapt0rUK I’m copying your setup Renogy lithium and DCC50S, not got any electrics at all at the moment starting fresh. Do you have a layout plan you are working to? I’m trying to formulate some kind of order to progress electrics whilst waiting for roof install!
Cheers
Cheers
So I was complete beginner with this so had a lot of help from other members in particular @Dellmassive. He's done an awesome thread about Lithium so lots of good reading in there:

 www.t6forum.com
In terms of layout I started out with this diagram, I'm only half way through it at the moment though, no solar in place yet and I don't have the battery monitors yet. Might find it helpful though:
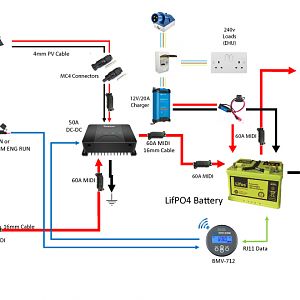
In the end I obviously went with the Renogy battery instead of LifPO4.
Lithium LifePo4 12v Batteries - Time For An Upgrade?
FYI checkout the Renogy Battery monitor that works with that battery . . . . https://www.renogy.com/monitoring-screen-for-smart-lithium-battery-series/ . BTW i contacted Renogy about these, not available on the UK site yet...they expect stock available in the UK in August! US site won't...
In terms of layout I started out with this diagram, I'm only half way through it at the moment though, no solar in place yet and I don't have the battery monitors yet. Might find it helpful though:
In the end I obviously went with the Renogy battery instead of LifPO4.
Not in yet either but I haven't got my hands on one yet so not sure on the physical size, depending on how big it is, might try and squeeze it under the driver seat too but I'm expecting I'll likely have to put it in a cabinet in the kitchen unit. Will try and go the same route as you for EHU, under the bonnet but I'll run the cable under the van rather than through the cab. Guy that fitted our roof told me it's much easier to run under the van and up through a gromit under the drivers seat... Haven't got there yet though! Anything better than taking the cab carpet up again though!Just reading your posts now and dellmassives a mine of info!
where did you fit your mains charger? I’m putting the EHU and consumer unit under the bonnet..
I used Raptors base as a guide too. I have solar and hookup in place. I've got a fairly standard van kitchen in. I haven't mounted it yet but have the IP65 Victron charger, the 15 amp one. They do like a slot in holster so going to mount in that so I can remove to use on something else if I need. I've got the connector at the back of the seat base then. My hookup runs from the back (already had a hole cut when I bought it) so I've run arctic cable from the consumer unit and going to most probably have a CBE mains socket to plug into as it's fairly small and unnoticeable.
Similar threads
- Replies
- 15
- Views
- 700
- Replies
- 4
- Views
- 656