I have scoured the forum and found excellent advice regarding rail fitment but before I start the dreaded drilling, does anyone happen to know the ideal location / measurement for the single rails for a 3/4 California bed on a SWB panel van. I understand that the Cali bed would need modifying if wanting it to slide all the way back to the tailgate but if I wasnt too bothered about that, what sort of distance do I need to be looking at from the front carpet/rubber mat edge to the start of each rail. Again, I believe that too far forwards could mean not being able to fit the bed in the rails so a happy medium would be great. Any help as always is appreciated.
You are using an out of date browser. It may not display this or other websites correctly.
You should upgrade or use an alternative browser.
You should upgrade or use an alternative browser.
Fitting Single Sliding Rails and Cali Bed.
- Thread starter Garny999
- Start date
That would be very helpful, thank you and yes it is SWB.I’ll have a measure up in the morning and attach a couple of photos, I assume it’s for a SWB?
Many thanks @boopzz , that would also be helpful. I thought it may have been a big job to alter the seat, but if its straight forward I would do it. Pics would be appreciated if you get time, cheers.I had mine fitted by kernow transporters. The mod to the seat is quite small, definitely worth doing to be able to move the seat back and give a bigger living space! I can take some photos if you need. Pretty much just grind a corner off so it matches the other side
There must be two types of seat because - in addition to the rear box section - my bed-base needed modifying to slide over the rear arch. When I spoke with Kernow about it Richard was a bit surprised.. But he was also surprised when I pointed out to him that the T5.1 and T6 tailgate vans had a different style rear bumper, so maybe he hadn’t noticed.Many thanks @boopzz , that would also be helpful. I thought it may have been a big job to alter the seat, but if its straight forward I would do it. Pics would be appreciated if you get time, cheers.
Anyway.
The holes for the rails are imprinted in the metalwork underneath the van. Once you have one end, the rest will line up.
When it comes to flooring, make sure you give a good gap around all the metal rail clips, otherwise you’ll have a creaky floor.
Ah, thanks @Ads_Essex . It is a new seat from Richard (Kernow ). He mentioned something about a mod near the seatbelt but to be honest i didnt understand him. I will have a look underneath. Also, the seat is apparently the 2019 version so how would i tell. Its not like I can keep throwing it in the van. This thing as you know is crazily heavy. Thanks again everyone.There must be two types of seat because - in addition to the rear box section - my bed-base needed modifying to slide over the rear arch. When I spoke with Kernow about it Richard was a bit surprised.. But he was also surprised when I pointed out to him that the T5.1 and T6 tailgate vans had a different style rear bumper, so maybe he hadn’t noticed.
Anyway.
The holes for the rails are imprinted in the metalwork underneath the van. Once you have one end, the rest will line up.
When it comes to flooring, make sure you give a good gap around all the metal rail clips, otherwise you’ll have a creaky floor.
Here are a few photos which show the measurements. Its a NWCC Verso conversion, the seat is removable (not done it yet). If the bed board and support is removed the seat goes all the way back or if the bed board is just tilted on the support frame it can give extra space. For two of us we find there is plenty of room without removing or tilting the bed board.That would be very helpful, thank you and yes it is SWB.
There is one photo of the seat back close to the wheel arch, I think I’ve seen a thread on this forum regarding the mod, from what I remember it’s not much more than a quick hacksaw and file job with some fabric tucking and fixing.
I’m very pleased with the rail / cali seat system, it gives so much flexibility with very little effort, however the anodised rail trim isn’t very tough so I’d advise a rug to cover the rails near the side door where there is most traffic.
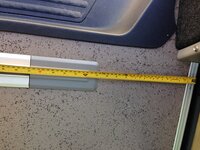
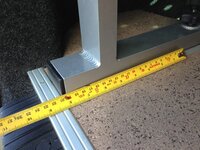
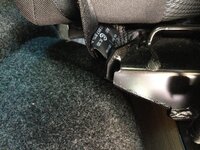
That is brilliant information, thank you. I shall get measuring once I get all this damn heat shield off. Thanks for the great photos.Here are a few photos which show the measurements. Its a NWCC Verso conversion, the seat is removable (not done it yet). If the bed board and support is removed the seat goes all the way back or if the bed board is just tilted on the support frame it can give extra space. For two of us we find there is plenty of room without removing or tilting the bed board.
There is one photo of the seat back close to the wheel arch, I think I’ve seen a thread on this forum regarding the mod, from what I remember it’s not much more than a quick hacksaw and file job with some fabric tucking and fixing.
I’m very pleased with the rail / cali seat system, it gives so much flexibility with very little effort, however the anodised rail trim isn’t very tough so I’d advise a rug to cover the rails near the side door where there is most traffic.
View attachment 69686View attachment 69687View attachment 69688
I don’t think you’d know until you fit it.Ah, thanks @Ads_Essex . It is a new seat from Richard (Kernow). He mentioned something about a mod near the seatbelt but to be honest i didnt understand him. I will have a look underneath. Also, the seat is apparently the 2019 version so how would i tell.
The box section will definitely want trimming - there are photos on here for that. You may as well get the grinder on that now.
The bed-base frame can be removed with the bed fitted, so don’t worry so much about that - it’s four bolts that can be done at a later date, if needed at all.
Thank you @Ads_Essex . It has really been helpful and thanks to @DXX @boopzz for the input. Because of your help I have managed to test fit the bed and all appears fine...very happy now. Not looking forward to the floor but will take it slowly. Here are some pics of todays work. Just need to put the underneath bits back on tomorrow. Thanks again all, without you i would have been knackeredI don’t think you’d know until you fit it.
The box section will definitely want trimming - there are photos on here for that. You may as well get the grinder on that now.
The bed-base frame can be removed with the bed fitted, so don’t worry so much about that - it’s four bolts that can be done at a later date, if needed at all.


Hi @Garny999, great effort and the pics are really useful. Planning to get a Cali seat and rails fitted like yours in the future, but for now we're just going to live with a simple pull out ply bed.
What I was wondering is whether you had some measurements of where the edge of the seat ends up on the right hand side (ie how for does it overhang from the right hand rail)? Or how much space is there between the seat and some datum on the right hand side of the van?
I'm planning to make furniture up now for the van, and want to try sizing it so that the Cali bed will 'just' drop in when we stump up the cash for one in the future. Don't want to make the furniture now and have to rip it all out again when it doesn't fit alongside the seat/bed.
Another question - where did you source your seat and rails from? And if you don't mind me asking, roughly how much did you pay?
I am glad the pictures help just like others pictures have helped me from fitting heater to sliding rails.Hi @Garny999, great effort and the pics are really useful. Planning to get a Cali seat and rails fitted like yours in the future, but for now we're just going to live with a simple pull out ply bed.
What I was wondering is whether you had some measurements of where the edge of the seat ends up on the right hand side (ie how for does it overhang from the right hand rail)? Or how much space is there between the seat and some datum on the right hand side of the van?
I'm planning to make furniture up now for the van, and want to try sizing it so that the Cali bed will 'just' drop in when we stump up the cash for one in the future. Don't want to make the furniture now and have to rip it all out again when it doesn't fit alongside the seat/bed.
Another question - where did you source your seat and rails from? And if you don't mind me asking, roughly how much did you pay?
So, measuring off the frame of the large panel directly behind the seat. (Panel removed as panel depth may vary), you are looking at approx 18.5 ", possibly 18.75" at a push. (47cm or 47.5cm thereabouts.
I purchased rails and seat from Richard at Kernow and will set you back £2500 upwards dependant on what he has in and condition etc.
Hope this helps.


Last edited:
Perfect, thanks very much!I am glad the pictures help just like others pictures have helped me from fitting heater to sliding rails.
So, measuring off the frame of the large panel directly behind the seat. (Panel removed as panel depth may vary), you are looking at approx 18.5 ", possibly 18.75" at a push. (47cm or 47.5cm thereabouts.
I purchased rails and seat from Richard at Kernow and will set you back £2500 upwards dependant on what he has in and condition etc.
Hope this helps.View attachment 69884View attachment 69885
Will be interested to see how you get on with the floor as well and what thicknesses of materials you use. Trying to work out if I can do a standard depth floor for now then add to it later to take in to account the thicker Cali rails (and also not glue floor packers down where the rails will eventually go).
W
Well, intially I was going down the glued batten route but have now been informed by Richard at Kernow to lay the Kombi floor and then lay the 12mm ply on top using gravity only. I will give it a go and see if there is any movement. Probably be okay once biscuit jointed. Failing that I will glue battens around the rails. I,m not sure of the depth of Kombi floor but sure you will be able to build it up. Its just that the kombi floor offers you the insulation/sound deadening. I know its down to money but if I was you I would try to do it now whilst empty.Perfect, thanks very much!
Will be interested to see how you get on with the floor as well and what thicknesses of materials you use. Trying to work out if I can do a standard depth floor for now then add to it later to take in to account the thicker Cali rails (and also not glue floor packers down where the rails will eventually go).
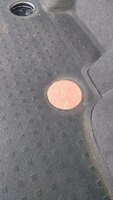
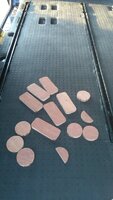
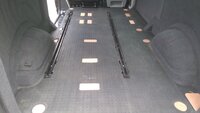
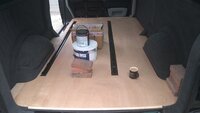
Rightly or wrongly I bonded (sikaflex) these sections of ply onto the van floor in the kombi/load ring cutouts in the mat. Using the sikaflex to make up the difference in height I could adjust them so they sat just underflush of the load mat to allow for some compression in it.
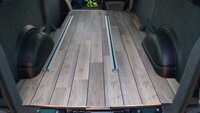
I then screwed (possibly bonded too I seem to remeber to prevent squeaks) the one piece ply floor to these.
Seemed to work well enough. Near side rail aluminium trim was a little 'tight' to get it to clip in though and had to relieve some of the ply to create a slightly bigger gap around the rail/clips.
Honestly @j4ckal that is excellent help as i was pondering about the kombi gaps i'm now going to do the same, looks excellent and as you say offers more stability. A picture paints a thousand words, thanks pal.View attachment 69907View attachment 69908View attachment 69909View attachment 69910View attachment 69911
Rightly or wrongly I bonded (sikaflex) these sections of ply onto the van floor in the kombi/load ring cutouts in the mat. Using the sikaflex to make up the difference in height I could adjust them so they sat just underflush of the load mat to allow for some compression in it.
I then screwed (possibly bonded too I seem to remeber to prevent squeaks) the one piece ply floor to these.
Seemed to work well enough. Near side rail aluminium trim was a little 'tight' to get it to clip in though and had to relieve some of the ply to create a slightly bigger gap around the rail/clips.
Honestly @j4ckal that is excellent help as i was pondering about the kombi gaps i'm now going to do the same, looks excellent and as you say offers more stability. A picture paints a thousand words, thanks pal.
No worries, just be careful you don't make it too high, else with your finished floor covering on you won't be able to click the aluminium trims in place.
This is the reason I went for the thinner of the karndean floor coverings.
Thanks pal, so are you saying I would struggle with a 12mm floor and standard Altro?No worries, just be careful you don't make it too high, else with your finished floor covering on you won't be able to click the aluminium trims in place.
This is the reason I went for the thinner of the karndean floor coverings.
I followed Richards advice - rubber Kombi floor, 12mm ply and some Karndean LVT. Worked a treat.Thanks pal, so are you saying I would struggle with a 12mm floor and standard Altro?
Similar threads
- Replies
- 8
- Views
- 1K
- Replies
- 8
- Views
- 2K
