Blackvue Dashcam Install

Hactus

Kombi 204 DSG 4Motion
VIP Member
T6 Pro
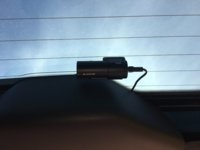
Thought I would post a few photos of the Blackvue cameras that I fitted in the Kombi at the weekend.

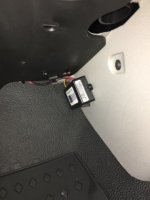
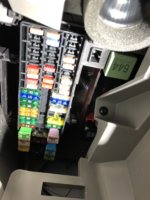
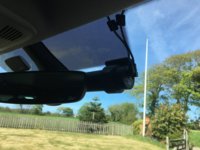
I have the Blackvue 650s 2-Channel Cameras and a Power Magic Pro which I mounted in the passenger footwell. I brought the power cable across from the fuse panel and up the passenger side A-pillar then across the top of the screen to the camera position, plenty of power cable with the spare coiled up and the base of the A-pillar. I also managed to find spare ignition live and permanent live in the fuse panel which with the Power Magic Pro allows the cameras to run when the van is parked and it protects the battery dropping below either 12v or 12.5v depending on how you set the switches.

The rear camera is powered via the coax cable fed from the front camera. The position of the rear camera is mounted just above the rear wiper motor and was not my preferred location. I wanted to mount the camera at the top of the rear screen but the size of the holes in the frame of the tailgate wouldn't allow the connector to pass through so had to route the cable down through the tailgate and out by the motor cover.

Routing the coax cable across the roof was fairly simple after I took the hardboard roof down but the cable that ships with the cameras was only just long enough, its not tight but there is literally no spare.
file1-3.jpeg file-3.jpeg file1-2.jpeg file-2.jpeg
 
Thats great, I've got my dash cam to refit in my new T6 but dont have a clue, how did you get the wires from the roof down to the fuse box, where is the fuse box and how easy is it to get to it, im no keen on trying to pull of panels in my new bus, without some info
 
Thats great, I've got my dash cam to refit in my new T6 but dont have a clue, how did you get the wires from the roof down to the fuse box, where is the fuse box and how easy is it to get to it, im no keen on trying to pull of panels in my new bus, without some info

@Jamroller have a look at some additional photos.

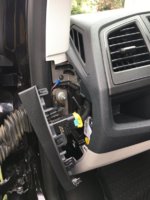
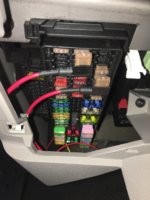
I crossed from the fuse panel across the top of the passenger footwell. By removing the panel with the passenger airbag switch I was able to fish the cables up and then around between the joint with the A-pillar trim and door rubber. At the top of the A-pillar I tucked the cable in between the pillar trim and roof trim round to the windscreen. I then tucked the cable along the front of the roof trim to the camera location. I also picked up an earth at the base of the A-Pillar (see purple cable).

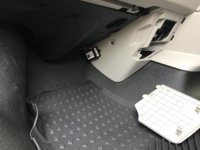
The fuse panel is at the base of the centre console that houses the gear selector. I was able to fish the cables from there to the top right corner of passenger footwell, see pic of the power magic box and you can see the cables.

The panel that contains the passenger air bag deactivation just pulls off, either use some trim tools or pull from where it touches the door rubber.

One word of caution that I read either on this forum or somewhere else - do not disconnect the Air Bag deactivation switch and turn on the ignition as this will throw the airbag fault light and this will need a trip to the dealer to reset.

file-2 (1).jpeg file-4.jpeg
 
Oooh thanks for this, I picked up my T6 last week and have a Blackvue 650 (front and rear camera) and Powermagic ready to install from my old car, at least I have an idea where to look at routing cables etc. now :)
 
@Jamroller have a look at some additional photos.

I crossed from the fuse panel across the top of the passenger footwell. By removing the panel with the passenger airbag switch I was able to fish the cables up and then around between the joint with the A-pillar trim and door rubber. At the top of the A-pillar I tucked the cable in between the pillar trim and roof trim round to the windscreen. I then tucked the cable along the front of the roof trim to the camera location. I also picked up an earth at the base of the A-Pillar (see purple cable).

The fuse panel is at the base of the centre console that houses the gear selector. I was able to fish the cables from there to the top right corner of passenger footwell, see pic of the power magic box and you can see the cables.

The panel that contains the passenger air bag deactivation just pulls off, either use some trim tools or pull from where it touches the door rubber.

One word of caution that I read either on this forum or somewhere else - do not disconnect the Air Bag deactivation switch and turn on the ignition as this will throw the airbag fault light and this will need a trip to the dealer to reset.

View attachment 21432 View attachment 21431
Thanks for this, its a big help, I've got a drop down storage under gear lever as its got the soft dash fitted, ill have a go tomorrow, thanks for the tips much appreciated
 
Mine has the comfort dash too but unfortunately I'm not able to fit my Blackvue this weekend so if you have any tips for accessing the fuse box behindbehi bottle cooler I would be grateful if you could post some tips up here :)
 
Mine has the comfort dash too but unfortunately I'm not able to fit my Blackvue this weekend so if you have any tips for accessing the fuse box behindbehi bottle cooler I would be grateful if you could post some tips up here :)


Yeah I m not sure how the bottle cooler comes out ether
 
I'm just about to do a similar install but I can't quite work out which fuses to tap into...as my fuse box looks different to the one shown above...can anybody point me in the right direction?

IMG_0878.JPG
 
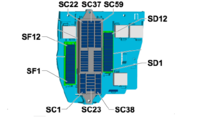
All fuseboxes are the same but fuses will vary slightly depending on fitted equipment, ignore the SF and SD bits on the edge as you dont have them
Upper middle row is ignition live to get a switched supply from

Fusebox C Layout.PNG
 
your be able to hide that "Power Magic Pro " behind the center dash panel by the center fuse box, there is loads of space behind there..

a few screws out and your be able to tuck in behind and make a much cleaner install..
 
your be able to hide that "Power Magic Pro " behind the center dash panel by the center fuse box, there is loads of space behind there..

a few screws out and your be able to tuck in behind and make a much cleaner install..
Reading your posts is swaying me to purchasing a blackvue off amazon and have a go :thumbsup:

(Maybe)
 
just ordered a DR900S-1CH myself =]
go on . . . . give it a go =]
 
I purchased a DR750S-2CH and, being electrically inept, had it professionally installed (not in my T6) a few weeks ago - I'm very happy with the way it has been installed and how it works. I also had the Power Magic Pro installed but I'm not convinced if it was worth it?? The installer left it with cut-off voltage set to 12.5 volts but I found that it was turning off after about 30 minutes in parking mode so I changed it to 12.0v. This was fine for the first couple of weeks but when we left the car at home for a week, the first time I went to start the car gave me a "battery low - run engine" message (Power Magic Pro had done it's job and protected the starter battery) - looking at the Blackvue it appear the voltage dropped below 12v and had stopped recording after less than 3 days - I was hoping for more than this and am considering forgetting about the parking mode and switching the cut-off voltage back to 12.5.

Has anyone got a Blackvue (ideally a 2 channel) that uses Parking Mode with a Power Magic Pro that can comment on how long their cameras keep going?

Thanks!
 
I think the calculations in Leisure Battery - Dead apply as the spec states the same power consumption (350mA, or 300mA GPS and WiFi OFF)
Technical specs: https://www.blackvue.com/product/dr750s-2ch/
Thanks - so my car's starter battery, which I understand to be 80ah, should be capable of powering the dashcam in parking mode for longer than the 3 days it did but probably wouldn't give me the 2 weeks I was hoping for to cover holidays, airport car parks, etc.. I need to look at the configuration to see how the dash cam is set up and if there is anything I can change to improve a bit.
 
I purchased a DR750S-2CH and, being electrically inept, had it professionally installed (not in my T6) a few weeks ago - I'm very happy with the way it has been installed and how it works. I also had the Power Magic Pro installed but I'm not convinced if it was worth it?? The installer left it with cut-off voltage set to 12.5 volts but I found that it was turning off after about 30 minutes in parking mode so I changed it to 12.0v. This was fine for the first couple of weeks but when we left the car at home for a week, the first time I went to start the car gave me a "battery low - run engine" message (Power Magic Pro had done it's job and protected the starter battery) - looking at the Blackvue it appear the voltage dropped below 12v and had stopped recording after less than 3 days - I was hoping for more than this and am considering forgetting about the parking mode and switching the cut-off voltage back to 12.5.

Has anyone got a Blackvue (ideally a 2 channel) that uses Parking Mode with a Power Magic Pro that can comment on how long their cameras keep going?

Thanks!
I haven’t got the same cameras, but I had this same problem with my Thinkware front and rear cameras. These have the power management facility built into them, but I found that however much I played with the battery voltage thresholds I either got a short recording period, or at the other extreme adjusted it so low that it flattened the battery, and never found the Goldilocks setting. I put this down to the eco alternator setup leaving the starter battery in a permanent low charge state due to the 80% setting and ended up disabling parking facility. I have considered wiring in a small usb power pack kept charged from the engine and using it like a UPS to power parking mode, but haven’t got round to doing anything about it.
 
I haven’t got the same cameras, but I had this same problem with my Thinkware front and rear cameras. These have the power management facility built into them, but I found that however much I played with the battery voltage thresholds I either got a short recording period, or at the other extreme adjusted it so low that it flattened the battery, and never found the Goldilocks setting. I put this down to the eco alternator setup leaving the starter battery in a permanent low charge state due to the 80% setting and ended up disabling parking facility. I have considered wiring in a small usb power pack kept charged from the engine and using it like a UPS to power parking mode, but haven’t got round to doing anything about it.
Thanks for the response - it’s not easy to tweak the settings and test with a car that is normally used daily. :)
 
Thanks - so my car's starter battery, which I understand to be 80ah, should be capable of powering the dashcam in parking mode for longer than the 3 days it did but probably wouldn't give me the 2 weeks I was hoping for to cover holidays, airport car parks, etc.. I need to look at the configuration to see how the dash cam is set up and if there is anything I can change to improve a bit.
A challenge being that the battery management of T6 keeps starter battery most of the time at charge state of about 80% so some “loss” in available capacity already there.

Long term limiting factor is that for longevity of starter battery, it shouldn’t go into the state of deep discharge too often. The critical number for lead-acid type batteries seems to be at about 30% of nominal capacity.

So at the maximum the “useful zone” would be from 30% - 80% of nominal capacity - about 40 Ah available. So the maximum "safe" running time for the camera would be less than 5 days (using 8.4Ah/day).

However from longevity point of view discharging below 50% is not recommended in many sources. E.g. the graph “Battery lifetime/cycle number” at Characteristics of Lead Acid Batteries | PVEducation gives some general numbers how “deep-cycling” affects the longevity of lead-acid type batteries. Similar statistics in BU-214: Summary Table of Lead-based Batteries – Battery University

Of course the crucial factor is the remaining energy in the battery needed to start the engine…
 
Back
Top