Audio Upgrade Stage-2 - Vibe Micro Amplifier Plug & Play - How I Done It -
**************
.
Audio Upgrade Stage-1 . . . . Blam Relax 200rs Speakers From Skipton.
.
Audio Upgrade Stage-2 - Vibe Micro Amplifier Plug & Play - How I Done It -
.
Audio Upgrade Stage-3 - Vibe Micro Sub Amp + Jbl Sub - How I Done It -
.
Audio Upgrade Stage-4 - Kicker 15" Sub + Kenwood Amps - How I Done It -
.
**************
its a bit late but here is Stage-2 - VW T6 Vibe Micro Amplifier Plug & Play
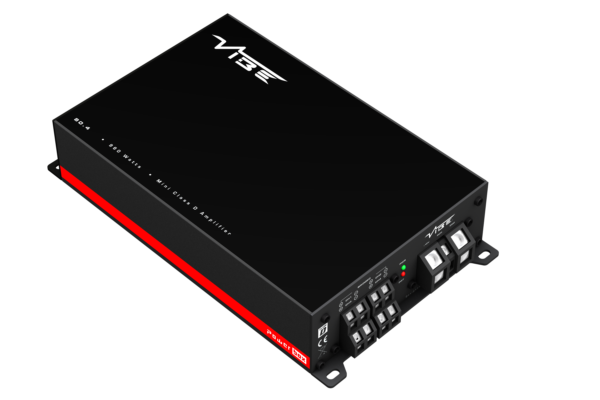
Its a Vibe POWERBOX 65.4M mini 4chnl Amp witha PNP loom for the Disc0 Nav Head unit . . . . .
*************************************
VW T6 Vibe Micro Amplifier Plug & Play
POWERBOX 65.4M
520 WATT MICRO CLASS D AMPLIFIER
4 X 65W RMS
100 % PLUG AND PLAY LOOM MADE BY US SPECIFICALLY FOR THE VW T6
*************************************

.

Now this has been fitted for the last nine months and working great . . . . . . . so lets look back and see - How I Done It -
*************************
It all started after stage-1 > Audio Upgrade Stage-1 . . . . Blam Relax 200rs Speakers From Skipton.
we had the speakers, but wanted a bit more boom . . . . we have the big amps and subs in the back not wired, so for now just a small plug and play solution for a bit more power . . . . This thread Stage-2.
as it turns out Stage-3 is a Mini under seat Sub + Micro Amp . . . . . (comming soon)
So Stage-4 will be the final Big Kicker 15" Sub and Amps setup. (to be fitted)
************************
The kit took ages to arrive from Skipton Car Audio . . .
this is what arrived. . . .

so whats the first thing to do . . . . . . . . Take it appart =].
using so sewing tools we were able to remove the tessa tape loom wrapping and expose the full loom.
this is the Vibe micro Amp front . . .

and rear . . .

.

we can see from the loom that the unit takes power from the same Radio feed and ground.
it also has a auto-switch-on function when it sees an audio signal from the Radio.
each end of the "T6" loom as the ISO block with all the wires linked, which is nice as we have the revers camera fitted.
you can see that most of the wires run direct appart from the 4x speaker wires. . . . They effectivly are cut from the Head-unit and run to the 4chl amp. then the amps 4chnl outputs are connected to the vans speakers . . . . power and ground is feed from the loom and switchon is auto . . .

all the connections were soldered and tessa taped, so being happy with that i tapped it back up . . .

.
Now over to the van, with the radio surround and radio removed we needed somewhere to put the amp. . . .

.
behind the glove-box seemed like a good location, so out it come . . . .

.
with everything connected loosely we run a test . . . . . everything worked great, with an obvious grain is audio power/level.
no to fit it all back in . . . . . which is where the problems started . . . .

there was no way to cram the new breakout loom in any of the spaces behind the radio, we tried de-looming it and all sorts - it just wouldn't fit . . .
this was the problem - that rear of the plastic radio assembly housing . . . . there was loads of room behind it, but just couldn't get the wires there . . . . so the solution?

well three cuts with the multi-tool had that pesky rear plastic part removed and opened up a world of space behind the radio . . . =]
this was the piece we cut out . . . . .

.
with everything refitted we were back to this - a fully OEM factory look, but with better speakers and small amp . . .

The above has been in for 9 months or so now, we have had no issues with the radio or amp, we have had no issues with rattles or anything from the rear plastic we removed . . .
we haven't had any fuses blow . . .
*******************************************************
Things to note . . .
The stock radio in the van is 4chnl - but in this PV setup you only get 2chl speakers, so by adding rear speakers will help you get more power (all 4x chls) from the stock radio.
This amp is only 4x65w which is not much more than the stock radio - this is true, but you can keep the gain low on the Amp and run the radio at lower levels - so the van radio becomes a pre-amp for the Vibe amp . . . all levels are kept low, so you are way down below any distortion levels and have more power at the speakers.
you can gain more power out by adding the 3/4th channel speakers to the amp - this was my original intention . . . . .
But then i thought about getting a small under seat Sub and running the 3/4th channels via a low pass cross over to feed the sub. . . .
But that lead onto stage-3 - coming soon =]
*******************************************************
**************
.
Audio Upgrade Stage-1 . . . . Blam Relax 200rs Speakers From Skipton.
.
Audio Upgrade Stage-2 - Vibe Micro Amplifier Plug & Play - How I Done It -
.
Audio Upgrade Stage-3 - Vibe Micro Sub Amp + Jbl Sub - How I Done It -
.
Audio Upgrade Stage-4 - Kicker 15" Sub + Kenwood Amps - How I Done It -
.
**************
its a bit late but here is Stage-2 - VW T6 Vibe Micro Amplifier Plug & Play
Its a Vibe POWERBOX 65.4M mini 4chnl Amp witha PNP loom for the Disc0 Nav Head unit . . . . .
*************************************
VW T6 Vibe Micro Amplifier Plug & Play
POWERBOX 65.4M
520 WATT MICRO CLASS D AMPLIFIER
4 X 65W RMS
100 % PLUG AND PLAY LOOM MADE BY US SPECIFICALLY FOR THE VW T6
*************************************
.
Now this has been fitted for the last nine months and working great . . . . . . . so lets look back and see - How I Done It -
*************************
It all started after stage-1 > Audio Upgrade Stage-1 . . . . Blam Relax 200rs Speakers From Skipton.
we had the speakers, but wanted a bit more boom . . . . we have the big amps and subs in the back not wired, so for now just a small plug and play solution for a bit more power . . . . This thread Stage-2.
as it turns out Stage-3 is a Mini under seat Sub + Micro Amp . . . . . (comming soon)
So Stage-4 will be the final Big Kicker 15" Sub and Amps setup. (to be fitted)
************************
The kit took ages to arrive from Skipton Car Audio . . .
this is what arrived. . . .
so whats the first thing to do . . . . . . . . Take it appart =].
using so sewing tools we were able to remove the tessa tape loom wrapping and expose the full loom.
this is the Vibe micro Amp front . . .
and rear . . .
.
we can see from the loom that the unit takes power from the same Radio feed and ground.
it also has a auto-switch-on function when it sees an audio signal from the Radio.
each end of the "T6" loom as the ISO block with all the wires linked, which is nice as we have the revers camera fitted.
you can see that most of the wires run direct appart from the 4x speaker wires. . . . They effectivly are cut from the Head-unit and run to the 4chl amp. then the amps 4chnl outputs are connected to the vans speakers . . . . power and ground is feed from the loom and switchon is auto . . .
all the connections were soldered and tessa taped, so being happy with that i tapped it back up . . .
.
Now over to the van, with the radio surround and radio removed we needed somewhere to put the amp. . . .
.
behind the glove-box seemed like a good location, so out it come . . . .
.
with everything connected loosely we run a test . . . . . everything worked great, with an obvious grain is audio power/level.
no to fit it all back in . . . . . which is where the problems started . . . .
there was no way to cram the new breakout loom in any of the spaces behind the radio, we tried de-looming it and all sorts - it just wouldn't fit . . .
this was the problem - that rear of the plastic radio assembly housing . . . . there was loads of room behind it, but just couldn't get the wires there . . . . so the solution?
well three cuts with the multi-tool had that pesky rear plastic part removed and opened up a world of space behind the radio . . . =]
this was the piece we cut out . . . . .
.
with everything refitted we were back to this - a fully OEM factory look, but with better speakers and small amp . . .
The above has been in for 9 months or so now, we have had no issues with the radio or amp, we have had no issues with rattles or anything from the rear plastic we removed . . .
we haven't had any fuses blow . . .
*******************************************************
Things to note . . .
The stock radio in the van is 4chnl - but in this PV setup you only get 2chl speakers, so by adding rear speakers will help you get more power (all 4x chls) from the stock radio.
This amp is only 4x65w which is not much more than the stock radio - this is true, but you can keep the gain low on the Amp and run the radio at lower levels - so the van radio becomes a pre-amp for the Vibe amp . . . all levels are kept low, so you are way down below any distortion levels and have more power at the speakers.
you can gain more power out by adding the 3/4th channel speakers to the amp - this was my original intention . . . . .
But then i thought about getting a small under seat Sub and running the 3/4th channels via a low pass cross over to feed the sub. . . .
But that lead onto stage-3 - coming soon =]
*******************************************************
Last edited:


")
