A Pillar Trim interchangeability - T5.1 & T6 Cali

andys

Ex member
VIP Member
T6 Legend
Anyone know if the T5.1 and T6 A pillar trims are interchangeable? I know I'd have to transfer tweeter grilles if I wanted to use aT5.1 trims but that wouldn't be a problem. I see that accessory companies sell grab handle kits that fit both so I'm assuming those bolt holes are the same but I'm not sure of the rest.
Did VW change the length/rake of the actual A pillars or was it just a facelift and new bonnet?
 
They’re completely different down the bottom where they connect to the dash.
 
They’re completely different down the bottom where they connect to the dash.
Ah bu&&er I never thought of that. Could kick myself as I'd had a pair spare in the garage for 3yrs but gave them away as I assumed I'd never need them but I could have cut them around to see if I could have adapted them then recovered.
 
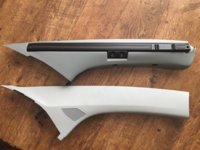
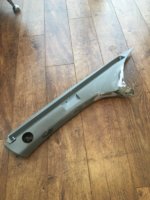
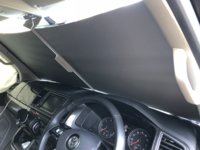
Right I've now got the T5 Remifront blinds and also a spare pair of T6 A pillar covers to see if I can marry them up and this is how they look next to each other.

IMG_4843.jpg

They're actually pretty much the same length at the front, but as @Deaky said they're completely different at the bottom with the T6 covers being much more steeply curved at the bottom and coming well down at the back, so the T6 dash must come substantially lower at that point. They're also a bit more curved as they go up, but that's not too much of an issue.

Here they are with the T5 cover overlaid on the T6, you can see how much more material the latter has.

IMG_4846.jpg

The T6 also has the tweeter grille missing from the T5, and the T5 the rear air vent missing from the T6.
So the options as I see it are

1) Remove the blind mechanism from the T5 cover and cut a slot in the T6 one to accomodate it. This would be the most technically difficult but likely to give the most OEM result.

2 Trim and shape the T5 cover, cut and transfer tweeter grille, cover the air vent, cut off and epoxy the T6 lower section onto the T5 pillar, and recover the whole thing to hide the Frankenstein appearance. This sounds more effort but would be more forgiving of small mistakes whereas option 1 is a one-chance only deal

I'll post up pics of however I attempt it but any comments welcome.
 
First step in this project today was to whip the existing trim off, test fit the T5 panel and see just what the differences are and what needs to be done to make it fit.
Pretty happy with the result, it's going to take much less work than I thought, the trim lines up on the sides fine and just needed a little nibble off the top to make that fit perfectly (which I also seem to remember having to do when fitting these to an actual T5!). So the main difference is the gap at the bottom as below
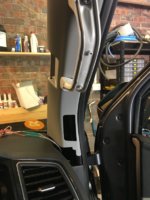
IMG_4859.JPG

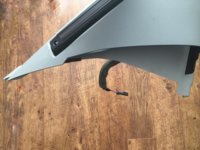
In addition, the holes for the A pillar grab handles needed dremelling slightly (see difference below)
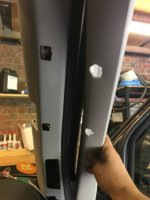
IMG_4855.JPG

This is needed to accomodate the trim that fits into that hole, but it's a separate piece, detachable from the base of the handle which leads me to wonder if the actual handles are the same, but the different collar trim was needed to fit the slightly different contour of the T6 trim. In any case I'm not going to the expense of T5 handles, in fact I'm not sure I'll even have grab handles at all, I've never used them.

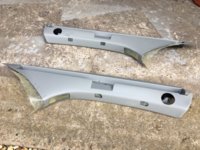
As a result of the trial fit, I've realised what a waste of perfectly good T6 trims it would be if I just cut a bit off the bottom, so after making a paper template of the gap, I've decided to build that up in fibreglass instead. I was going to have to re-cover anyway. I will have to fill the air inlet hole (or fit dummy T5 grilles) but I also spent some time experimenting with tweeter position and have decided not to cut in a T6 position tweeter grille, as the soundstaging and treble sound were much improved by moving both further up the A pillars and facing the driver. So I'll probably cut those in either near the top or in the top hole for the grab handle. There's plenty of room behind the trim in all the possible positions so I won't need to make a protruding pod.

Here's the only extra bit that will need building in, next stop to get some fibreglass kit and see what I can do with that.
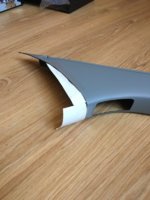
IMG_4861.JPG

By the way, anyone got black A pillar trims? Mulling that over when I come to decide on the covering.
 
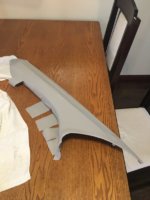
Made some progress on this today. I've decided I will scrap the grab handles so removed the mounting plates from the pillars and covered the trim holes and T5 air vent openings with fibreglass. Also put a piece across the bottom to fill the gap that results from the T6 dash being lower towards the driver at each end. Only put one layer on for now as I wanted to get the basic shape and curves right, and tomorrow I'll carry on building up the strength with more layers, though not too much as they will need to flex a bit going in and out. Then after that I'll cut the bottom to fit, and fill and smooth everywhere down with flexible filler before covering it. My initial idea was to copy @StudleyGlass design above, but I baulked at the cost of alcantara and decided to go with vinyl instead (great service and quick delivery from AS Trim). Then ended up copping out even more and going for light grey as I wasn't sure how black vinyl would look on the A pillars. I can always spray them with black vinyl paint if I wanted to. Also cut holes to relocate the tweeters near the top of the pillars as this just leaves room to fit 3" mids at the bottom behind the blinds if I want to fit them. Never done anything like this before so god knows what it'll turn out like, but I'm enjoying it immensely.

IMG_4886.JPG
 
Slow progress on this. Ended up spending yest aft and this morning helping out an old guy down the road so only got to finishing the sanding this afternoon. All the unwanted holes are covered and despite appearances they're completely smooth.
IMG_4889.JPG

Then got to the tricky bit, covering with vinyl. I coated both surfaces with the contact adhesive and waited for the 20 mins it said, and the laid the trim on the vinyl, starting at the centre. I pressed down across the flat parts and pushed into the edges of where I needed to cut material out for the blinds and handle. Then I pressed it down over the flat straight frot edge and folded it over, following it round the sharp front point and along the bottom. So far it was going well and I was feeling quite smug about how quickly I was going to get it done.
And then it all started to go wrong.
I started to work up the back to the compound curves and realised I needed to cut slits in it as I was going so that it would sit right. Had to keep pulling it off and round to get folds out of it as I cut the slits, and then realised I had cut into parts of the vinyl that would show :(
IMG_4890.JPG

So I've ripped it off and had a break from it. I've got enough vinyl to cover one cockup, but I need to get the next two right so I'm going to scan Youtube for tutorials and see if I can learn how I can do it properly.
 
Well done mate. Good honest reporting.. nice to see how things are really done..
 
Thanks @Fish, I figure someone else might learn by my mistakes even if I don't :laugh:

The internet reckons heat is the answer so I'll get the heatgun out and have another go in a bit. That's going to be fun, it's still 28º outside and I'm going to be using a heatgun :(
 
Great write up buddy been watching the progress on this, I’d use a hairdryer mate instead if a heat gun think it would be more than adequate;)
 
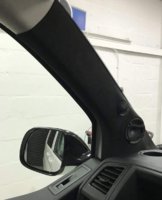
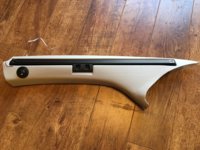
Tada! :D Don't have a hairdrier in the house @Roca but a heatgun did the trick. Really tricky job as I haven't done this before and this has many more intricate bits to go round than a normal A pillar. It's not perfect, but it was never going to be, and it needs trimming and reglueing in a couple of fairly hidden places, but I've run out of contact adhesive. Incidentally, if anyone does this for god's sake use spray adhesive, for some reason I bought brush-on and it's terrible!. It's a bit lumpy near the bottom where I should have blended the extra fibreglass extension into the T5 pillar a bit more gradually, but it's close enough that I can live with it fine without feeling the need to rip it off and start again. I've left the driver's side til last as hopefully I'll take the lessons learnt and the second time will be better - it's going to be closer so faults will bug me more. So here is the finished article, I'm going to sit down with a beer now :thumbsup:

IMG_4893.jpg
 
Nice project, nicely done.
Could you have used California A pillar trims with the built in blind?
 
Nice project, nicely done.
Could you have used California A pillar trims with the built in blind?
Yes I could have done but the ones I saw were way more than the £200 I paid for these, and they didn't seem to cover as well as the Remifronts
 
Back
Top