@Thoggs lining as it happens

No problem at all.:thumbsup: we will try to keep it updated, especially when we are working on forum members vans but we are so busy that sometimes it can be hard to find the time to keep uploading pics as we go day to day.
 
Sorry its been a while since we last posted anything but it has been absolutely manic in the workshop recently. I had been toying with the idea of selling pre carpeted panels and carpeting kits but with the workshop nearly fully booked for the rest of 2017 and every thing else we have in development I have decided (been told!) we just dont have time to do this aswell. However we will be bringing our HPL panels to market in the next few weeks these wont use hidden fixings but do look absolutely amazing and can be fitted in no time and look great with or without carpet on the metal work. :thumbsup:
 
A while ago I mentioned on here that we were working on something a bit special at slidepods hq with our new Teign conversion. We have built one before as a bespoke comission and it was such an intensive build I swore I would never ever ever build one again. However we displayed the van at camperjam and busfest last year on our trade stand and due to the popularity of it we decided to take it into production and get it all designed up on CAD for CNC cutting. This conversion is only available on lwb vans and wont be to everybodys taste but variety is the spice of life and as you would expect from us its deffinately not the normal way of designing a van conversion. Im not going to bother boring you with all the details of how we went about lining the van as if you have read through this thread you will know (if you havent read this thread and are thinking of lining your own van or commissioning a company to do it I suggest you do). Any way in order to give you something to look at here is a picture of the CNC cutting the first sheet of lightweight ply for the cabinatery which is due to be assembled next week (any guesses on what colour the van might be?).
20170412_154319.jpg
 
Another little detail added to this van is the upgraded front steps with courtesy lights we have installed. Ill post up a pic when I get to the workshop of them working and in place. When we install these we actually go to the trouble of building a replica of the VW loom using all the proper loom clips.

IMG-20170308-WA0004.jpeg
 
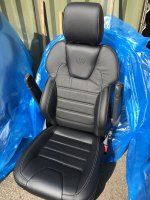
Also we have been working closely with the trimmer we use to develop a recaro style upgrade for normat T5 and T6 seats with embossed details. It has been done before but it was important to us to continue to keep our buisness local to be able to offer flawless support to our customers in the future. Here is an example of what I am talking about and needless to say we are taking them to the next level for the Teign conversion.

IMG-20170411-WA0005.jpg
 
Bit of a giveaway but I'll say blackberry.

10 out of 10!

Yep we agonised over this colour decision with our customer as blackberry is a hard colour to compliment. We wanted something bold and origonal that would really pop when the back of the van was opened without being overpowering inside the van.
 
I will be very interested to see the final result.
BTW I'll give you a call re the work I have scheduled with you - want to talk amps and a couple of other things ;)
 
@slidepods dare I ask the cost of the seat, it looks awesome

I totally forgot to check today whilst I was at the workshop what the price we are doing the current set for was. To be honest when I chatted to our trimmer I thought it was going to be a lot more than it actually was. I did have a little sit in the set in the picture I posted up and it made my mind up that they are deffinately going in my van :thumbsup:
 
Next update......
As you can see here we use MDF to mock up a conversion first (I know, I know its cheap nasty stuff that shouldnt rear its ugly head in any quality conversion, other than sub boxes but rest assured it all ends up in the bin in the end). In fact we actually mock it up twice once using jigsaws to get our scribed templates perfect and then again for the first run on the CNC after programing the CAD designs. This allows us the ability to make any fine adjustments we need to before starting to cut the lightweight ply for the first time.
The one pictured here is the second mock up cut on the CNC machine. If you look closely now all the details are there to see what the finished product will be like :thumbsup:
20170411_080535_zpsmfanolfn.jpg
 
Another little feature for this van is the underslung water tank with level sender. Its a popular upgrade for our customers however we have never been happy with the off the shelf fixing methods provided within the market as they involve drilling the fixings through the vehicle floor and are a nightmare if you need to drop the tank down again in the future.
So we have taken it upon ourselves to engineer our own in house stainless steel bracket system :thumbsup:
This allows us to fit a whopping 57 liter under chassis fresh water tank without peircing the floor.
20170427_101832_zps4e0mjco8.jpg
 
Do you sell the bracket kit? I would be interested if you did. I assume it's compatible with the off the shelf cak tanks?
 
Its not a CAK tank we use. We are planning on selling a kit with everything needed to install including the tank. You will need appropriate tools to install M8 captive rivnuts though to install it.
 
Another little feature for this van is the underslung water tank with level sender. Its a popular upgrade for our customers however we have never been happy with the off the shelf fixing methods provided within the market as they involve drilling the fixings through the vehicle floor and are a nightmare if you need to drop the tank down again in the future.
So we have taken it upon ourselves to engineer our own in house stainless steel bracket system :thumbsup:
This allows us to fit a whopping 57 liter under chassis fresh water tank without peircing the floor.
View attachment 7411
That, like your other work, looks a quality installation and would appear not to interfere with the under vehicle airflow :thumbsup::thumbsup::).
 
Back
Top