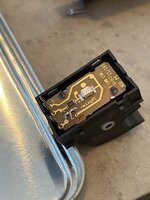
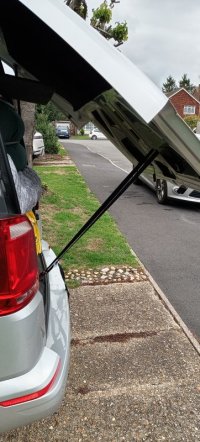
that looks pretty good for non OEM.Same. Took the feed from the numberplate light and job’s a good’un.
Just need to fit @Willoughby’s extra unlock switch now..
Tailgate - opening from inside?
- Thread starter scotia
- Start date
Yes, but then I don't have kids, and they shouldn't be in that part of the van while it's moving anyway.
If you have the auto lock set to lock the doors when moving, does this disable the electric unlocking on the rear door (so you can't open the door from the outside)? If so then the inside button should have no effect either.
If you have the auto lock set to lock the doors when moving, does this disable the electric unlocking on the rear door (so you can't open the door from the outside)? If so then the inside button should have no effect either.
Tailgate can be coded to lock automatically - independently of general central locking.Looks good, any chance it could be knocked by anything inside is my concern.
---> [Guide] Retrofitting an internal Tailgate release switch
I just purchased these too, but found out that even 180ohm wasn’t working on T6.1 -20. I opted to open the switch, and using a soldering iron to bump the 180ohm resistor away and bridge these contacts to make it a plain switch with no resistors.To help you to avoid wrong colour here are part numbers for a factory fitted black switchfrom a panel van:
Switch 7E5959551 (black)
Frame 7E0858099 (black)
View attachment 21556
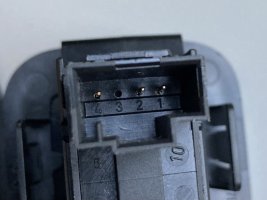
The OEM switch has 180 ohm resistor built in between pins 1 and 4 (switch doesn't short circuit but 180 ohms) but anything less than 370 ohms seemed to work.
In my panel van the switch was active (to open the tailgate) only when doors were unlocked as it seemed to be just parallel to outside switch. Couldn't open it if doors were locked by remote. I didn't verify it it was different if locked from drivers door.

There is a previous forum post including a how to video. It explains exactly how to do this & the fittings required. If you can solder wires you should be able to complete this.

 www.t6forum.com

[Guide] Tailgate switch retrofit How To Video
Hi all, I’ve made a video on my YouTube channel to show how to retrofit a tailgate switch to open it from the inside, take a look and subscribe if you like what you see Cheers, CDAT
Thanks for this guys. I had the same question and this really helped me to do this to a VWT6.1 with tailgate boot.
It only took about 1 hour in total to fit a push button switch to the inside of my tailgate door. Here's some pictures to help out anyone else who's looking at this job:
Here's what you'll most likely need:

Image 1: Tools. Note I've shown two red connectors to splice in, but in the end I went for male/female connectors which can be pulled apart if needed so that in the future if I need to remove the panel the cable can be disconnected and then reconnected.
Once you've unscrewed the back panel to expose the inner gubbins of the door. Near the bottom you will find this:

Image 2: Identifying the two cables to splice into. They are white and go into the switch via a pale blue connector. Polarity is not important as it is simply about closing the circuit.

Image 3: Belt and braces, I don't want any condensation/moisture getting to the switch as any short would open the door. So I've gone overboard with the heatshrink to make sure it's well protected.

Image 4: OK so I've spliced in a short length of heavy duty outdoor grade two core with a male and female connected on the end. This is to receive the corresponding connectors from the switch assembly. Note in the inset I've heatshrink sheilded the female connector. The same is done to the female connector on the switch assembly therefore reducing risk of short circuit between the two. Note the voltage through these cables is about 4v as all it does is trip a solenoid/relay to activate the actual locking mechanism.
I'm not an electrician so this is just how I've done it. I'm open to feedback as ever and thanks to everyone who's contributed to this forum, it's really helpful!
The splice was done without cutting the original cables, I exposed some cable and then soldered the new cables in place before re-insulating... but it's hard to solder on the underside of a tailgate that's almost 2m in the air... here's my solution:

I could then sit on the bumper and save myself a lot of shoulder strain!
It only took about 1 hour in total to fit a push button switch to the inside of my tailgate door. Here's some pictures to help out anyone else who's looking at this job:
Here's what you'll most likely need:

Image 1: Tools. Note I've shown two red connectors to splice in, but in the end I went for male/female connectors which can be pulled apart if needed so that in the future if I need to remove the panel the cable can be disconnected and then reconnected.
Once you've unscrewed the back panel to expose the inner gubbins of the door. Near the bottom you will find this:

Image 2: Identifying the two cables to splice into. They are white and go into the switch via a pale blue connector. Polarity is not important as it is simply about closing the circuit.

Image 3: Belt and braces, I don't want any condensation/moisture getting to the switch as any short would open the door. So I've gone overboard with the heatshrink to make sure it's well protected.

Image 4: OK so I've spliced in a short length of heavy duty outdoor grade two core with a male and female connected on the end. This is to receive the corresponding connectors from the switch assembly. Note in the inset I've heatshrink sheilded the female connector. The same is done to the female connector on the switch assembly therefore reducing risk of short circuit between the two. Note the voltage through these cables is about 4v as all it does is trip a solenoid/relay to activate the actual locking mechanism.
I'm not an electrician so this is just how I've done it. I'm open to feedback as ever and thanks to everyone who's contributed to this forum, it's really helpful!
The splice was done without cutting the original cables, I exposed some cable and then soldered the new cables in place before re-insulating... but it's hard to solder on the underside of a tailgate that's almost 2m in the air... here's my solution:

I could then sit on the bumper and save myself a lot of shoulder strain!
I've just bought an OEM switch, and would love it to work when the doors are locked. Did you get it coded @mmi and if so do you happen to remember what settings were required? I'm not really familiar with VCDS so would need to take it somewhere and give them some specifics to get it done, but I couldn't find anything in any VCDS-related threads. Thanks!EDIT2 (3 years later): The BCM differentiates switches inside and outside by the 180 resistance on the wires. Thus internal switch needs to be coded as a) installed and b) enabled. This coding allows tailgate opening from inside even when the doors are locked.
I've just bought an OEM switch, and would love it to work when the doors are locked. Did you get it coded @mmi and if so do you happen to remember what settings were required? I'm not really familiar with VCDS so would need to take it somewhere and give them some specifics to get it done, but I couldn't find anything in any VCDS-related threads. Thanks!
Just need to flip two bits -
- to tell BCM the switch is installed - byte 2, bit 6 = 1
- to enable tailgate opening with the switch - byte 1, bit 4 = 1

T6 - BCM Central Electrics Decoder - Codings, Adaptations, Measurement Blocks
VIP Membership is required to download this document Excel 2016 spreadsheet for decoding T6 BCM Codings, Adaptations and Measurement Blocks. The decoding procedure is straightforward: just copy coding string from VCDS, OBDeleven, Carista etc...
Connect your new momentary switch across the wires that lead to the plug that goes into there, you should be able to work out which ones you need to connect to by seeing which wires connect together when you operate the handle
Sorry, that photo is the new momentary switch. So I will chop into the existing wires and bring them to pins 1 and 4 (another thread states that pin 2 is for illumination, which I don't want). The easiest way to connect the new wires to those pins would seem to be to put them into a plug which will then fit the switch, but I have no idea if this is a proprietary VW plug, or some kind of industry standard, or what to even Google to try and work it out.
For anyone looking at this thread in future, the answer to my own question is that it seems to be a proprietary plug:

I found a helpful ebay seller who was able to supply it, even though it wasn't listed by default on his page. It would appear it's now (Nov. 2024) a standard listing. He assures me the terminals required to fit it are standard automotive parts but I'm yet to test that theory.

I found a helpful ebay seller who was able to supply it, even though it wasn't listed by default on his page. It would appear it's now (Nov. 2024) a standard listing. He assures me the terminals required to fit it are standard automotive parts but I'm yet to test that theory.
I had done the splice. And found it only worked after the van was unlocked from the fob and then only after a side or front door had been opened.
So I no longer use the switch. I am interested to try your plug if it works.
So I no longer use the switch. I am interested to try your plug if it works.
That’s quite possible the case. There was an option to disable tailgate opening on my Carista Evo OBD.l
Which goes to show that everything on the van is input/output controlled.
Which goes to show that everything on the van is input/output controlled.
Similar threads
- Replies
- 1
- Views
- 764
- Replies
- 0
- Views
- 280
- Replies
- 2
- Views
- 613

