@Camper Essentials


i see you show the C-rail with cutouts for the VW OEM two bar roof rack system.

...


this is my van . . . looks like i had the roof rack fitted to holes 2 & 3

...

1684251232509.png


what's the best way to go if i want to fit my roof bars and having your:

LWB interchangeable C-rail . . .


1684251344314.png


.
 
Hi,
Good to see you habe one of my rails. I have a few ways of integrating roof racks and roof bars with my latest profile that you have there without any modification to the awning rail so the awning rail works perfectly as though there was nothing sat on top of it but it's still totally hidden in the gutter:

OEM Logo Roof Rack - sits on top and I supply a 4mm rubber block. You can therefore use in any bolt position.

Thule Roof Racks - sit on top no modification needed at all. I can supply roof racks.

Longitudinal aluminium roof rails - my spacer system replaces spacers that come with them and integrates seamlessly.

Other roof racks. Send me photos, I usually have a solution.

Thanks
Sach
Camper Essentials
07900600886
www.CamperEssentials.co.uk
 
Awesome, that's great @Camper Essentials

ill get your spacer blocks sorted out.

FYI, here are some close ups of out OEM VW Bars . . . .


looks like the OEM bolt protrusion is about 10mm.

1684592143988.png1684592153909.png1684592177741.png1684592168520.png1684592190601.png
 
The Journey Starts Now - For Real !!!

...

its finally happened - we got ourselves a van.

:mexican wave:

well a second van of sorts.

as per the thread, my MY18 PV will stay as my work van.

so here it is, meet our newest family member . . . . . .


1692875813342.png1692875829178.png

1692875874166.png1692876717472.png1692876687199.png1692876667742.png

+++

a massive thank you to all those that have helped get us this far, without your help this wouldn't have happened.

weve begged, borrowed, blagged, sold, anything and everything to get to this point.

and as we all know these vans are money pits, so will continue the begging, borrowing and selling to fund the onwards upgrades.


a special thank you to to these guys for directly helping in one way or another towards the van, either by donations or buying stuff from us:


@czmate1999
@starstruck
@Pauly
@anonomous donation
@BoroBoy
@WeaWar
@Sabre
@cgtmiles
@Deaky
@Wanderlust
@Eli
@VanDamMan
@Jollyvan
@Mick
@Ricardo T


+++++


to get added to the list:

donate here: Dellmassive`s Camper Van Adventure

or

buy some stuff here: For Sale - @Dellmassive - List of SALE items & Garage Clear-out


.


++++++
 
so what have we got . . . . ?

its a 2017/18 VW T6 Transporter SWB T30 DSG, AC, Trend Line Panel Van,

well it started off as a panel van, - for its first three years.

Then a Forum member bought it, and over his owner ship:

added the OEM Kombi floor and 1+1+1 2nd row seats,
added a passenger captains chair,
added sound insulation
added carpet and roof lining
added to rear LED lights,
added side sliders camper glass windows,
added THQ headlights
added Amorok 18" wheels
added Koni suspension,


+++++++++++++++++++

1692876850616.png


++++++++++++++++
 
Last edited:
lets take a look at whats been done before we got it. . . ?

"SWB, 80k miles. FSH, second owner and I know the first. I brought it sept 2019.
cam belt water pump and aux tensioners done earlier this year."

the van started out this this. . .

with full bulkhead and double van bench,


1692877644534.png


sound deadening was added. . . . .

1692877700415.png1692877709241.png1692877722932.png


then insulation was added . . . .


1692877764976.png


the side windows were added. . . .


1692877841755.png1692877851090.png


as were the 2nd row seats. . . .

1692877896530.png1692877908720.png

then full carpet lining. . . .


1692877944189.png1692877968951.png

1692878012978.png
.

the ceiling was recovered, in a squishy covering that seems better than the EOM cab head lining. . . .

that finish looked good to me. . . .


1692878070817.png1692878081791.png1692878113478.png


+++++++++++


back to the exterior . . . . .

we have Amorok 18" steels. . . .

"Amarok 18’s and Michelin Cross climates with about 3-4mm on front and 5-6mm on rear."

1692878246176.png

..


and fancy suspension from @CRS Performance which you can see here,

"CRS Performance installed Koni shocks and springs."

but I've checked and they are on there . . .


1692878323263.png1692878375328.png


+++


THQ v3 headlights


1692878529476.png


+++

1692877927373.png
 
thats the good bits. . . .

so what about the not-so-good-bits.


as an ex-fleet van there are some battle scars that i expected.

some worse than others,

all can be addressed - at a price.

so ill list them here and address them at some point allong the road.

..
Ding!


1692879158492.png

..

bang !

1692879185828.png


..

ouch,


1692879205068.png

..

oops,


1692879226413.png

..

crunch,

1692879241012.png

..

oooh,

1692879266476.png

.


argh,

(slight ripple dent in roof)

1692879320830.png

..


Drivers door hinge spring snapped off - this is well annoying.

..


nothing major that cant be fixed.


+
 
Last edited:
Thats the van so far. . .

Now for us to start adding our touch. . . . .

the first thing the "Chief Advisor" wanted was to be able to sleep in the van.

we had already decided that an Ovano bed/box system was the way to go.

but just to double check we done a few evenings research to make sure,

we didnt like the forty-winks style bed board.


1692880087775.png

...


but did like the Ovano style boxes,


1692880142960.png


we also looked at U style side boxes with pull out bed. . . .

this is what the previous owner had used. . . .

1692880207977.png


+++++++++++


So Ovano Box it was. . .

lucky for us the Forum come to the rescue with a seller offering a Ovano XL SWB box.

(his setup)

1692880332315.png

a quick trip across country in the van . . . . and:

Here it is. . . .

:mexican wave:


1692880481736.png1692880493182.png1692880694892.png1692880505030.png1692880522420.png


we couldn't reuse the existing triple squared D-ring lashing point bolts.

so a quick trip to B&Q got me some M8*100mm bolts and M10 washers.

that had the Ovano securely fixed into the van at the four fixing points.

..


.
 
what about a mattress . . . . ?

we had been doing the rounds at Forum meets, busfest, camperjam etc etc and looking into bedding.

and at the time had decided Duvalay was the way to go.


1692880955275.png

++

but now we had the van,

we decided we already had a ton of camping sleeping back and sheets and covers and mats and. . . . . . etc etc etc ,

so decided we just wanted a foam mattress.

we had looked at the roll up inflatable double mattress, but decided that as the van needed to be a daily driver, that the camping stuff would be loaded in/out of the van as needed.


so things like sleeping bags and mattresses didnt need to live in the van,

so space was not a concern.


...


in the end we decided to go for the Forty-Winks Premium mattress and storage bag.


whether this was the right decision, only time will tell as we haven't actually used it yet.


it is very firm - thats for sure.

and the carry bag is way over priced for what it is.

++++


1692881278483.png


+++


1692881306039.png

+++


this is ours,

it fits on the Ovano perfect, and has the cut outs for the rear D-Pillars.

1692881405107.png


+++

standard mattress vs the premium,

the premium has the memory foam topper.

1692881640150.png1692881650743.png


............


so when laying the mattress out in the van, you need to have it the right way up. . .


weve worked out that if you have this TAB at the TOP, the mattress will be the correct side up.


1692881733010.png


++


well get back to with how we got on with it.


++
 
ok so thats the bed sorted,

which led us to the first problem. - Space !!!

right away we realised that with the 2nd row seats folded down and the bed set,

there was no room to move, let alone swing a cat or boogie.


1692881962432.png


the idea being we had three setups in mind.

+++++

1- wild camp ( no external kit)

2- short stay ( railsail + wind breaks + camp chairs)

3 - longer stay ( Vango Gali 3 drive away awning + everything)

+++


and in almost all three of the these setups the wife wanted the PortaPotti inside the van for the night time comfort breaks (an F1 term)

.


well no chance here,


the first thing to do was remove the 3 rear seat when camping, but space was still too tight - we are SWB remember.

so the next option was Swivle seats . . .

:mexican wave:


yes we will be looking into poptops etc - but thats later on.

for no we have to deal with what we got.

++++

when i though swivles, the first name that come to mind was Rusty-Lee.

but,

after some research on the forum it was clear that that wasnt the best idea as the wobblw and rattle.

so the RIB and a couple of other names poped up.


+++

KIRAVANS see to keep coming back as stocking some real decent quality kit,

we had recently bought a railsail from them, amongst other things.

so went back to have a look at swivles. . .


.


they stocked the RIB version, which didnt need a drivers side handbreak kit?


1692882496933.png


+

but at the last second decided to go for the KIRAVANS home brew version.

+++

the full kit was cheaper that the RIB,
offered lower overall Hight @ 19mm rise,
safety tested,
good warranty,
come with two swivles and handbreak kit

1692882645365.png


++++

Description​

We've tried every single seat swivel on the market. Over the years we've sold thousands of RIB, Aguti & Sportscraft swivels.
... and we've experienced every single squeak, wobble & difficulty of fitting these things! So we set out to resolve each of them:

MEET THE ALL NEW KIRAVANS ULTIMATE SEAT SWIVEL​

  • Guaranteed no wobbles & squeaks - we've engineered them out.
  • Fits driver (when you add on a handbrake lowering kit) & passenger side - one swivel to replace them all.
  • Rotates clockwise & anticlockwise - your choice.
  • Minimal height - at 19mm we think its the lowest on the market.
  • Incredibly easy to install - our record is 4 minutes. (watch the video).
  • OEM quality finish - we design stuff properly, to look good & work properly.
For the driver seat we've also created a great looking handbrake lowering kit that's dead easy to fit. No longer do you need to fashion a naff wooden box around your handbrake ;-)

GOOD TO KNOW​

  • Kiravans Ultimate Seat swivel is designed AND manufactured right here in Yorkshire
  • The swivel locks in place facing forward, but when reversed it remains free to move with your body
  • Its compatible with heated seats, airbags & the Kiravans T5/T6 Double swivel
  • Of course it is safety tested by VOSC to the relevant standards.

NOT SURE?​

If you want a safe, solid, easy to use, rattle free swivel then we really think this one ticks all the boxes... and in any case, our No Quibble returns policy & 3 year guarantee have you covered.

+++


+++

as soon as it arrived we got to work fitting the passenger side as a test. . .

1692882810770.png

1692882783290.png1692882793380.png

1692882853785.png


so far so good, this seems to have now given us enough room to swing said cat and fit the dog + Flash-Lav in the van at night.


..

hand break kit and drivers swivel to be fitted soon.


..


this is what we have now in regards to space. . . .


1692886109352.png


1692886121782.png

1692886136824.png


.
 
Last edited:
next up was Snoozing and side blackout blinds. . .


the chief advisor chose these as i wasn't so bothered either way. . .

initially we both liked the VanShades blinds,

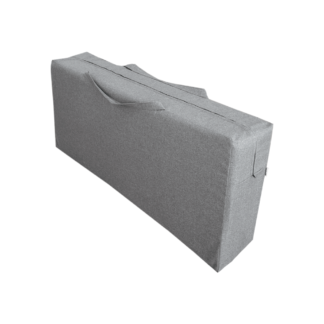
but at £160-£300 per unit - they will have to wait for another day. . .


1692883195537.png


so that took us down the YouTube rabbit hole, and eventually to Andy @ Transporter HQ.

we already had his Camper Glass windows fitted - which are great, so thought the blinds must be good too.


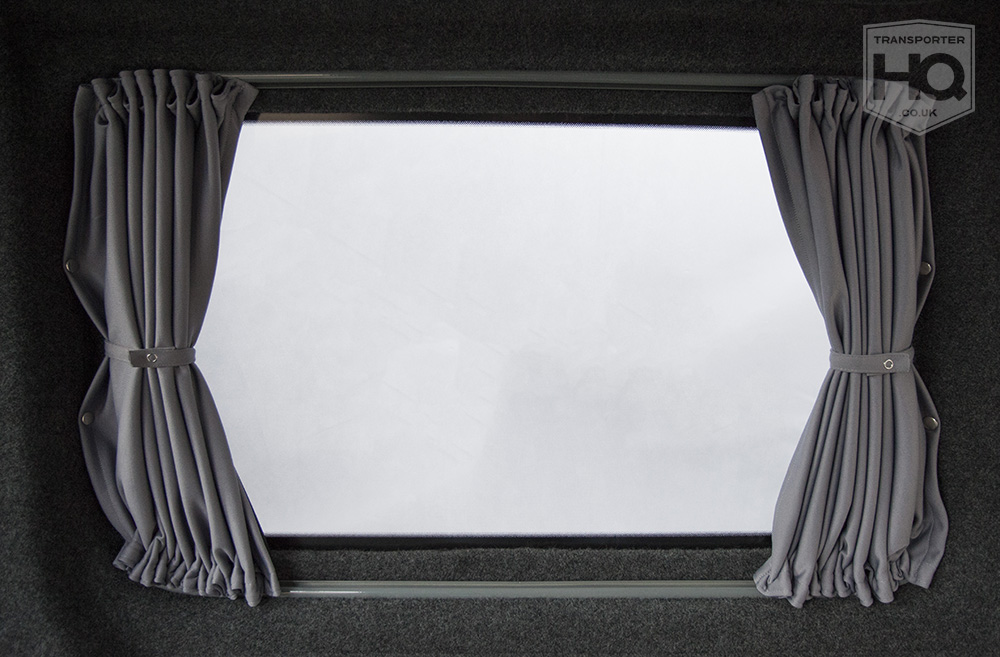
we went for these Grey (with a black rear lining)


1692883794021.png


and this one for the slider. . . .


1692883886695.png


...


so far so good,


Our VW T5 T6 drivers side curtains (opposite the sliding door) are great value and quality. They come ready to fit with all pre-bent rails, tiebacks, screws and fixings for ease of installation.

The curtains are made of high quality stretch fabric and come with strong grey aluminium rails, which finish off your windows perfectly.

Grey on the inside, black on the outside of the curtain. Also available in black (see other listings).

Although we don’t class these as black out curtains, they are extremely dark.

The curtains come with press studs to stop light getting in through any cracks down the side of the curtains.

Compatible with both VW T5 Transporters and VW T6 Transporters.

Included in your kit:​

  • 1 Set of T5/T6 Drivers Side Curtains (Opposite Sliding Door (with Tie Backs))
  • 2 Pre-Bent Rails (Top and Bottom of Curtain)
  • End Caps for Rails
  • Spare Curtains Loops
  • Press Studs
  • Self Tapping Fitting Screws


they even offer a fitting video. . . .


+++++++++++


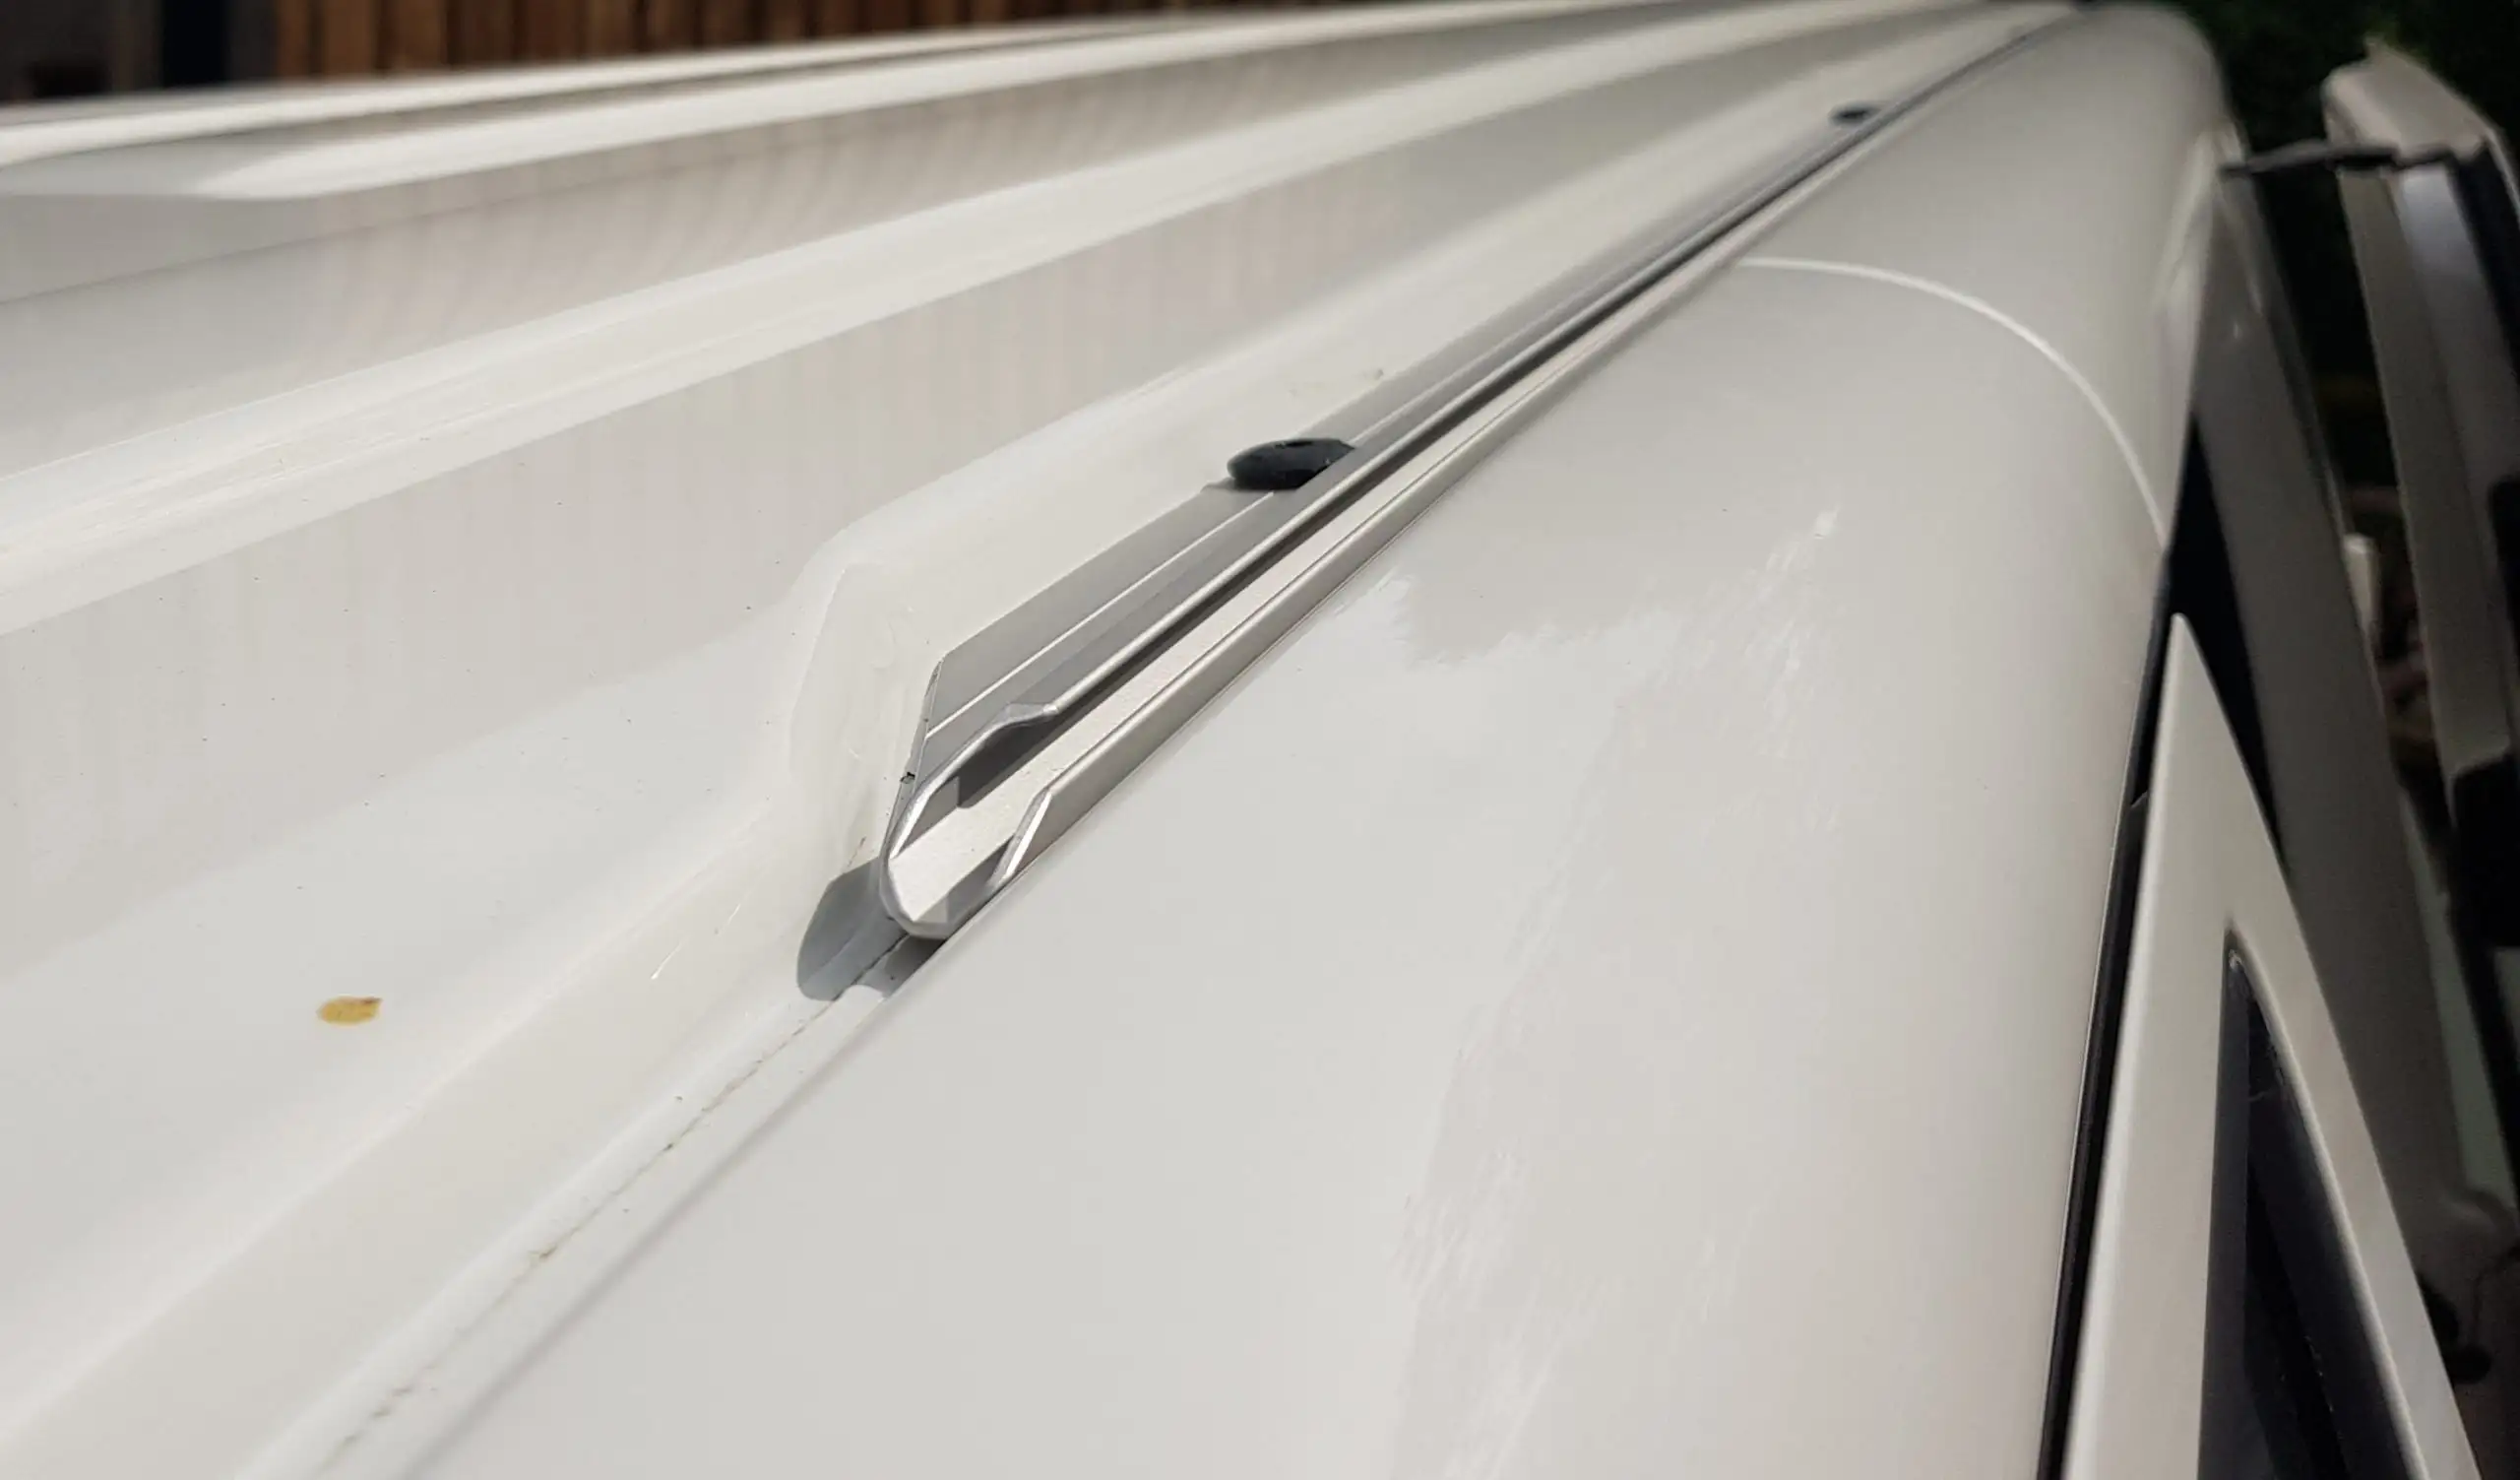
we have the side slider ones fitted. . . . but this where the problem starts.

all fitted and screwed to the van,

curtains clipped in,

side pop stud drilled in,


go to slide the curtains to the side . . . . . . . . . and they wont budge.

the curtain clips are fouling on the screw heads as you try to slide the curtains open or closed.


++++++++++++++

the curtain clips have a channel, that should slide over the fixings screws . . .

1692884098116.png


and the fixing video shows the pre drilled screw holes all lined up nice and central to the rail. . .


1692884234144.png


.

but our holes were not dead centre, which is causing the slider clips to foul.


so i need to take another look at this.


realistically i think i need to re-drill the rails with pilot holes that are central, and then re fix the screws, . . . which is very annoying as i will have even more holes in the van.


++++++


for the time being we have unclipped the curtains, and reclipped them either side of the fixings. . . no ideal, but will have to do for now.

++++++

we are waiting for the drivers side to arrive from THQ, so will double check this before we drill the van.


+++++


ill update with pics later. . .
 
fly screen for open side windows. . . . . ?

the wife has done a McGyver with a domestic door fly screen. . .

its work in progress, so will post more when shes done.
 
Awning Rail . . . . Yes Please.

I've already been using the C-Chanel style rail on the other van.

and was happy to see this van had a C rail fitted.

looking closer at it i think its a Stitches + Steel version, as its in three section.

1692885335081.png

either way i decided to fit another one on the other side,

so that we can play with various setups and see what works well for us.

i decided to go with the same as i had before . . .

the Camper Essentials @Camper Essentials "VW T5 T6 Bolt On Awning Rail" - SWB Interchangeable version.

this way i can fit it on either side as i see fit.


1692885500104.png
1692885518993.png


+++

VW T5 T6 Bolt On Awning Rail​

£99.99

VW T5/T6 TRANSPORTER BOLT ON AWNING RAIL
  • Long Wheel Base (LWB) or Short Wheel Base (SWB) options
  • Left Hand Side (LHS) / Nearside / Passenger side on UK vehicle or
  • Right Hand Side (RHS) / Offside / Driver’s Side on UK vehicle or
  • Interchangeable so that it can be swapped from one side to the other (Please note both ends are then finished as like the front end and there is an extra set of holes drilled in the flange.
This fantastic awning rail is a single piece of aluminium which is discreet – in fact out of sight – yet smart looking with chamfered ends to stop your awning snagging when feeding it in.
Simply bolted on to the T5/T6 gutter using the existing bolt holes in only a few minutes – there is no glue or drilling and it can be removed easily too if desired.
The best, most discreet and easiest to use awning rail on the market which will give the ultimate in awning attachment. Quick and easy to use whilst holding your awning onto your van in the most secure and weatherproof way possible.

+++

the new rail come with some new rubbers as well - which was nice.

they are not cheap. . . but seem very good quality and finish.

+++++


initially i wanted to swap the S+S one to the drivers side and fit the better CE one to the Slider side.

then realised that the S+S was drilled for interchangeable fitting.

so for now i fitted the CE on to the drivers side. . .

at some point ill take both off. . . . and drill the S+S one the same as the CE one so that both can be interchangeable.


either way im no keen on the S+S one as its in three parts . . . and im expecting the Kador to catch as we are sliding in in and out.


also we are used to the expertly finished CE one with hand smoothed sloping edges that make it a dream to use. . .


1692885812563.png


...

this is ours. . . .

1692885839441.png


..


and final result with both. . .

1692885882386.png


.


so now we have dual C-Rails.

ill be testing setups soon with a drive away awning setup on one side,


and a rails sail + windbreaks setup up on the other side.


.
 
Kombi Floor hole clip things. (Floor Blanks)

i didn't know these were a thing . . . until seeing a YouTube video from UAO


UAO - UrbanArkOverland


1692886356854.png

in his vide showing . . . "VW TRANSPORTER ACCESSORIES. 5 upgrades you don't know you NEED"


he shows them,


1692886467826.png


...


they are 3D printed by the looks of it.


and should turn my van from this. . . .


1692886603985.png


+++++


into this:


1692886576648.png


+++


1692886654094.png1692886667800.png


++++++++

Nice, ill let you know how we get on with them..


+++++
 
what about a removable false floor that covers over the area where the brackets are? would give you a nice flat floor space between the front seats and the bed
 
what about a removable false floor that covers over the area where the brackets are? would give you a nice flat floor space between the front seats and the bed
nice idea.

have you seen any about or know of any?

the Kombi seat sockets are raised off the floor.

so id imagine any false floor would need cut-outs or recesses to accomadate the sockets.

+++

maybe a job for @Eli to CNC me out a false floor out of the same stuff the Ovano is made from?


1692889215483.png


...........


so maybe a CNC Sheet - green,

with recesses for the sockets - red.


1692889360383.png
 
Back
Top