Out of interest, how did you mount the consumer unit? just directly to the plastic bay separator or to something else?
You are using an out of date browser. It may not display this or other websites correctly.
You should upgrade or use an alternative browser.
You should upgrade or use an alternative browser.
Deaky’s Kombi to Camper journey
- Thread starter Deaky
- Start date
The sides of the consumer unit are shaped, I made an angled shim and bolted the unit through it to the side and front plastics. This means it’s easy to remove to access the fuse box underneath.Out of interest, how did you mount the consumer unit? just directly to the plastic bay separator or to something else?
any chance of a pic? considering another shameless copyThe sides of the consumer unit are shaped, I made an angled shim and bolted the unit through it to the side and front plastics. This means it’s easy to remove to access the fuse box underneath.
Sorry @Ann3x i didn’t take any pictures when I made it and you can’t really see it once it’s installed.any chance of a pic? considering another shameless copy
Cool - worth an ask! Ill work something out if i go that way.Sorry @Ann3x i didn’t take any pictures when I made it and you can’t really see it once it’s installed.
Having a tidy up in my bits cupboard today and cane across this wireless charger

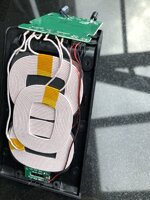
Obviously my first thought was, can I fit this in the van. I took it apart to see what was inside.
Then removed the centre console from the van
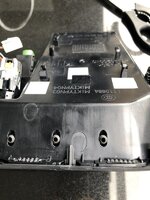
Theres plenty of room underneath and even a couple of lugs I could use to secure it in place
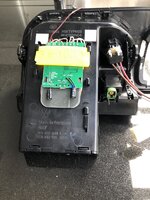
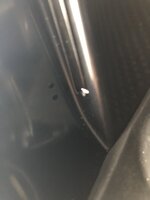
The charger has two LED’s red for standby and blue for charging. I removed the led module, drilled a couple of small holes and mounted the module behind
A bit of tape to make sure everything was secure.
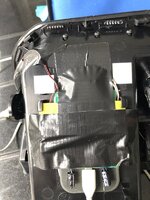
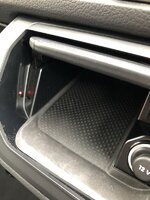
The charger has a micro USB connector, I’ve passed a USB lead through from the glove box and plugged it in.
Job done. Took about 30 mins

Obviously my first thought was, can I fit this in the van. I took it apart to see what was inside.

Then removed the centre console from the van

Theres plenty of room underneath and even a couple of lugs I could use to secure it in place

The charger has two LED’s red for standby and blue for charging. I removed the led module, drilled a couple of small holes and mounted the module behind

A bit of tape to make sure everything was secure.

The charger has a micro USB connector, I’ve passed a USB lead through from the glove box and plugged it in.
Job done. Took about 30 mins

Top job, actually makes me wish I had a comfort dash fitted 
the Victron Phoenix smart has 2 outputs,a dedicated 3a starter battery charger,1 charger 2 jobs,these are robust and brilliant units,although got a lower ip rating of ip43.Made a start on the hookup today. Got the mini consumer unit and the EHU plug fitted under the bonnet. I've brought a Victron blue smart 3 output charger but upon inspection I can't control the outputs on the app like I thought I would be able to. My idea was to connect it to the starter and leisure battery and charge the starter as and when I needed to. Not all the time. I can't do this so I'm sending it back and getting a 4a charger for the starter and a 15a for the leisure battery. I'll just add another RCBO into the consumer unit.
View attachment 63638
View attachment 63639
Today I’ve got round to fitting a Victron Smartshunt. Had to wait for a few bits to arrive. Namely some 10mm eyelets  I’ve bolted to unit to the side of the seat base
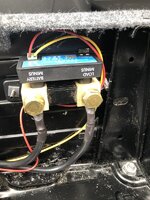
The smartshunt is able to monitor the voltage of the starter battery too, seeing as I already have a cable coming from the starter battery to under the seat it was a simple task to add a fused connection to this cable for the smartshunt to monitor. At the same time I’ve added a trickle charger to the starter battery.
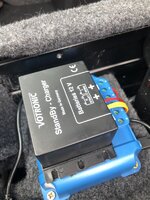
The trickle charger is connected to the load output of the MPPT solar controller. In turn the solar controller is set to only turn on the load when the leisure battery is being charged. Basically, if it’s not very sunny or at night the starter battery will not be charged.
Here you can see the starer battery is 12.3v

On the solar controller, the leisure battery is receiving a charge, so the load output is automatically turned on

And new we can see that the starter battery is receiving a small trickle charge

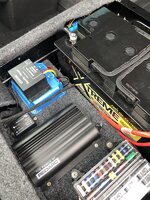

The smartshunt is able to monitor the voltage of the starter battery too, seeing as I already have a cable coming from the starter battery to under the seat it was a simple task to add a fused connection to this cable for the smartshunt to monitor. At the same time I’ve added a trickle charger to the starter battery.

The trickle charger is connected to the load output of the MPPT solar controller. In turn the solar controller is set to only turn on the load when the leisure battery is being charged. Basically, if it’s not very sunny or at night the starter battery will not be charged.
Here you can see the starer battery is 12.3v

On the solar controller, the leisure battery is receiving a charge, so the load output is automatically turned on

And new we can see that the starter battery is receiving a small trickle charge


Yes it is, and I have a case on my phone tooLiking the look of that wireless charging @Deaky , is that working right through the plastic of the console and the rubber matting?
Here’s the panels covered in roof lining material.
View attachment 20922
View attachment 20927
Then all fitted in the van. Next job is fit the LEDs
View attachment 20924
View attachment 20926
View attachment 20923
View attachment 20925
Hi @Deaky, where did you get the headlining material? My roof is being done, hopefully in a few weeks and wanted to try and get that type of material on it.
Thanks,
Hi @Deaky, where did you get the headlining material? My roof is being done, hopefully in a few weeks and wanted to try and get that type of material on it.
Thanks,
This is what I used mate
Headlining material with foam and scrim backing
Headlining fabric with a 3mm foam and scrim backing This is available in grey and black The grey roll is 1 4m wide and the black headlining roll is 1
Thank you, you are a gent.This is what I used mate
Headlining material with foam and scrim backing
Headlining fabric with a 3mm foam and scrim backing This is available in grey and black The grey roll is 1 4m wide and the black headlining roll is 1www.harrisonstrimsupplies.co.uk
If I could have read this thread when I was 12 I would have paid more attention at school. Nice work as always @Deaky
this. very much this!

T6Kombi-exec
Member
WOW WOW WOW!!! So so so impressed.
Totally beyond my capabilities but yet so inspiring.
Couple of questions if I may Deaky. I have an edition Kombi and am wanting to use Calli sliding door card and tailgate cover and trim. Can you tell me where you obtained yours from and did you have to change B pillar trim to suit? Did the require any extra holes drilling in the frame to get clipped on?
I am also wanting to dummy the offside one but I have read they wont fit so will have to deal with that separately.
In the rear you used a couple of old door mouldings with speaker grills in to re cover and fit into ply panels. (what vehicle were these from as I really like the shape and would like to copy that idea).?


