I like your seats! Are they trimmed or just covers?Finally added the lower dash after changing it's colour, although it's kind of hard to tell from the picture.
View attachment 115353
View attachment 115354
View attachment 115355
You are using an out of date browser. It may not display this or other websites correctly.
You should upgrade or use an alternative browser.
You should upgrade or use an alternative browser.
What Have You Done To Your Van Today?
- Thread starter Daneeyre
- Start date
-
- Tags
- mod modification mods retrofit

Cheers will check it outebay... VW T6 GTI Tartan Gear Gaiter, Blue Red,Orange,Grey Yellow | eBay
wanted to try it out and see if i liked it. i think i do. can never have enough tartan.

Thanks! They've been re-trimmedI like your seats! Are they trimmed or just covers?
")
Last edited:
Be aware of the front flaps as they either touch the door or are very close , I have the same ones on my work van and both doors are now rusting as they have rubbed the paint off , you may be able to shave some plastic off so this doesn't happen I wouldn't want the same to happen to yoursHi @BenR - they came from Mr Bezos! Shorty mud flaps

Cut the three middle posts off an old full width rear threshold to use the polystyrene from the stock narrow one to bridge to the raised floor.

Randomly found I had inherited four blanking plugs with the caravelle stuff, but still need two more. Prioritised the side that we open more!
Good point @Leehoops - I should have said to @BenR that I'd read this somewhere else on here (may even have been you @Leehoops). I trimmed mine back to make sure they don't rub on the bottom edge of the doors. Also gave them a squirt of ACF 50 to try to keep the rust monster at bay.Be aware of the front flaps as they either touch the door or are very close , I have the same ones on my work van and both doors are now rusting as they have rubbed the paint off , you may be able to shave some plastic off so this doesn't happen I wouldn't want the same to happen to yours
Same here, can’t believe it’s nearly 3 years oldTook it for its’ first MOT today. Passed with no probs
Great feeling that.Took it for its’ first MOT today. Passed with no probs
Might treat it to a remap ....Great feeling that.

Braver than me leaving it at 102...Might treat it to a remap ....
Well, I did my previous van that was a 102 and Pendle mapped it and it transformed it into such a nicer flexible drive. So hoping a Pendle on this 150 DSG will do the same.Braver than me leaving it at 102...
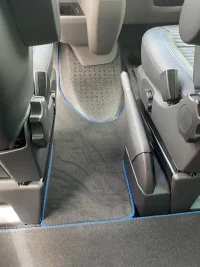
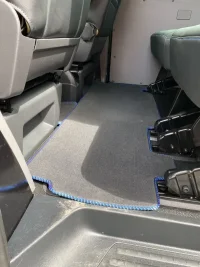
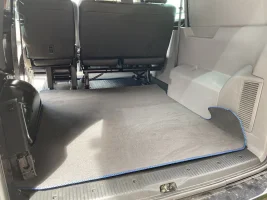
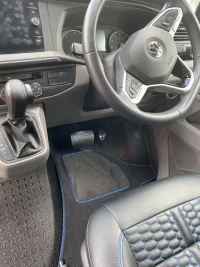
New carpets - full Kombi set from Harrison’s trim supplies. My van has the rear heater/cooler trim so the load bay carpet sits slightly proud in the corner but will sort it out when I sound proof and insulate.
Attachments
-
 AC842445-ED78-4C7C-936B-F8C4FA1E2C00.webp100.6 KB · Views: 42
 -
 69DE5B10-5C39-490D-9970-DB26D219DBB1.webp103.2 KB · Views: 42
 -
 5849AC3D-9095-4BBA-94FF-BEE83E21D2EE.webp85.5 KB · Views: 42
 -
 724011CE-3AA7-431C-B5AE-2F247C97B049.webp100.9 KB · Views: 43
 -
 B3653E5E-BBD3-4602-A90D-7BC54C458FFD.webp111.5 KB · Views: 43
Agreed - some of the quotes on here are ridiculous for what is actually a fairly simple job to do. Very good access once the air cleaner box has been removed. If you turned up at a VW dealer with your T6 on the back of a flatbed after the valves and pistons had been smacking seven shades of $~@$ out of each other two weeks after you fitted a belt you had bought over the counter from them, I'd be very surprised if their immediate reaction was to order in a new long engine and fit it f.o.c. Belt failure is usually secondary to something else such as a seized water pump or debris thrown up from the road which has taken out the aux belt and then the timing belt. The tensioner design on these makes it difficult not to tension them up correctly so anyone who has done timing belts on other vehicles will probably find these a joy to work on.
If anyone is twitchy about timing belt failures, have a look under your engine to see if it came with a full under tray (I believe many vans came without these). If you can see your sump you might want to have a look to get hold of a T5 / T6 under tray. It could be the best £50 quid you spend on your van (although if it does it's job properly, you'll never actually know!). Look up 7E0805685A
As recommended by @Mooncat, I’ve fitted the engine under tray that VW omitted in an obvious cost cutting exercise.
Hopefully this will help to protect the exposed components from debris and weather. Great little upgrade that didn’t take long and wasn’t too difficult.... only problem was access and getting my head under my lowered van!


Also this YouTube video by our very own @Dellmassive came in very handy....
Taken off the front badge to spray it a metallic bronze using Fulldip liquid vinyl which will hopefully be roughly the same as the Fuel Zephyr's in matte bronze.
fulldip spray
Still trying to figure out how the chrome strips to either side of the badge come off - A bit undecided if doing them all bronze will be too much but you have to undercoat them in the same matte black to begin with so we'll see what the black and bronze combo looks like first.


fulldip spray
Still trying to figure out how the chrome strips to either side of the badge come off - A bit undecided if doing them all bronze will be too much but you have to undercoat them in the same matte black to begin with so we'll see what the black and bronze combo looks like first.


Finished adding the led light bar.
Has a mixture of spot and flood LEDs so good penetrating light.
Now driving in the bush at night is doable.
H4 headlights on high beam were hopeless.
Hopefully I can spot wildlife by the roadside and take avoiding action.
Driving lights and light bars are quite common in Australia on vans,
Heading off soon on a fairly lengthy trip to Cairns in North Queensland so will post pictures and daily blog if anyone is interested.
Last edited:
Similar threads
- Replies
- 10
- Views
- 2K
- Replies
- 10
- Views
- 678
- Replies
- 4
- Views
- 2K