Webasto Combination Timer wiring

Jez42

New Member
Hi,
I've seen plenty of knowledgeable Webasto info on this forum, and so hope someone may be able to help:
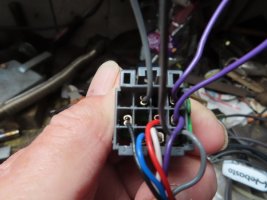
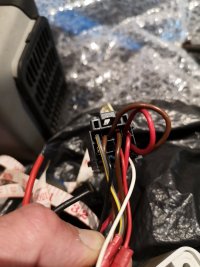
I have inherited an Air Top 2000 d (with diagnosis) with a combination timer (88206A) that has a number of pin connections that are not as described in the service manual, and I have been unable to find info on why they may be like that.
Specifically there is a red/brown cable going to pin 7, there is a jumper wire (red) between pins 10 + 11 and the brown wire that is meant to share 12 with the other jumper wire is actually going into pin 4 (maybe thats fine, as these pins are connected with the jumper anyway).
Image attached.
Has anyone come across info on what every one of these pins relates to, and not just the ones that are factory connected?
Thanks in advance,
Jez
IMG_20210723_101806.jpg
 
At the bottom is one that I have just wired up.
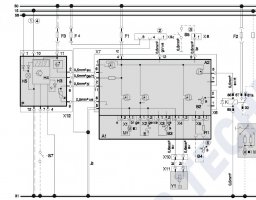
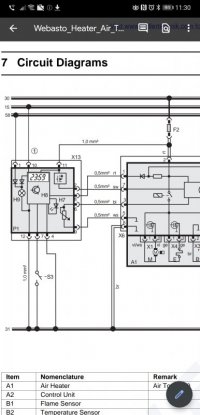
Pin 7 goes to ground via a switch for use as a remote instant heat button duplicating the heat button on the 1531 so that you can be lazy and switch it on from the other end of the van - you can also connect a wireless remote relay to perform the same function from indoors .
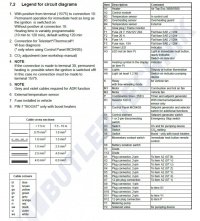
Number 15 = power when the ignition switch is turned to RUN.
Number 30= power directly from the battery. In campervans this means the leisure so this why 10 and 11 are wired together as there is no ignition switch power to contend with.
Number 31= chassis ground connections.
Number 58= lighting with instrument panel. ( I never use this as the light should come on as soon as you touch any button)
For camper van set up I also always wire 10 and 11 together also the 12 and 4.
Your pin 4 and 12 is the same as being wired the other way round!

Ignore the right hand side of the wiring diagram as this schematic is for a different heater also pin 8 is red on yours.

For some reason your wiring has been hacked and joined instead of new terminals being fitted! ( Always signs of a bodge and can lead to poor connection errors )
1531timercon.jpg

legend.jpg

IMG_1723.JPG
 
Last edited:
  • Like
Reactions: mmi
That's amazing, thanks, and appreciate the quick response.
Tbh, I was hoping it would be you that picked this question up!
 
Manuals for the 1531:
 

Attachments

  • 7-Day Digital Timer Model 1531 Features.pdf
    40.9 KB · Views: 17
  • 7-Day Digital Timer Model 1531 Quick Reference.pdf
    22.3 KB · Views: 12
  • 7-Day Digital Timer Model 1531 Operating.pdf
    62.2 KB · Views: 13
  • Like
Reactions: mmi
Hi Oldie,
I have just had a chance to properly go over the info you sent, and have one additional question.
As you say, the hacked crimps look pretty dodgy, and so I have a replacement plug on order to sort that out.
I know you said that pic was from a different heater, so after comparing against the correct diagram for my one, I was surprised to see that my one does not specify separate fuses for timer and heater positives, but shows them connected together with a single 15A fuse.
I was pretty sure that my one had been hacked so as to control both off the same switch, but now it appears that is actually, sort of, correct.
How would this normally look? I.e. should the timer neg & pos be terminated in the X6 plug?
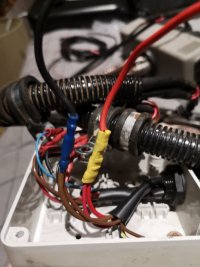
Here's a pic of how mine are currently joined together.
Thanks,
Jez

IMG_20210725_112252.jpg

Screenshot_20210725_113017_com.google.android.apps.docs.jpg
 
OMG! What a rat's nest. One of the worst that I have ever seen.

Both joined is not necessarily bad practice - Webasto looms are like that from the factory sometimes with joins hidden in the loom a couple of inches from where it enters the heater. It is difficult to connect them together at the X6 plug as there is insufficient room to fit them and bend them at 90 degrees for exit. A 1A fuse is all that is required for the 1531 and 10A is usually enough for the heater, 15A is used to cover for the immediate switch on surge. It is usual to have separate fuses though which is how I wire them when I make up a loom.
That heater is an old one and most probably needs a service if you have no idea as to when it was last done. Minimum of new burner pad and decoke usually needed. That is the first thing that I do when one arrives after checking the ecu for the error history.
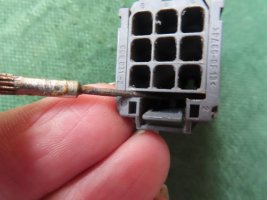
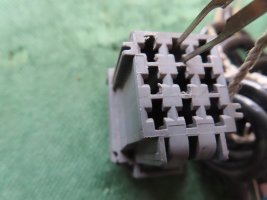
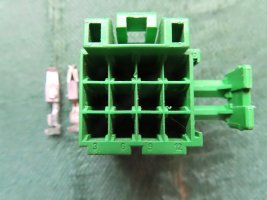
New replacement plug not needed - just replace the terminals ( JPT - Junior Power Timer ones will do instead of the pukka ones ) New plugs are around 15 pence each, around £1 for enough terminals, don't get ripped off by dealers! Some plugs have a locking key in the side and some slide a couple of mm to open. You need something to depress the tangs on the terminals also.

Personally when I get a heater in like that I remake the loom completely so that you are not adding to someone else's idea of repair with consequent risk of failure at a later date.

Used and abused grey one is just one that was at hand for illustration - correct one is 12 terminal like the green one.

.IMG_1724_1 (Copy).JPG
IMG_1726 (Copy).JPG
IMG_1728 (Copy).JPG
 
Haha, the worst you've ever seen? I bet that's saying something!
I'm actually working with 2 units, I bought a 2000 S (2003 year) for £100 which is the one that came with the multi control and the horrendous wiring loom.
But the heater was in a right state, rusted intake and exhaust pipes and looked pretty mucky inside.
So, I bought a different one, a 2000 d with diagnostic (2001) for £150, and this one looks spotless. The guy said it was a demo of some sort and was never used. Looking at the insides, that kinda rings true.
So, I am trying to make 1 good one, and just taking the loom and control from the crappy one.
Good shout about the terminals, Butler sell the complete plug and terminals kit for £8 which I was considering.
Still, first thing I need to do is plug it all in and check nothing else too expensive is knackered first!
Thanks again.
Jez
 
Back
Top