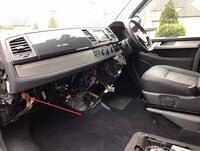
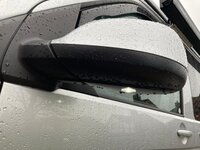
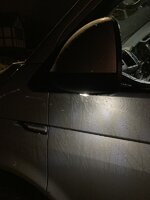
Has anyone fitted the mirror (puddle) lights from Travellin Lite? It says they’re an easy fit and the actual fitting of the lights into the mirror housing will be easy, however vehicle electrics are like a dark art to me and how to connect the lights into the right place so they work as intended baffles me. I haven’t bought them yet and don’t have the instructions to look at so if anyone knows and could explain the electrical connections so I can see if I feel confident in tackling this one that would be great, thanks.
You are using an out of date browser. It may not display this or other websites correctly.
You should upgrade or use an alternative browser.
You should upgrade or use an alternative browser.
Travelling-Lite Mirror Lights
- Thread starter RayF
- Start date
I would imagine the most difficult part will be getting the wires from the mirror to under the dashboard. You may need to take the door card off. The electrical connections will be simple if it's anything like their footwell lights.
But how to know where to connect them, which wires go to the interior lights. It does say on the website that the door cards need to come off. Maybe I could do a speaker upgrade at the same timeI would imagine the most difficult part will be getting the wires from the mirror to under the dashboard. You may need to take the door card off. The electrical connections will be simple if it's anything like their footwell lights.
It will tell you which wires to connect to. There’s some coloured plugs in the passenger footwell. They’ll connect to the courtesy light circuit there.But how to know where to connect them, which wires go to the interior lights. It does say on the website that the door cards need to come off. Maybe I could do a speaker upgrade at the same time

Ah right, well that doesn’t look too bad and most helpful thanks. Hopefully it won’t require that much trim removedIt will tell you which wires to connect to. There’s some coloured plugs in the passenger footwell. They’ll connect to the courtesy light circuit there.
View attachment 93878
I’d really like ambient lights in the footwell so maybe kill two birds and all thatThat’s where the aftermarket footwell lights connect to, it isn’t difficult at all. Remove the glovebox, 7 screws and you’re there.
You need to speak with @saxoboy for these. Simple to install.I’d really like ambient lights in the footwell so maybe kill two birds and all that
Hi there, don’t think I’ve posted on here before, but been lingering for a while and done quite a few mods now since getting my T6 campervan back in June, thanks to all the advice I’ve found on here. Most recently (about 3 weeks ago now) I fitted the mirror puddle lights. Really pleased with them, but had a few learning points and tips that might be helpful.
Firstly after all of the threads on broken clips on the lower mirror casing, I decided to bite the bullet and buy a pair beforehand for about £20 including postage. Turned out to be a wise decision as I completely butchered them getting them off (I’d love someone to do a how-to video on getting them off gracefully in one piece - it took me a lot of faffing and levering a trim tool to get them out). Anyway having the spare lower casings allowed me to drill these out and fit the lights beforehand (tip: I used the grid as a guide as well as measuring to get them in the same place on both sides).
I started with the passenger side, took the door card off without too much hassle, then got the mirror covers off without damaging the top cover which was my main aim. Trying to thread the wires through was a bit of a challenge though and I eventually resorted to removing the wing mirror by loosening the three screws and discovered that the foam between the mirror and door only had a small gap on to get the wires through (I’d been trying with a flexible wire feed, but just couldn’t get it through). Anyway, mirrors off and it was no trouble feeding the wires throughthen through the flexible duct between the door and front wing and under the dash.
Having done that and replaced the door card (damaging 2 clips in the process, but not enough to cause any issues), I realised that it would be easier to just take the mirrors off and feed the cables through to the flexi duct rather than take off the door card. This made the drivers side much easier, so I’d recommend doing that way rather than taking the door cards off.
Anyway, drivers side was then a doddle in comparison. After I had the wires under the dash (with lower dash trim removed), I fed a piece of spare wire that they send with the kit under the dash to the drivers side and connected this up (the wire on the kit only gets you so far, but all the fittings are included to wire it up). Then connected that up along with the passenger side wires to the appropriate wires under the passenger side using the posi tap fittings. The guide suggests routing up to the courtesy light, but I found this easier (especially as I was wiring in the footwell lights at the same time and they’re both on the same circuit).
I’m a relative novice with car electrics etc., but found the guide really easy to follow even if the pictures weren’t the best (albeit I followed the footwell light guide for the wiring - also purchased from traveling-lite).
Hope this helps.
Chris
Oh and just seen an earlier comment about removing the dash trim. I managed to do it by just removing the lower trim (where the footwell lights fit into). It was a bit awkward getting to the wires with the posi tap fitting, but easier than removing the glove box etc to get to it that way.
That’s very helpful Chris, thank you. I feel more confident to try it. I just hope there won’t be too much of a difference with a T6.1.Hi there, don’t think I’ve posted on here before, but been lingering for a while and done quite a few mods now since getting my T6 campervan back in June, thanks to all the advice I’ve found on here. Most recently (about 3 weeks ago now) I fitted the mirror puddle lights. Really pleased with them, but had a few learning points and tips that might be helpful.
Firstly after all of the threads on broken clips on the lower mirror casing, I decided to bite the bullet and buy a pair beforehand for about £20 including postage. Turned out to be a wise decision as I completely butchered them getting them off (I’d love someone to do a how-to video on getting them off gracefully in one piece - it took me a lot of faffing and levering a trim tool to get them out). Anyway having the spare lower casings allowed me to drill these out and fit the lights beforehand (tip: I used the grid as a guide as well as measuring to get them in the same place on both sides).
I started with the passenger side, took the door card off without too much hassle, then got the mirror covers off without damaging the top cover which was my main aim. Trying to thread the wires through was a bit of a challenge though and I eventually resorted to removing the wing mirror by loosening the three screws and discovered that the foam between the mirror and door only had a small gap on to get the wires through (I’d been trying with a flexible wire feed, but just couldn’t get it through). Anyway, mirrors off and it was no trouble feeding the wires throughthen through the flexible duct between the door and front wing and under the dash.
Having done that and replaced the door card (damaging 2 clips in the process, but not enough to cause any issues), I realised that it would be easier to just take the mirrors off and feed the cables through to the flexi duct rather than take off the door card. This made the drivers side much easier, so I’d recommend doing that way rather than taking the door cards off.
Anyway, drivers side was then a doddle in comparison. After I had the wires under the dash (with lower dash trim removed), I fed a piece of spare wire that they send with the kit under the dash to the drivers side and connected this up (the wire on the kit only gets you so far, but all the fittings are included to wire it up). Then connected that up along with the passenger side wires to the appropriate wires under the passenger side using the posi tap fittings. The guide suggests routing up to the courtesy light, but I found this easier (especially as I was wiring in the footwell lights at the same time and they’re both on the same circuit).
I’m a relative novice with car electrics etc., but found the guide really easy to follow even if the pictures weren’t the best (albeit I followed the footwell light guide for the wiring - also purchased from traveling-lite).
Hope this helps.
Chris

That’s a very helpful post, thank you! Stop lurking and step forward more often!!!Hi there, don’t think I’ve posted on here before, but been lingering for a while and done quite a few mods now since getting my T6 campervan back in June, thanks to all the advice I’ve found on here. Most recently (about 3 weeks ago now) I fitted the mirror puddle lights. Really pleased with them, but had a few learning points and tips that might be helpful.
Firstly after all of the threads on broken clips on the lower mirror casing, I decided to bite the bullet and buy a pair beforehand for about £20 including postage. Turned out to be a wise decision as I completely butchered them getting them off (I’d love someone to do a how-to video on getting them off gracefully in one piece - it took me a lot of faffing and levering a trim tool to get them out). Anyway having the spare lower casings allowed me to drill these out and fit the lights beforehand (tip: I used the grid as a guide as well as measuring to get them in the same place on both sides).
I started with the passenger side, took the door card off without too much hassle, then got the mirror covers off without damaging the top cover which was my main aim. Trying to thread the wires through was a bit of a challenge though and I eventually resorted to removing the wing mirror by loosening the three screws and discovered that the foam between the mirror and door only had a small gap on to get the wires through (I’d been trying with a flexible wire feed, but just couldn’t get it through). Anyway, mirrors off and it was no trouble feeding the wires throughthen through the flexible duct between the door and front wing and under the dash.
Having done that and replaced the door card (damaging 2 clips in the process, but not enough to cause any issues), I realised that it would be easier to just take the mirrors off and feed the cables through to the flexi duct rather than take off the door card. This made the drivers side much easier, so I’d recommend doing that way rather than taking the door cards off.
Anyway, drivers side was then a doddle in comparison. After I had the wires under the dash (with lower dash trim removed), I fed a piece of spare wire that they send with the kit under the dash to the drivers side and connected this up (the wire on the kit only gets you so far, but all the fittings are included to wire it up). Then connected that up along with the passenger side wires to the appropriate wires under the passenger side using the posi tap fittings. The guide suggests routing up to the courtesy light, but I found this easier (especially as I was wiring in the footwell lights at the same time and they’re both on the same circuit).
I’m a relative novice with car electrics etc., but found the guide really easy to follow even if the pictures weren’t the best (albeit I followed the footwell light guide for the wiring - also purchased from traveling-lite).
Hope this helps.
Chris
Well done
I’d really like ambient lights in the footwell so maybe kill two birds and all that
I have visions of your garage stashed with mods you have ready to go once you get your van!!!
And you’d be right, I can hardly get in there now lolI have visions of your garage stashed with mods you have ready to go once you get your van!!!
mind you, it’s an 8x6 storage shed rather than a garage and the wheels are taking most of the space.
Thank you Chris, you’ve been very helpful, your info was just what I was looking forJust attaching a couple of pictures of them fitted if that’s of any interest.
View attachment 93954View attachment 93955

Lovely jobJust attaching a couple of pictures of them fitted if that’s of any interest.
View attachment 93954View attachment 93955
These instructions are now available in the VIP section, here:... I completely butchered them getting them off (I’d love someone to do a how-to video on getting them off gracefully in one piece - it took me a lot of faffing and levering a trim tool to get them out)...
Similar threads
- Replies
- 0
- Views
- 250
- Replies
- 13
- Views
- 1K
- Replies
- 3
- Views
- 1K
- Replies
- 3
- Views
- 1K
- Replies
- 3
- Views
- 1K


