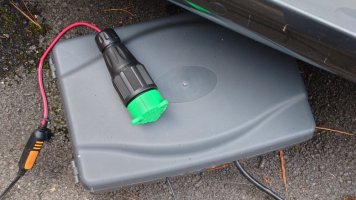
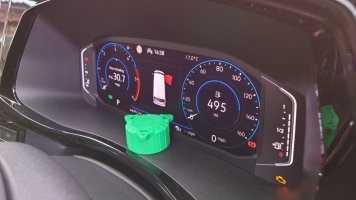
So following some experiments over here I thought I'd write up making an adaptor to connect a charger to a 13 pin trailer socket.
What is this?
In a fully wired 13 pin trailer socket there should be a permanent live circuit direct to the vehicle battery using pins 9/13. Traditionally this was used to supply power to the towed trailer/caravan.
However it can also be used to connect a maintenance charger quickly and easily to a locked van. This can be used to support the battery if the van is parked for any length of time but also if you have a wholly 12v fit out a charger that is happy to also be a supply can make a straight forward 12v EHU approach.
Can I use it?
In my case I have the OEM towing module fitted from the factory in a MY21 T6.1 Caravelle and the approach below I've tested works to at least 5 days with the van locked.
If you have the OEM towing module fitted later some people have found that some of the live supply might need enabling using VCDS or similar.
If you have the OEM second battery then pins 9/13 will likely connect to your leisure batteries - still useful but be aware.
If you have an aftermarket a fully wired solution should have pins 9/13 connected.
If you are not sure the cost of a 13 pin plug and some grain of wheat lamps is not huge to do a quick trial before investing further
What do I need?
A decent 13 pin trailer plug, I used this one from Amazon.
5 grain of wheat lamps, try your local model shop, I used these ones from eBay.
I also used this bootlace crimper kit to make a neat finish and avoid wire whiskers.
This is all you need to test but if you want form a complete system...
A maintenance charger with a quick connect system, ideally semi waterproof. I already use a number of CTEKs so I had an MXS 5.0 to hand and simply bought a new quick connect. If I was using this for EHU I'd buy one rated for supply as well like the MXS 7.0. There are equivalent chargers from NoCo and Victron that you might choose. Personally I'd stay in the 5-10 amps region.
A waterproof box to hold your charger and extension lead, I have several of these.
How do I build it?
What we are going to do is to build a "virtual trailer" using the grain of wheat bulbs, this will trigger trailer detection.
Trailer detection uses both indicator and both side light circuits and they must be incandescent lamps.
When you are happy you will want to open up the connector and tuck the lamps inside. You will then need the seal the quick connector cable and clamp it to keep things waterproof and provide some strain relief. I built up a "collar" of electrical tape and then tightened the connectors cable entry down on to that.
For use pop the charger and extension lead in the waterproof box. This has a small padlock loop on the closure so if you're not in a trusted area you might want to consider a padlock and maybe a short bike lock cable through the spare wheel cage to discourage tinkering. Tuck the whole lot under the rear of the van.

Caveat: This is presented as info for what worked for me, make your own judgement about if it works for you 

What is this?
In a fully wired 13 pin trailer socket there should be a permanent live circuit direct to the vehicle battery using pins 9/13. Traditionally this was used to supply power to the towed trailer/caravan.
However it can also be used to connect a maintenance charger quickly and easily to a locked van. This can be used to support the battery if the van is parked for any length of time but also if you have a wholly 12v fit out a charger that is happy to also be a supply can make a straight forward 12v EHU approach.
Can I use it?
In my case I have the OEM towing module fitted from the factory in a MY21 T6.1 Caravelle and the approach below I've tested works to at least 5 days with the van locked.
If you have the OEM towing module fitted later some people have found that some of the live supply might need enabling using VCDS or similar.
If you have the OEM second battery then pins 9/13 will likely connect to your leisure batteries - still useful but be aware.
If you have an aftermarket a fully wired solution should have pins 9/13 connected.
If you are not sure the cost of a 13 pin plug and some grain of wheat lamps is not huge to do a quick trial before investing further
What do I need?
A decent 13 pin trailer plug, I used this one from Amazon.
5 grain of wheat lamps, try your local model shop, I used these ones from eBay.
I also used this bootlace crimper kit to make a neat finish and avoid wire whiskers.
This is all you need to test but if you want form a complete system...
A maintenance charger with a quick connect system, ideally semi waterproof. I already use a number of CTEKs so I had an MXS 5.0 to hand and simply bought a new quick connect. If I was using this for EHU I'd buy one rated for supply as well like the MXS 7.0. There are equivalent chargers from NoCo and Victron that you might choose. Personally I'd stay in the 5-10 amps region.
A waterproof box to hold your charger and extension lead, I have several of these.
How do I build it?
What we are going to do is to build a "virtual trailer" using the grain of wheat bulbs, this will trigger trailer detection.
Trailer detection uses both indicator and both side light circuits and they must be incandescent lamps.
- Strip about 1cm of insulation from 4 lamp leads - I find with the fine leads it's best to fold the exposed wire back over the insulation to give the crimp something to grip as they are thing.
- Crimp 4 leads together as common ground, this will go in pin 3 (lighting earth), crimp the other ends individually and connect to pins 1 and 4 then 5 and 7. Pins 1-4 tend to be on a raised central bit so easiest to do these first.
- If you want to test then crimp the leads of a 5th lamp and connect this to pin 9/13 - mark this lamp as if it lights it proves your permanent live is present and working.
- If you want to dive straight in then cut off any existing terminals on your quick connect, crimp them and then connect ground to pin 13 and live to pin 9 - make very sure you get these the right way around!
When you are happy you will want to open up the connector and tuck the lamps inside. You will then need the seal the quick connector cable and clamp it to keep things waterproof and provide some strain relief. I built up a "collar" of electrical tape and then tightened the connectors cable entry down on to that.
For use pop the charger and extension lead in the waterproof box. This has a small padlock loop on the closure so if you're not in a trusted area you might want to consider a padlock and maybe a short bike lock cable through the spare wheel cage to discourage tinkering. Tuck the whole lot under the rear of the van.


