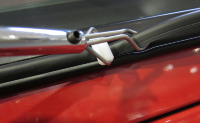
I'm not going to do any more to it until the day comes to remove it and take it to the canvas place. Like you say, something may become more obvious as to how I put it back on then, fingers crossed.It looks like a kador/awning rail type arrangement around the top that you slide on but, as you say, this would need some sort of vertical opening in the fabric, such as the Velcro closure the SCAs have, to work. There must be an easier way - probably worth detaching the bottom first to see if something becomes more obvious??
You are using an out of date browser. It may not display this or other websites correctly.
You should upgrade or use an alternative browser.
You should upgrade or use an alternative browser.
Ripped My Roof : (
- Thread starter andys
- Start date
No seam, other than the main double stitched ones that hold the four pieces together that couldn't be done in situ, been all the way round in great detail.Maybe not velcro, but could there be a seam thats stitched afterwards Andy? probably at the front on yours?
I'm going to explore more options if I have a new canvas made though, like a velcro gap at the front to pass the solar cables through, maybe even a panoramic roof.
P
Phil_G
Guest
This was mentioned in one of the repair videos, they do colour-match, might be worth remembering:
https://www.amazon.co.uk/Kleiber-Percent-Cotton-Canvas-Awning/dp/B008O33GTM/ref=sr_1_fkmr0_1
https://www.amazon.co.uk/Kleiber-Percent-Cotton-Canvas-Awning/dp/B008O33GTM/ref=sr_1_fkmr0_1
Today was the day, brave pill taken, ladder out. This canvas is coming off today.
So first, as mentioned above, I decided the best thing to do was release the bottom of the canvas to take the tension off the top and make it easier to pull off. I'm about 10 screws down one side when something dawns on me - the screws, and the part of the metal frame they go through, are below the bottom of the canvas. They aren't holding the canvas on, they're holding the frame to the van!! Ok it's not that big a deal, the side of the frame I'm working on doesn't move in the slightest as it appears to be bonded down with something immensely strong, so the screws are probably just an extra precaution, or maybe even just to hold it in place while the bonding compound cures. So all the screws back in and I'm absolutely baffled again, back to square one.
There's no metal trim around the bottom like the one at the top so I went round the van again, looking for a gap in the canvas that I knew wasn't there. And then... I saw this...
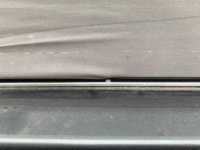
And it suddenly dawned on me what's going on here. So I grabbed one end and pulled...
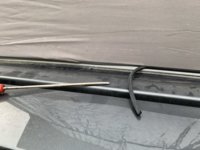
And kept pulling all the way round. Yes the edge of the canvas is just tucked into the groove and the rubber sealing strip is just pushed into the channel behind it to secure it in place, and with it in out of the way, the bottom of the canvas is free
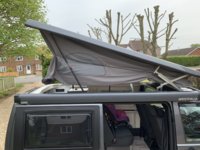
Now I'm jubilant I've cracked this, and a search around the inside of the roof lying on my back turns up a tiny gap in the top strip exactly in the centre at the front, so pulling that out gives the same result
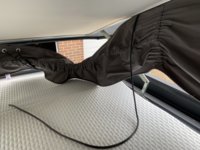
Here's a close up of how the two edges fit into the track
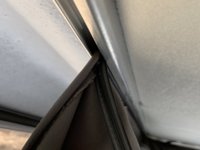
And as easy as that, the canvas is off!

After all those months of umming and arring and fretting about how I can get this done without damaging an extremely expensive vehicle, once I know what I'm doing the canvas is off in less than 10 minutes. So wasting no time, I whiz it off to a canvas repair place I've spoken to. I'm not going to name them yet as I did with the last one as that turned out to be a waste of time, but these guys are young, enthusiastic and competely free of BS so I have high hopes. They advised me not to have a new canvas as the tear, to them, was really small and they've repaired canvasses with far greater damage without hesitation, so a new panel will be put in on the side. In addition, they're going to cut out and replace the front section where the solar cables came through the canvas, and stitch in a canvas tunnel to hide the cables, like the one in the left hand corner where the reading light cables are fed. The price for this was £180 and will be ready in 3 weeks.
Without the canvas there, access to some parts of the top is massively improved and I was able to get in and have a good clean while I had chance. The reason the solar cables will no longer be passing through the canvas is that I can now get to the top of the inside roof and feed the cables through behind the metal strip, after dremelling a slight indentation in the top, and then down the inside of the canvas inside the tunnel they're making. As a result, the appearance of the solar cables will be neater inside and out, and will remove the risk of leaks where the gland was sealed through the canvas in future (though there was absolutely no sign of that happening).
Absolutely buzzing how well that went, beers will be drunk tonight even though it's a school night
So first, as mentioned above, I decided the best thing to do was release the bottom of the canvas to take the tension off the top and make it easier to pull off. I'm about 10 screws down one side when something dawns on me - the screws, and the part of the metal frame they go through, are below the bottom of the canvas. They aren't holding the canvas on, they're holding the frame to the van!! Ok it's not that big a deal, the side of the frame I'm working on doesn't move in the slightest as it appears to be bonded down with something immensely strong, so the screws are probably just an extra precaution, or maybe even just to hold it in place while the bonding compound cures. So all the screws back in and I'm absolutely baffled again, back to square one.
There's no metal trim around the bottom like the one at the top so I went round the van again, looking for a gap in the canvas that I knew wasn't there. And then... I saw this...

And it suddenly dawned on me what's going on here. So I grabbed one end and pulled...

And kept pulling all the way round. Yes the edge of the canvas is just tucked into the groove and the rubber sealing strip is just pushed into the channel behind it to secure it in place, and with it in out of the way, the bottom of the canvas is free

Now I'm jubilant I've cracked this, and a search around the inside of the roof lying on my back turns up a tiny gap in the top strip exactly in the centre at the front, so pulling that out gives the same result

Here's a close up of how the two edges fit into the track

And as easy as that, the canvas is off!

After all those months of umming and arring and fretting about how I can get this done without damaging an extremely expensive vehicle, once I know what I'm doing the canvas is off in less than 10 minutes. So wasting no time, I whiz it off to a canvas repair place I've spoken to. I'm not going to name them yet as I did with the last one as that turned out to be a waste of time, but these guys are young, enthusiastic and competely free of BS so I have high hopes. They advised me not to have a new canvas as the tear, to them, was really small and they've repaired canvasses with far greater damage without hesitation, so a new panel will be put in on the side. In addition, they're going to cut out and replace the front section where the solar cables came through the canvas, and stitch in a canvas tunnel to hide the cables, like the one in the left hand corner where the reading light cables are fed. The price for this was £180 and will be ready in 3 weeks.
Without the canvas there, access to some parts of the top is massively improved and I was able to get in and have a good clean while I had chance. The reason the solar cables will no longer be passing through the canvas is that I can now get to the top of the inside roof and feed the cables through behind the metal strip, after dremelling a slight indentation in the top, and then down the inside of the canvas inside the tunnel they're making. As a result, the appearance of the solar cables will be neater inside and out, and will remove the risk of leaks where the gland was sealed through the canvas in future (though there was absolutely no sign of that happening).
Absolutely buzzing how well that went, beers will be drunk tonight even though it's a school night
P
Phil_G
Guest
Brilliant Andy, mystery solved. This thread will be a godsend to so many people in the future...
Makes you wonder why all the pop-top people you spoke to didnt mention it...
Makes you wonder why all the pop-top people you spoke to didnt mention it...
As with most things taking it apart is the easy part, the hard part is putting back together. Take your time refitting, expect this to be more frustrating and fiddly.
Yes I'm only too aware that I'm only halfway through thisAs with most things taking it apart is the easy part, the hard part is putting back together. Take your time refitting, expect this to be more frustrating and fiddly.

Yes this method of securing it wasn't mentioned by any of the "experts" I spoke to and never came up on any of my 'net searches. I hope it does help someone else out in the future.Brilliant Andy, mystery solved. This thread will be a godsend to so many people in the future...
Makes you wonder why all the pop-top people you spoke to didnt mention it...
So pleased with the progress made on this today.
I picked up the canvas from being repaired the other day. The workmanship is good but the match and blending in of the repaired section is disappointing, so I'm not going to recommend them on here. Shame, they talked the talk when I took it in, but I'm getting used to being unimpressed by tradesmen within the campervan industry. Anyway, it's now solid and I had a day off today, which according to last night's forecast was going to be free of rain.
I knew it'd be a struggle to get it back on and it is. Holding the bead around the edge of the canvas into the channel at the top of the roof, while pushing the sealing rubber strip in is proving to be really difficult, particularly as I have a damaged R hand which stops me putting any pressure on with my thumb, which is just what is needed to push it home. If it doesn't go in properly it just undoes itself behind you as you move along, and the bead of the canvas just drops out of the channel if it's not held in.
I've had to call it a day anyway as the light shower of rain that started half an hour in looks like it's set for the day now, but before I have another go I need to find some sort of tool that will allow me to get enough pressure on the strip to compress it and squeeze it into the retaining channel, without damaging the rubber, and hold the bead in. The sealing strip is about 10mm wide, with the opening of the metal channel about 2-3mm less than that. I'm going to spend a while googling for ideas but just wondered if anyone knew of any sort of tool that exists for this sort of task, maybe in lines of work that haven't occurred to me? I've tried screwdrivers, all my trim tools, the end of a spoon, a 1" wallpaper border roller but nothing that works yet.
Would glazing paddles work? E.g. https://www.amazon.co.uk/Window-Gla...azing+paddle&qid=1557486351&s=gateway&sr=8-10
Is that the same sort of thing I posted? It looks better, it seems to have a bar pushing the rubber down.
Think it needs something closer in size to the channel. Actually I have tried using the end of window packing wedges like in that picture, but they were denting the rubber and kept slipping off. I'm trying to find something on Amazon that can deliver to work tomorrow as I don't want to waste this Sunday cos I won't get another free day for a while after that.Would glazing paddles work? E.g. https://www.amazon.co.uk/Window-Gla...azing+paddle&qid=1557486351&s=gateway&sr=8-10
Last edited:
Similar threads
- Replies
- 3
- Views
- 2K
- Locked
- Replies
- 0
- Views
- 826
- Replies
- 15
- Views
- 2K
- Replies
- 1
- Views
- 974

