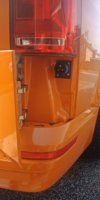
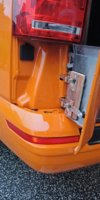
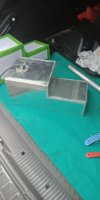
Anyone know how to make rear offside under indicator section hinged access panel to install electrics simulator to Jerber Campers hook up access .. I would like to install an additional 230v socket in there to power externally when on hook up ..typically small oven etc... but don't want to put socket underneath for ingress issues and having to get under to connect and disconnect
You are using an out of date browser. It may not display this or other websites correctly.
You should upgrade or use an alternative browser.
You should upgrade or use an alternative browser.
Rear Under Tail Light Panel For Hidden Electric
Yes spot on... I can see the hinge method of attachment to van .. looks like bonded filler piece to the moveable section.. is there anything clipping it in position when driving or is it free..
How is the panel attached initially to remove it to carry out mods
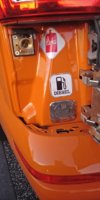
The hinges are Hafele Grass Tiomos 110* Inset clip on 348.31.803 (I initially used the 95* ones but the door didn't open far enough to get the LPG filler onto the refill point) with 0mm mounting plates 348.38.511. The main part of the hinge is screwed to some 12mm hardwood ply and the plates are bolted to an almost 90* strip of 3mm aluminium which is in turn bolted to the body via rivnuts,
The ply is stuck to the plastic cover using PU adhesive.
I used a junior hacksaw blade and a reverse jigsaw blade to cut the plastic cover, cutting down the angles for the most part to leave as much of the cover as possible, replacing the plastic push fit retainers with bolts into rivnuts in the existing holes to keep the top part and side parts of the cover in place once they've been cut off the main cover shape.
I needed to reprofile the metal on the door alignment plates to allow the now opening doors to clear them, just cut it down to match the rubber block shape.
Some cam locks off aliexpress US $8.3 8% OFF|Black MS725 inner hexagon Cam Lock, cabinet Cylindrical door locks, for Distribution box,Industrial lock-in Cabinet Locks from Home Improvement on Aliexpress.com | Alibaba Group to keep the covers closed with a couple of handles to make it easier to open US $6.17 22% OFF|Rarelock 10pcs/lot ABS Handle For Padlock Cabinet Lock Box,Lock Catch e-in Locks from Home Improvement on Aliexpress.com | Alibaba Group
I found an air powered finger belt sander with various grades of belt was the best way to shape the plastic and the metalwork, giving really a nice finish, you just have to be very careful and keep offering it up to check progress since you can't put it back on once you've ground it off.
If you need any measurements or close up pics let me know.
Did you think about it opening the other way? I'm thinking about doing this and I was planning on using a tab like the fuel flap to stop someone opening it when locked.
I was also concerned about the rear lid scratching it when you open it.
I was also concerned about the rear lid scratching it when you open it.
I have seen similar where the hinges were mounted the other way round (big circle bits fixed to the van) but that way means you need to open the tailgate before opening the covers, you could do it with a hinge on the outer edge but might have issues finding a place to fix to the cover and van unless you were prepared to bolt through the cover.
That's fine but depending on where you put the circuit breaker, you might then have mains cable going through half to three quarters of the van before it gets to the protection device.
The recommended max length between input plug and RCD is 2 metres.
The more you put the cable at risk of being damaged inside the van, sharp bends, getting crushed under carpets, wearing through the insulation on the edges of holes in the metalwork etc, the more you risk having a live conductor shorting out to the bodywork, which does not make for a nice day if somebody gets electrocuted.
Mount it under the bonnet next to van battery.
Nice and clean and bonnet can be closed without damaging cable.
That’s where mines at, dry and clean.
I’ve had that rear cover off a few times and it’s always muddy.
The hinges are Hafele Grass Tiomos 110* Inset clip on 348.31.803 (I initially used the 95* ones but the door didn't open far enough to get the LPG filler onto the refill point) with 0mm mounting plates 348.38.511. The main part of the hinge is screwed to some 12mm hardwood ply and the plates are bolted to an almost 90* strip of 3mm aluminium which is in turn bolted to the body via rivnuts,
The ply is stuck to the plastic cover using PU adhesive.
I used a junior hacksaw blade and a reverse jigsaw blade to cut the plastic cover, cutting down the angles for the most part to leave as much of the cover as possible, replacing the plastic push fit retainers with bolts into rivnuts in the existing holes to keep the top part and side parts of the cover in place once they've been cut off the main cover shape.
I needed to reprofile the metal on the door alignment plates to allow the now opening doors to clear them, just cut it down to match the rubber block shape.
Some cam locks off aliexpress US $8.3 8% OFF|Black MS725 inner hexagon Cam Lock, cabinet Cylindrical door locks, for Distribution box,Industrial lock-in Cabinet Locks from Home Improvement on Aliexpress.com | Alibaba Group to keep the covers closed with a couple of handles to make it easier to open US $6.17 22% OFF|Rarelock 10pcs/lot ABS Handle For Padlock Cabinet Lock Box,Lock Catch e-in Locks from Home Improvement on Aliexpress.com | Alibaba Group
I found an air powered finger belt sander with various grades of belt was the best way to shape the plastic and the metalwork, giving really a nice finish, you just have to be very careful and keep offering it up to check progress since you can't put it back on once you've ground it off.
If you need any measurements or close up pics let me know.
Any photos of the doors shut showing the cam lock closing ... I've decided to fit an LPG filler to the rhs under back light panel and peace the 907 Bottle with a gaslow version .. perhaps in bigger locker than standard one fitted...
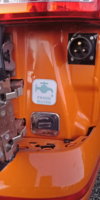
What's behind the the flat sections where the ehu and the LPG plates are mounted ? . does the gas connector on the rear of the filler plate need to be a straight type or will angled type fit ?
Like this?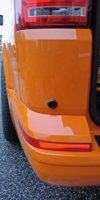
There is a gap behind those flat parts that goes through to the inside of the van BUT there isn't much space, I needed to grind away the pressing that forms the rear corner inside to allow me to get the gas fitting in with a convoluted tube over everything inside the van to give a drop out to the underside of the van in case of any leaks.
The electric side wasn't a problem as the cable would bend enough to get around the corner that is almost right behing the outer skin, about 1 1/2 to 2 inches gap between outer wing and inner strenghtening pressings if I remenber correctly, maybe less, if you have the inside panels off you can feel from the inside of the van towards that panel under the lights.
There are 3 thicknesses of metal under the lower parts where I've fitted the fillers for heater diesel and water tanks. They were a bugger and I had to use a long reach die grinder to get them right.
Not got any pics to hand but I can take some tomorrow of the finished inlets.
Thanks photo to give me idea where to fit cam lock...
Did the convoluted tube route from the filler point into the gas locker and hence drop out zone and does this fit over the ss gas pipe ?
I'll know more when I start looking to access via any panels to take off although it's all carpeted on the inside behind and not sure what panels to get at to remove ... Photos when you get a chance appreciated.
Ian
I have a GasIt LPG tank fitted under the van, so the gas line goes down and out of the van from a straight fitting off the back of the filler, via flexible filler hose through one of the existing holes at the bottom of the rear corner behind the wheelarch to exit underneath, the convoluted tube ensures any leaks exit the van without any chance of any gas entering the van interior.
It actually looks like a steering rack gaiter Replacement rubber bot for removalbe LPG fillpoints - GAS IT Leisure Gas Bottles, Gas Cylincers and Gas Tanks - Catering, Motorhome, Campervan, Caravan, Farrier and Road Repair Refillable Gas Solutions. that is clamped to a brass fitting at the filler end Flange for boot connection for removable fill points - GAS IT Leisure Gas Bottles, Gas Cylincers and Gas Tanks - Catering, Motorhome, Campervan, Caravan, Farrier and Road Repair Refillable Gas Solutions.
It actually looks like a steering rack gaiter Replacement rubber bot for removalbe LPG fillpoints - GAS IT Leisure Gas Bottles, Gas Cylincers and Gas Tanks - Catering, Motorhome, Campervan, Caravan, Farrier and Road Repair Refillable Gas Solutions. that is clamped to a brass fitting at the filler end Flange for boot connection for removable fill points - GAS IT Leisure Gas Bottles, Gas Cylincers and Gas Tanks - Catering, Motorhome, Campervan, Caravan, Farrier and Road Repair Refillable Gas Solutions.
This is the filler tubing I used FARO Type Ø8mm Poly Pipe - 1 meter
I haven't opened these covers in over 6 months (since before last year's Dubs in't Dales) and they are relatively clean underneath.
Has anyone done this with the hinges on the outside?
Similar threads
- Replies
- 3
- Views
- 2K
- Replies
- 5
- Views
- 1K
- Replies
- 0
- Views
- 697
- Replies
- 4
- Views
- 1K
- Replies
- 1
- Views
- 1K

