[Guide] Mobile Solar Panels ? . . . - How I Did It -
- Thread starter Dellmassive
- Start date
** New Kit **
£1 per / Watt
DOKIO 300w Solar Panel Kit Mono Portable Flexible Folding -
https://amzn.to/32c8tGa

£1 per / Watt
DOKIO 300w Solar Panel Kit Mono Portable Flexible Folding -
https://amzn.to/32c8tGa

Slight change up today . . . . suns out, battery is low - its Solar Time . =]
this is my normal temp/mobile small setup:
50W fold out panel with a PWM controller hacked onto a 12v socket plug.


..
top socket for the AUX battery, and lower socket for the Starter battery.

after doing some recent testing on DC-DC chargers, and seeing theat most have an "Auto VSR" function where by the dc-dc charger kicks in and starts charging regardless of the ignition or engine run. (when the starter battery voltage is raised to a set point from either a EHU mains charger or solar charger)
so lets see if this 50W panel has enough to make that happen.

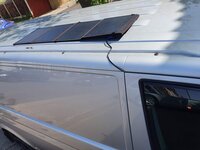
so this time for maximum solar yield im throwing the panel on the roof. . . .
.

.
this is the current starter battery state . . . .

ill update this later with the BM2 results . . . . . . . . TBC.
*********

**

*************
edit . . .
here are todays results . . . the kit was connected around 11am.
here is the BM2 starter readout:

the dips in the readout below corresponds with the AUX battery spikes . . . so as the Redarc DC-DC see the rise in starter battery voltage . . . it turns on.
which due to the current flow causes a volt drop, . . .
so it looks like the dc-dc charger has been cycling on & off as the starter battery rises and falls throughout the day. .

the BM2 AUX readout :


the BM3 readout:


The net effect is both batteries are more charged than they were this morning.
conclusion. . . .
The 50w kit has helped charge up BOTH batterys.
you can see the panel has raised the starter battery to the point where the AUX battery has started charging via the DC-DC charger.
so with the sunny day we have harvested charging power from 11am start to around 6pm ish.
But ultimately 50W is no where near enough to charge both battery's, but will maintain one battery . . . ie starter battery.
Bigger panels and more Watts can be used like this to charge BOTH batterys.
.
this is my normal temp/mobile small setup:
50W fold out panel with a PWM controller hacked onto a 12v socket plug.


..
top socket for the AUX battery, and lower socket for the Starter battery.

after doing some recent testing on DC-DC chargers, and seeing theat most have an "Auto VSR" function where by the dc-dc charger kicks in and starts charging regardless of the ignition or engine run. (when the starter battery voltage is raised to a set point from either a EHU mains charger or solar charger)
so lets see if this 50W panel has enough to make that happen.

so this time for maximum solar yield im throwing the panel on the roof. . . .

.

.
this is the current starter battery state . . . .

ill update this later with the BM2 results . . . . . . . . TBC.
*********

**

*************
edit . . .
here are todays results . . . the kit was connected around 11am.
here is the BM2 starter readout:

the dips in the readout below corresponds with the AUX battery spikes . . . so as the Redarc DC-DC see the rise in starter battery voltage . . . it turns on.
which due to the current flow causes a volt drop, . . .
so it looks like the dc-dc charger has been cycling on & off as the starter battery rises and falls throughout the day. .

the BM2 AUX readout :


the BM3 readout:


The net effect is both batteries are more charged than they were this morning.
conclusion. . . .
The 50w kit has helped charge up BOTH batterys.
you can see the panel has raised the starter battery to the point where the AUX battery has started charging via the DC-DC charger.
so with the sunny day we have harvested charging power from 11am start to around 6pm ish.
But ultimately 50W is no where near enough to charge both battery's, but will maintain one battery . . . ie starter battery.
Bigger panels and more Watts can be used like this to charge BOTH batterys.
.
Last edited:
Sorry, . . . . . . . . . but i just couldn't help myself.
meet the latest edition to the Dellmassive solar family . . . . .
The BlueFusion 50W foldup solar kit . . . .
I've put a link on the first post - Mobile Solar Panels ? . . . - How I Did It -
or go see it direct here >
************************************************************************************
Delivered in 3days . . . .
i dont know why i get so excited about this stuff. =]

so lets see it

this is very similar to the ACCOPOWER, But with improvements . .

.

the whole thing folds up nicley into the incuded pouch on the back . . .
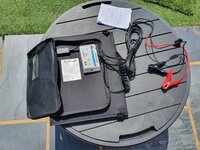
spec wise we have this :
50W, VOC@21.3v, ISC@3.03A panel,
and a branded EPEVER PWM controller.

.
yes the cable is fused . . .

with a 5A fuse . . .
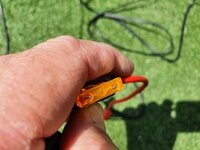
and a decent battery clip . . .

.
SOLARWORLD cells . . .
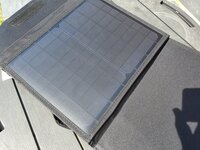
folded out we have this . . .

.
.
.
.
here is the user guide FYI:
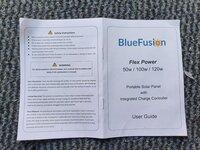
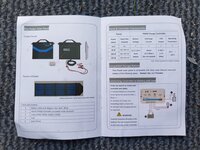


.....
and the EPEVER:
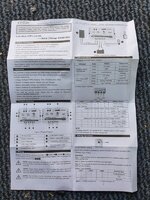
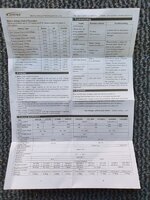
...
I've got it hooked up to a Extreme AGM "solar2" , and BM2 . . . . . so ill updated this with a readout later . . .

meet the latest edition to the Dellmassive solar family . . . . .
The BlueFusion 50W foldup solar kit . . . .
I've put a link on the first post - Mobile Solar Panels ? . . . - How I Did It -
or go see it direct here >
************************************************************************************
Delivered in 3days . . . .
i dont know why i get so excited about this stuff. =]

so lets see it

this is very similar to the ACCOPOWER, But with improvements . .

.

the whole thing folds up nicley into the incuded pouch on the back . . .

spec wise we have this :
50W, VOC@21.3v, ISC@3.03A panel,
and a branded EPEVER PWM controller.

.
yes the cable is fused . . .

with a 5A fuse . . .

and a decent battery clip . . .

.
SOLARWORLD cells . . .

folded out we have this . . .

.
.
.
.
here is the user guide FYI:


.....
and the EPEVER:


...
I've got it hooked up to a Extreme AGM "solar2" , and BM2 . . . . . so ill updated this with a readout later . . .

Interested to read how this is @Dellmassive. I keep looking at them as a portable option to trickle charge the batteries. Don’t want to put a permanent solar panel on the roof but being able to connect something like this and leave it on the dash would be ideal. Also interested to hear how it compares to the other 50W foldable one you have (was it an Acopower)Sorry, . . . . . . . . . but i just couldn't help myself.
meet the latest edition to the Dellmassive solar family . . . . .
The BlueFusion 50W foldup solar kit . . . .
I've put a link on the first post - Mobile Solar Panels ? . . . - How I Did It -
or go see it direct here >
************************************************************************************
Delivered in 3days . . . .
i dont know why i get so excited about this stuff. =]
View attachment 69125
so lets see it
View attachment 69126
this is very similar to the ACCOPOWER, But with improvements . .
View attachment 69128
.
View attachment 69129
the whole thing folds up nicley into the incuded pouch on the back . . .
View attachment 69130
spec wise we have this :
50W, VOC@21.3v, ISC@3.03A panel,
and a branded EPEVER PWM controller.
View attachment 69131
.
yes the cable is fused . . .
View attachment 69132
with a 5A fuse . . .
View attachment 69133
and a decent battery clip . . .
View attachment 69134
.
SOLARWORLD cells . . .
View attachment 69135
folded out we have this . . .
View attachment 69136
.
.
.
.
here is the user guide FYI:
View attachment 69137View attachment 69138View attachment 69139View attachment 69140
.....
and the EPEVER:
View attachment 69141View attachment 69142
...
I've got it hooked up to a Extreme AGM "solar2" , and BM2 . . . . . so ill updated this with a readout later . . .
View attachment 69127
Interested to read how this is @Dellmassive. I keep looking at them as a portable option to trickle charge the batteries. Don’t want to put a permanent solar panel on the roof but being able to connect something like this and leave it on the dash would be ideal. Also interested to hear how it compares to the other 50W foldable one you have (was it an Acopower)
well , , , they are basically the same spec, so both work the same.
but being 50W they can charge at 2.8A, where as lower power panels and ones without a solar controller will work more like a maintainer.
ACCOPower:
50W
VOC 21.3v
ISC 3.04A,
and BlueFusion:
50W
VOC 21.3v
ISC 3.03A,
and as a comparison . . .
here is my Lensun 200W>
5*40W - 200W
VOC 21.24v
ISC 12.22A,
......
so if you want one for a basic battery topper-upper . . . then a 50W works great. (ie 2.8A charge rate)
if you want a faster charge rate or plan on using the van while solar connected . . .
then look at a
100W kit - around 6A charge rate
or
200w kit - around 12A charge rate
I've just realised that i havent got my 200W Lensun shown here . . . .
so here it is.
my original kit is a 5x40W@200W with a EPEVER MPPT (no lithium profile)
but it looks like they have upgraded the kit now:
its 4x50W@200w and a new mppt controller with a lithium profile and wifi dongle thing.

 www.lensunsolar.com
..

****************************************
but as you will see i swapped out the EPEVER for a Victron 75/15 MPPT. (i like the bluetooth monitoring APP and load output.)
it starts folded up like this . .

and has legs on the back of each panel to angel it better . .
there is a zipped pocket that contains the conections and controller . . .

these are the cells up close . . .

the joining wires between panels are sewn into the body . . .

size wise . . .
this is the 200W Lensun next to the 50W BlueFusion . .
you can see it in action here at T6F Summer Camp:

with this setup i had the panel just on the floor outside.
i then used a set of 15ft MC4 PV extension leads that run into the tent. (that way i could position the panel where i liked)
in the tent in a battery box i had the MPPT controller and battery etc.

the 200W kit should create upto about 12A, here you can see a BM2 readout of the mobile leisure battery that was in the tent,
we had a Dometic compressor fridge, lights, chargers etc etc etc running 24/7, you can see the result below.

edit:
this is the original solar mppt controller that come with the kit. . . .


end.
so here it is.
my original kit is a 5x40W@200W with a EPEVER MPPT (no lithium profile)
but it looks like they have upgraded the kit now:
its 4x50W@200w and a new mppt controller with a lithium profile and wifi dongle thing.

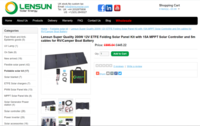
Lensun 200W Foldable Solar Panel Waterproof Solar Controller
Lensun 200W 12V Foldable Solar Panel Kit with Waterproof MPPT Solar Controller, battery clips for RV/Camper Boat Battery Charge
 www.lensunsolar.com

..

****************************************
but as you will see i swapped out the EPEVER for a Victron 75/15 MPPT. (i like the bluetooth monitoring APP and load output.)
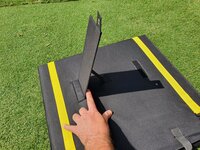
it starts folded up like this . .

and has legs on the back of each panel to angel it better . .

there is a zipped pocket that contains the conections and controller . . .

these are the cells up close . . .

the joining wires between panels are sewn into the body . . .

size wise . . .
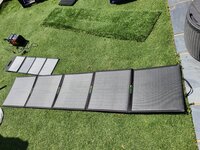
this is the 200W Lensun next to the 50W BlueFusion . .

you can see it in action here at T6F Summer Camp:
with this setup i had the panel just on the floor outside.
i then used a set of 15ft MC4 PV extension leads that run into the tent. (that way i could position the panel where i liked)
in the tent in a battery box i had the MPPT controller and battery etc.
the 200W kit should create upto about 12A, here you can see a BM2 readout of the mobile leisure battery that was in the tent,
we had a Dometic compressor fridge, lights, chargers etc etc etc running 24/7, you can see the result below.
edit:
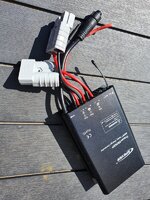
this is the original solar mppt controller that come with the kit. . . .


end.
Last edited:
Does anyone know of a cheap (<£100) folding solar panel of around 50W that doesn’t include a solar controller, so just with leads (e.g. MC4 connectors)?
I’d like to put in a Victron MPPT solar controller now ready for a solar panel on the roof in the future, but we haven’t got a pop top fitted yet. So was thinking I could have a cheap folding panel left on the dash to top up the leisure battery for now, with the controller already fitted ready for the future.
I’d like to put in a Victron MPPT solar controller now ready for a solar panel on the roof in the future, but we haven’t got a pop top fitted yet. So was thinking I could have a cheap folding panel left on the dash to top up the leisure battery for now, with the controller already fitted ready for the future.
This one is reasonably priced as is the Blue Fusion one @Dellmassive has just bought. Both come with controllers but the wiring is easily removed (have a look at the pictures).


50W 100W Solar Panel charger bag 12V folding Kit Caravans Boat Motorhome | eBay
Find many great new & used options and get the best deals for 50W 100W Solar Panel charger bag 12V folding Kit Caravans Boat Motorhome at the best online prices at eBay! Free delivery for many products!
www.ebay.co.uk
Does anyone know of a cheap (<£100) folding solar panel of around 50W that doesn’t include a solar controller, so just with leads (e.g. MC4 connectors)?
I’d like to put in a Victron MPPT solar controller now ready for a solar panel on the roof in the future, but we haven’t got a pop top fitted yet. So was thinking I could have a cheap folding panel left on the dash to top up the leisure battery for now, with the controller already fitted ready for the future.
semi flexable or foldable?
you could use any of the kits above . . . .
i done the same thing . . . just swapped out the PWM controller for a Victron. Then just kept the old controller for another day.
Lensun & Renogy & PhotonicUnivers all do panels only . . .
buy you say cheap . . . and 50W ish, so £2 per watt.
lesun example :
or £99 for the 50W above.
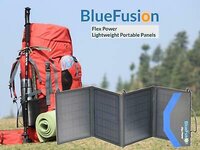
BlueFusion Portable Folding Solar Panel Charger 50W, 100W, 120W | eBay
Flex Power 50W, 100W, 120W. Peak Power (Pmax): 50W 100W 120W. Premium Solar Panels and Accessory for Leisure and Marine Applications. Lightweight and Portable. Panel Model: MD1199/50W MD1199/100W MD1199/120W.
rover.ebay.com
************************************************************************************
Foldable. I just assumed the controller was attached/inbuilt to the ones above (and might be able to save money if I could buy the panel without controller) but if you think it’s easy enough to remove then maybe I’ll got for one of those.
no the controller are always separate/removable on all the kits. . . .
they are normally just velcro`ed in.
the foldup ones are great that store away small.
and the semi flexable ones are great, are more durable, but take up more space . . .
the controllers are normally the cheap PWM controllers that dont cost much. . . .
obviously a upgrade to a victron will be a big improvement.
Next Day . . . . . Time to test the BlueFusion 50W fold kit out on the van.
first thing first, . . . . . . . i cut off the battery clamps then got a fused "12v 15A plug/socket extension lead" and connected them together.
i just cut off the socket and . . . . then soldered and heat-shrink the ends together.
which gave me this . . .


next was out to the van . . .

remembering into follow the "solar controller standard" of CONNECT BATTERY FIRST - THEN SOLAR PANELS SECOND.
i left the panel folded up and plugged into the 12v starter battery socket . . .

wanting to copy yesterdays ACCOPOWERS test i layed the panel out of the roof..

.

and folded the flap under . . .

ill update this later with the BM2 results.
Edit:
Looking good so far. . . . its only lightly sunny . .
but the starter battery is showing a charge and a raise in voltage . . .


to the point that the Redarc DC-DC charger has kicked in, in "Auto VSR" mode and started charging the AUX battery.


BM3 readout (combined graphs)


well leave it all connected and see what happens later . . . . .
edit #2
sun has gone in and its cloudy now . . . . . . . =[
its started raining, so I've ended the test.
looks like even on a couldy day 50w is enough to show a difference . . .
starter BM2:


AUX BM2:


BM3 combined readout.


you can see from the BM3 graph that the Redarc DC-DC charger kicked in as the starter battery reached around 13v
net result . . . both batteries have received a charge. . .
test ended just now due to weather . . .
.
first thing first, . . . . . . . i cut off the battery clamps then got a fused "12v 15A plug/socket extension lead" and connected them together.
Car Cigarette Lighter Extension Cable, CHGeek 12V 24V Adapter Plug Socket DC Power Supply Wire Lead Car Charger 12FT/3.6M Male to Female for Outdoor, Camping and Travelling: Amazon.co.uk: Car & Motorbike
Car Cigarette Lighter Extension Cable, CHGeek 12V 24V Adapter Plug Socket DC Power Supply Wire Lead Car Charger 12FT/3.6M Male to Female for Outdoor, Camping and Travelling: Amazon.co.uk: Car & Motorbike
amzn.to
i just cut off the socket and . . . . then soldered and heat-shrink the ends together.
which gave me this . . .


next was out to the van . . .

remembering into follow the "solar controller standard" of CONNECT BATTERY FIRST - THEN SOLAR PANELS SECOND.
i left the panel folded up and plugged into the 12v starter battery socket . . .

wanting to copy yesterdays ACCOPOWERS test i layed the panel out of the roof..

.

and folded the flap under . . .

ill update this later with the BM2 results.
Edit:
Looking good so far. . . . its only lightly sunny . .
but the starter battery is showing a charge and a raise in voltage . . .


to the point that the Redarc DC-DC charger has kicked in, in "Auto VSR" mode and started charging the AUX battery.


BM3 readout (combined graphs)


well leave it all connected and see what happens later . . . . .
edit #2
sun has gone in and its cloudy now . . . . . . . =[
its started raining, so I've ended the test.
looks like even on a couldy day 50w is enough to show a difference . . .
starter BM2:


AUX BM2:


BM3 combined readout.


you can see from the BM3 graph that the Redarc DC-DC charger kicked in as the starter battery reached around 13v
net result . . . both batteries have received a charge. . .
test ended just now due to weather . . .
.
Last edited:
New Mobile Solar Related idea today . . .
after playing with the 50W fold up kits over the last couple of days i though it was time to start stepping up the power.
the plan is to start using some of the semi-flexible panels wired into a standalone controller . . .
but also to connect them up to the DC-DC charger if it has a solar input.
im starting off with the 110W black Lensun panel i have (one of the two panels LS-110Fx2, so 110w+110W=220W kit)
 www.lensunsolar.com


im planing to put this up on the vans roof . . . . as a temporary mobile solar. (for stationary use - not driving)
so to stop any wind or weather causing trouble im planing to use magnet strip so that it can magnet to the roof of the van and not blow-off...
a quick look on amazon led me to this :

this is what arrived . . .

.

it cuts easy and is not super magnetic . . . . . but with a long strip, looks like it will do the job.
we started of with this . .
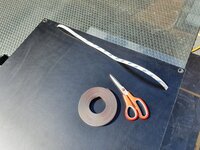
then this . . .

up close its like this . .
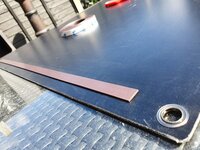
..
and a rough guide on size . . . . heres the finger shot.

....
Job done right ?
well this is what i have now . . . .
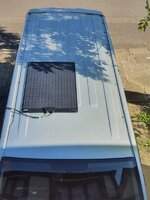
a 110W flex-able panel firmly positioned on the roof with magnetic tape . . . . that will easily peel back off the roof. then easily stored in the back of the van.

next ill make up a cable to connect to the Redarc BCDC1250D DC-DC controller for testing . . .
and ill do a second Victron MPPT test . . .
TBC . . . . . . . .
after playing with the 50W fold up kits over the last couple of days i though it was time to start stepping up the power.
the plan is to start using some of the semi-flexible panels wired into a standalone controller . . .
but also to connect them up to the DC-DC charger if it has a solar input.
im starting off with the 110W black Lensun panel i have (one of the two panels LS-110Fx2, so 110w+110W=220W kit)
Black flexible solar panel
Black flexible solar panel made of fiberglass back sheet, fiberglass back sheetis better with ETFE film than PET back sheet.
 www.lensunsolar.com
im planing to put this up on the vans roof . . . . as a temporary mobile solar. (for stationary use - not driving)
so to stop any wind or weather causing trouble im planing to use magnet strip so that it can magnet to the roof of the van and not blow-off...
a quick look on amazon led me to this :

this is what arrived . . .

.

it cuts easy and is not super magnetic . . . . . but with a long strip, looks like it will do the job.
we started of with this . .

then this . . .

up close its like this . .

..
and a rough guide on size . . . . heres the finger shot.

....
Job done right ?
well this is what i have now . . . .
a 110W flex-able panel firmly positioned on the roof with magnetic tape . . . . that will easily peel back off the roof. then easily stored in the back of the van.

next ill make up a cable to connect to the Redarc BCDC1250D DC-DC controller for testing . . .
and ill do a second Victron MPPT test . . .
TBC . . . . . . . .
Prt2 - next day
with the Redarc dc-dc on Anderson plugs it was out in 2 seconds
out to the shed, we had an MC4 on the power in side - yellow wire.

and made up a short 10awg earth/ground/neg cable with the other MC4...

all heat shrinked and ready to go . . .
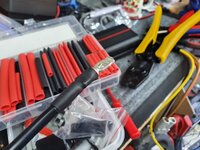
once i had the new black cable fitted into the anderson plug, we were ready to go . . . (luck for me, when we tested the Victron Orion DC-DC it was an isolated unit and need two ground links . . . so for that install i just fitted two Anderson plugs, both with ground links . . . then one red from each battery... That made my life here easy as i already had a body ground (for the solar panel) - so just added it to the spare slot on the Redarc.
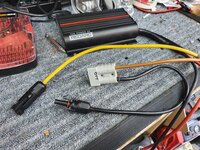
next up was a MC4 extension cable . . . here one ready to go . .
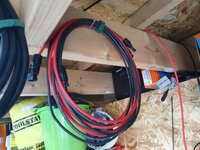
this is what we have ready to go . .
1x 110W semi flexable lensun panel with mag strips.
the Readrc dc-dc with MC4 & andersons,
one MC4 link lead.
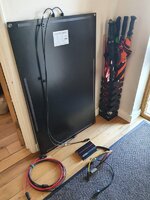
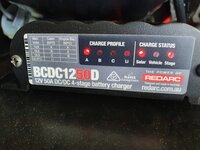
The Readrc just plugged right back in . . leaving us the two MC4 connectors for the solar panel.

which plugged in here like this . .

which gave us a solar power link light right away plus a bulk charge indication. . .
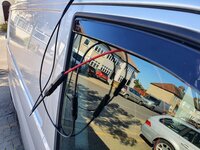
i run the cables through the window in this occasion . .
and the the panel up on the roof . . .magnet stuck down to stop ant wind from getting it airborn.
this is the two battery read outs at the time of plugging in . . .
starter


aux


*******************
the weather is no great today . . . but we have a bit of sun this morning.
lets see how the Redarc MPPT does.... and if it revers charges the starter battery at all . . .?
TBC . . .
*****************
edit:
got to go out in the van . . . . so here are the results so far . . .

you can see the AUX battery has been charging from the solar panel connected to the Redarc dc-dc . . .


but the starter battery has remained static as it was before . . .

you can see it better on the BM3 readout . .

so in conclusion . . . .
The Redarc Dc-Dc MPPT works great with mobile solar panels.
But does not Reverse charge the starter battery . . .
So far it looks like that its only the Renogy and CTEK units that have this function.
**********************************
one option to get around this (Reverse charge the starter battery from the AUX battery) could be one of the Votronic diode based trickle chargers,
or the more advanced Ablemail AMT12-2 trickle charger.
though i would fit a disable switch to either of the above so you could choose when to have the batteries adjoined in this way.
ie use scenario would be:
on EHU with charger connected to AUX battery
Mobile with Solar connected only to AUX battery
***********************************
other possible option would be:
connect EHU charger to starter battery, then the "Auto VSR" on the DC-DC will start charging the AUX battery, - Subject to 10-20% possible losses over the conversion process compared to EHU direct to AUX & loads.
or
Separate solar MPPT to starter battery, then the "Auto VSR" on the DC-DC will start charging the AUX battery, - Subject to 10-20% possible losses over the conversion process compared to EHU direct to AUX & loads.
with the Redarc dc-dc on Anderson plugs it was out in 2 seconds
out to the shed, we had an MC4 on the power in side - yellow wire.

and made up a short 10awg earth/ground/neg cable with the other MC4...

all heat shrinked and ready to go . . .

once i had the new black cable fitted into the anderson plug, we were ready to go . . . (luck for me, when we tested the Victron Orion DC-DC it was an isolated unit and need two ground links . . . so for that install i just fitted two Anderson plugs, both with ground links . . . then one red from each battery... That made my life here easy as i already had a body ground (for the solar panel) - so just added it to the spare slot on the Redarc.

next up was a MC4 extension cable . . . here one ready to go . .

this is what we have ready to go . .
1x 110W semi flexable lensun panel with mag strips.
the Readrc dc-dc with MC4 & andersons,
one MC4 link lead.

The Readrc just plugged right back in . . leaving us the two MC4 connectors for the solar panel.

which plugged in here like this . .

which gave us a solar power link light right away plus a bulk charge indication. . .

i run the cables through the window in this occasion . .

and the the panel up on the roof . . .magnet stuck down to stop ant wind from getting it airborn.

this is the two battery read outs at the time of plugging in . . .
starter


aux


*******************
the weather is no great today . . . but we have a bit of sun this morning.
lets see how the Redarc MPPT does.... and if it revers charges the starter battery at all . . .?
TBC . . .
*****************
edit:
got to go out in the van . . . . so here are the results so far . . .

you can see the AUX battery has been charging from the solar panel connected to the Redarc dc-dc . . .


but the starter battery has remained static as it was before . . .

you can see it better on the BM3 readout . .

so in conclusion . . . .
The Redarc Dc-Dc MPPT works great with mobile solar panels.
But does not Reverse charge the starter battery . . .
So far it looks like that its only the Renogy and CTEK units that have this function.
**********************************
one option to get around this (Reverse charge the starter battery from the AUX battery) could be one of the Votronic diode based trickle chargers,
or the more advanced Ablemail AMT12-2 trickle charger.
though i would fit a disable switch to either of the above so you could choose when to have the batteries adjoined in this way.
ie use scenario would be:
on EHU with charger connected to AUX battery
Mobile with Solar connected only to AUX battery
***********************************
other possible option would be:
connect EHU charger to starter battery, then the "Auto VSR" on the DC-DC will start charging the AUX battery, - Subject to 10-20% possible losses over the conversion process compared to EHU direct to AUX & loads.
or
Separate solar MPPT to starter battery, then the "Auto VSR" on the DC-DC will start charging the AUX battery, - Subject to 10-20% possible losses over the conversion process compared to EHU direct to AUX & loads.
Last edited:
Hi dellmassive.
i have read this post and re read it and again and again I think I am getting solar panel blindness
anyways questions I have are the following , I think I am gonna go with a lensunsolar foldable 100w , my thinking is that with the 3x panels they will just fit on top of the dash with a bit of overhang seeing ur 4 panel blue solar panel has enough room.
I haven’t measured yet in the bus but will later. That’s the first thought.
this lensunsolar being the bigger panel and on ur advice to trickle charge my leisure battery even with the fridge on, would it be enough To still charge ?
The specs are this ....
Item Specifications:
Model: LS-100FD
Rated Power Output: 100W
Optimum Operating Voltage [Vmp]: 18V
Optimum Operating Current [Imp]: 5.56A
Open Circuit Voltage [Voc]: 21.24V
Short Circuit Current [Isc]: 6.11A
Cell Technology: Monocrystalline Solar Cells
Solar Cells Efficiency:21%
Production Tolerance: +3%
Output Type: Solar Cables, Solar Controller
Dimensions(unfolded): 1300 x 570 x 6 mm/51 x 22.5 x 0.24 inch
Dimensions(folded): 580 x 440 x 60 mm/ 22.8 x 17.3 x 2.3 inch
Net. Weight: 3.7 kgs/8.2 lbs
All Technical data at standard test condition AM=1.5, E=1000W/mm, Tc=25℃
I would for now just like to plug it into the cigarette socket with the PWM to charge. And I am also right in thinking with no load right now, they will charge both van and leisure battery through the CTEK on this method,
And looking how u replaced the croc clips u got the extention cable for the cigarette socket,
I checked the link that’s a 10A. Did you replace ur fuse for a 15A?
soldering and putting heat shrink around the joins will be ok. Just the fuse change is needed ?
Also what is your thought is between Anderson vs MC4 connectors. Which would be best ?
i might later have it just connected to the leisure battery , with a quick connector tucked under the front seat.
sorry for all the questions.
In case anyone is interested, this may help you assess your energy produced via your PV in kWh.yr for wherever you may be. I've never liked Wp as its just peak test conditions. I think you'll find most cell brands and inverters on the list, but I stress it is for households. But cells are generic in a sense. PV*SOL online - a free tool for solar power (PV) systems. This is a free tool, there is a payable one, but its not really necessary. Plus its pricey.
I’m curious as to why you cut and spliced the cables together rather than simply disconnecting the clips cable at the controller and attaching the new cable in its place at the controller. It looks like there is a set of screw connectors there? Was it just so you had a longer cable or was there some other reason?first thing first, . . . . . . . i cut off the battery clamps then got a fused "12v 15A plug/socket extension lead" and connected them together.
https://amzn.to/2yHRL7b
i just cut off the socket and . . . . then soldered and heat-shrink the ends together.
Hi dellmassive.
i have read this post and re read it and again and again I think I am getting solar panel blindness
anyways questions I have are the following , I think I am gonna go with a lensunsolar foldable 100w , my thinking is that with the 3x panels they will just fit on top of the dash with a bit of overhang seeing ur 4 panel blue solar panel has enough room.
I haven’t measured yet in the bus but will later. That’s the first thought.
this lensunsolar being the bigger panel and on ur advice to trickle charge my leisure battery even with the fridge on, would it be enough To still charge ?
The specs are this ....
Item Specifications:
Model: LS-100FD
Rated Power Output: 100W
Optimum Operating Voltage [Vmp]: 18V
Optimum Operating Current [Imp]: 5.56A
Open Circuit Voltage [Voc]: 21.24V
Short Circuit Current [Isc]: 6.11A
Cell Technology: Monocrystalline Solar Cells
Solar Cells Efficiency:21%
Production Tolerance: +3%
Output Type: Solar Cables, Solar Controller
Dimensions(unfolded): 1300 x 570 x 6 mm/51 x 22.5 x 0.24 inch
Dimensions(folded): 580 x 440 x 60 mm/ 22.8 x 17.3 x 2.3 inch
Net. Weight: 3.7 kgs/8.2 lbs
All Technical data at standard test condition AM=1.5, E=1000W/mm, Tc=25℃
I would for now just like to plug it into the cigarette socket with the PWM to charge. And I am also right in thinking with no load right now, they will charge both van and leisure battery through the CTEK on this method,
And looking how u replaced the croc clips u got the extention cable for the cigarette socket,
I checked the link that’s a 10A. Did you replace ur fuse for a 15A?
soldering and putting heat shrink around the joins will be ok. Just the fuse change is needed ?
Also what is your thought is between Anderson vs MC4 connectors. Which would be best ?
i might later have it just connected to the leisure battery , with a quick connector tucked under the front seat.
sorry for all the questions.
*************************
- looks like a nice kit, basically half of the 200W kit i have.lensunsolar foldable 100w
Lensun 100W 12V ETFE Foldable Solar Panel Kit, with 10A Controller for Battery & Solar Generator Power Station Charge
Lensun 100W 12V ETFE Foldable Solar Panel Kit, with 10A Controller for Battery & Solar Generator Power Station Charge
 www.lensunsolar.com
*
- im not so sure that will fit on the dash . . . my two dash units are 50W, so half the size. so have a measure up and maybe make a cardboard template . . . . thats not a massive problem as you can put it on the floor or roof as have shown above. (the 50w panels defo fit)3x panels they will just fit on top of the dash with a bit of overhang seeing ur 4 panel blue solar panel has enough room.
*
- yes, you get around 6A per 100W, and 3A on a 50W . . . . so depending on you loads or fridge power draw 100W is a good size to got with. (you can alway add more later if you need/want too)to trickle charge my leisure battery even with the fridge on, would it be enough To still charge
*
- correct provided you plug the solar into a 12v socket that is connected to the starter battery. . . .I would for now just like to plug it into the cigarette socket with the PWM to charge. And I am also right in thinking with no load right now, they will charge both van and leisure battery through the CTEK on this method,
then it will be: solar>starter battery>ctek dc-dc>leisure battery.
*
- NO... the max a 12v socket can take is around 10A or 150w ish (for long time, short burst is fine) . . . . and even at 10A the plug and socket will start to get HOT after about 5-10mins. so for me running a 50W panel im putting back in 3A, but fused the cable for safety at 10A. . . . . the socket is not designed for long duration at 10A or above due to the small contact area of the +ve and -ve pins.And looking how u replaced the croc clips u got the extention cable for the cigarette socket,
I checked the link that’s a 10A. Did you replace ur fuse for a 15A?
for you, if you wanted to connect your 100W panel, thats fine as it will be 6A max, so again fuse the cable at 10A for saftey.
but, for example i wouldnt connect a 200W solar @ 12A via that socket.
*
- yes, or as suggested above just unscrew the battery clamp cables (and keep for another layout) and just fit a new 12v plug lead for the dash socket idea)soldering and putting heat shrink around the joins will be ok. Just the fuse change is needed ?
*
Also what is your thought is between Anderson vs MC4 connectors. Which would be best ?
i might later have it just connected to the leisure battery , with a quick connector tucked under the front seat.
My take on this is that: all PV kit normally comes with MC4 connectors on the panel side . . they are cheap to buy and easy to fit . . . so i stick with using MC4 for all my panels and panel to controller inputs. . . it makes it easy to connect various panels to various solar controllers or dc-dc units, plus being male/female you cant mess up the polarity.
Now, i use Anderson 50A connectors on all my power output sides . . . (ie dc-dc to battery, or PWM to battery)
why? . . well i started using MC4`s, and ctek quick disconnects, and victron quick disconnects, and chock block, and Anderson power-pole and, and, and. i ended up in a complete mess with 5 different connection standards across all my kit. . . . . with some of the DC-DC charger chucking out +40A i chose the 50A Anderson connector. They are strong, tough, polarity conscious, a good tight fit and will take the current without getting hot or burning . . . (upto 45A/50A obviously)
so really the choose is entirely yours . . . just bear in mind that the MC4 connector was designed for high voltage low current (20A 600V) - MC4 connector - Wikipedia
and the Anderson 50A is designed for high Amps, low Voltage (50A/120A Max - 600V) - Anderson SB50 (120A) Connector Housing - Red
i also made up a load of adapter leads . . . so Anderson 50A to battery clamps or Anderson to 12v socket etc etc etc.
Then i just went out and got a few MC4 15ft extension leads . . (plus the MC4 connector tool)
and various 5/10/15ft 50A Anderson extension leads.
That way i can now connect any solar panel via MC4 to any device . . . .
and i can connect any device via 50A Anderson to the van, or shed, or jump-leads, or, or, or, or, .
*****************
Now in your case, on a 100w 6A panel, a 50A Anderson may be too beefy . .?
so you could go with using MC4 connectors as inputs to your CTEK dc-dc . . . or any other connector . . . though preferable locking and polarity sensitive.
well spotted. and yes the basic reason was for quickness (it was quicker to solder/join the cable to cut up 12v extension lead than it was to rummage through the shed to find the bits to make up a proper lead...... FYI I've kept the clamps and fuse etc for another day.I’m curious as to why you cut and spliced the cables together rather than simply disconnecting the clips cable at the controller and attaching the new cable in its place at the controller. It looks like there is a set of screw connectors there? Was it just so you had a longer cable or was there some other reason?
yes the PWM controller had screw terminals.
but i wanted the cable longer so i could put the panel on the vans roof.
The accopower kit was different as the PV pigtails from the panel were about 1mtr long, which reached into the van through the door, to the PWM controller that i hung on the seat headrest, then used a 1mtr 12v socket lead cutup to reach the 12v socket on the dash..
BUT , ,
The BlueFusion was slightly different in that the PV pigtail leads are about 6in, so the PWM had to stay in the pouch behing the panel. So i need about 3mtrs of cable to reach the 12v dash socket.
yes, i could have extened the PV cables and move the PWM inside the van.
Yes, i could have unscrewed the battery clamp lead and replace with a 12v plug lead
i could still do any of the above . . . . but for now i knew i wanted a like for like test again the accopower that had the 12v plug on.
Similar threads
- Replies
- 8
- Views
- 883
- Replies
- 3
- Views
- 341
- Replies
- 16
- Views
- 670
- Replies
- 3
- Views
- 293

