Keeps mine at 12.6, I asked the same question last week and if the AMT wasn’t working it would drop below 12.I’ve just fitted the AMT12-2 today and hooked up the EHU. The BM2 shows that the starter received some charge back but seems to have stopped at 12.29V.
What voltage level on the starter should it maintain / reach?
You are using an out of date browser. It may not display this or other websites correctly.
You should upgrade or use an alternative browser.
You should upgrade or use an alternative browser.
[Guide] Battery Maintainer (for Starter battery) -- How I Done It --
- Thread starter Dellmassive
- Start date
It’s definitely stopped at 12.29V. I’ll see what it does overnight.
Overnight the BM2 showed the voltage dropped to 12.2v so I’ve been in touch with Ablemail. They recommend I change the programme to number 5 and also return the unit for a software update (despite it only having been delivered last week).
However having checked all the connections I have established that the starter battery is actually measuring 12.8V despite the BM2 saying 12.29V. I’m going to swap out the BM2 for a new one as I suspect it’s faulty.
My AMT12-2 just arrived.
The leisure battery I have is a 100Ah Lithium battery. AM I right in assuming I need to set it up to "Setting 3"?
The leisure battery I have is a 100Ah Lithium battery. AM I right in assuming I need to set it up to "Setting 3"?
@Skyliner33 yes that I how read it.
If in any doubt email Jonathan on [email protected] . He was very good at responding when I had a few questions.
If in any doubt email Jonathan on [email protected] . He was very good at responding when I had a few questions.
Hi, yes, I spoke to him earlier, said I can use either 3 or 7. Im going in to see him on Monday as he wants a quick look at mu leisure electric setup.@Skyliner33 yes that I how read it.
If in any doubt email Jonathan on [email protected] . He was very good at responding when I had a few questions.

The Ablemail AMT12-2 unit looks just the job, but I'm struggling to figure out how to connect the positive starter battery side. I have a Redarc BCDC1225D, and that has starter input on a flying lead, not a post, so I can't bolt on to a post at the DC-DC charger. The current iteration of the AMT12-2 on sale appears to have blade connectors instead of 6mm posts, so I can't bolt both the starter battery feed and the Redarc input to the AMT post either. So, what would be the best way to connect in the AMT output to the starter-feed / Redarc input line? I was planning to butt-crimp & solder the starter feed to the Redarc input, but haven't done it yet so I still have both wires available, if only I could figure out how to connect the AMT into them.
Having thought about the above, it seems to me that the obvious way to join the systems is by bolting the starter battery feed, the Redarc input and the AMT output all together with a 6mm nut & bolt within a plastic box. I.e. a home-made 6mm terminal / junction box. Does this sound sensible?
I just use 12 / 24V 300A 3 Way / Pin Bus Bar Power Distribution Box Cable Connector Block | eBayHaving thought about the above, it seems to me that the obvious way to join the systems is by bolting the starter battery feed, the Redarc input and the AMT output all together with a 6mm nut & bolt within a plastic box. I.e. a home-made 6mm terminal / junction box. Does this sound sensible?
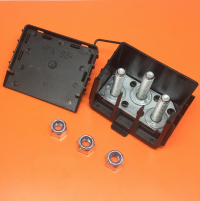
Thanks! When I posted I didn't know they were called a "bus bar" - once I discovered that it was easy to find them. That looks like exactly what I was imagining.
Ok I have just finished commissioning my recent Leisure battery system - Good Fun
Standard Starter Battery
Benton DX25 DC-DC Charger with MPPT
ALLiON 126Ah Lithium Battery
Victron IP65 25amp Smart Charger
Voltech VP 12v 1000w Inverter
Solar Blanket 200W
It all tests perfectly and I have wired it into a live ignition sense to give it full functionality
I have the ability to connect either the "Lithium" or the "starter" battery to the Victron IP65
for top up as required if needed. (changing settings via Bluetooth App for standard or Lithium)
I noticed when testing the Victron Charger when attached to the main battery that once it went high the
Benton DX25 DC-DC switched over to topping up the Lithium Leisure Battery......
Is this a reasonable way to trickle charge both batteries in my system ?
or am I best to disconnect my main start battery from the Benton DX25 DC-DC when charging it ?
and swap over to Lithium mode when directly charging the Lithium Leisure battery ?
Any shared thoughts from the brains trust would be fantastic

Last edited:
P
Phil_G
Guest
I do like to see neat installations like that 
What is charging the Starter battery? Mains supply to the Victron smart charger? Is there any way to select the charging start signal on the Benton charger? Despite your saying you have installed a sense wire, it sounds like it is set to automatic.
If you could ensure it only switches on when the van ignition is on this would keep charging restricted to the starter battery. I would expect solar input to the Benton to override the sense wire anyway so solar charging the Leisure battery at all times (be careful about leaving the lithium battery connected once it gets colder, they don't like low temperature charging)
If you could ensure it only switches on when the van ignition is on this would keep charging restricted to the starter battery. I would expect solar input to the Benton to override the sense wire anyway so solar charging the Leisure battery at all times (be careful about leaving the lithium battery connected once it gets colder, they don't like low temperature charging)
Yes I was charging the starter battery with the mains supplied VictronWhat is charging the Starter battery? Mains supply to the Victron smart charger? Is there any way to select the charging start signal on the Benton charger? Despite your saying you have installed a sense wire, it sounds like it is set to automatic.
If you could ensure it only switches on when the van ignition is on this would keep charging restricted to the starter battery. I would expect solar input to the Benton to override the sense wire anyway so solar charging the Leisure battery at all times (be careful about leaving the lithium battery connected once it gets colder, they don't like low temperature charging)
there are no user selectable settings on the Benton charger apart for the battery type.
Mains Charging via victron will be infrequent and solar will only be in use when 200w blanket is deployed at a camping site or similar, we do get some low temperatures here in Australia but I doubt that I will attempt charging in those conditions, the Benton also has a temperature sense cable directly connected to the negative terminal of the Lithium battery but I think it is for over temperature protection, the Lithium battery its self has some smarts and will Protect @ -10oC ±5oC Reset @ 0oC ±5oC. I didn’t choose it just for this feature but is certainly a welcomed feature.
thanks for your input
Looking at the picture of the Benton unit online, there are 2 small screws under the cover, one says IGN, the other Sensor.
I can't find an installation manual online but If it has an IGNition sense wire connection, surely this should override the auto charging setting and it should be selectable otherwise, what's the point of the IGN terminal?
Found a manual https://d347awuzx0kdse.cloudfront.n...df?v=47dc79f6bdcf27386ded8082afcf31034654a574 but it's not clear why the IGN terminal is there if it automatically turns itself on even when there's no IGN input.
Last edited:
Agreed - that manual is the only information I received and it states as below.... maybe I will contact the distributer and see if they can shed any light on the subjectLooking at the picture of the Benton unit online, there are 2 small screws under the cover, one says IGN, the other Sensor.
I can't find an installation manual online but If it has an IGNition sense wire connection, surely this should override the auto charging setting and it should be selectable otherwise, what's the point of the IGN terminal?
Found a manual https://d347awuzx0kdse.cloudfront.n...df?v=47dc79f6bdcf27386ded8082afcf31034654a574 but it's not clear why the IGN terminal is there if it automatically turns itself on even when there's no IGN input.

Heya
I’m looking to get the Ablemail AMT12-2 installed (already ordered it).
Unfortunately I don’t think I’m up to the challenge, especially as it’ll involve removing the drivers seat to access the DC-DC.
I live in North London. Can anyone recommend an auto-electrician that could install this for me? So far all the places I’ve rung say they don’t do something like this.
Winter 2022 - Mobile EHU and battery charging via 12v socket.
right so its winter / xmas 2022 so the van will be layed up for a while. . .
possibly 2 weeks or more. . .
so this time i thought i would demo the Mobile EHU method using a Portable Power Pack and mains charger.
this is what we are going to use . . .

I've fully charged the ECOFLOW River Pro 600 . . . .
its 720Wh capacity. ( your see why this numberr is important later)
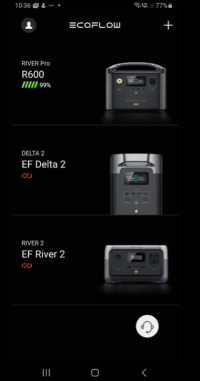
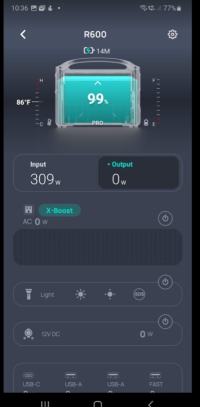
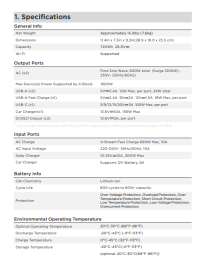
+++
next up we have the charger . . .
im going for a small smart charger for this test,
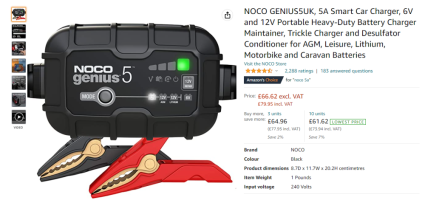
The NOCO Genius 5A Smart will do the trick,
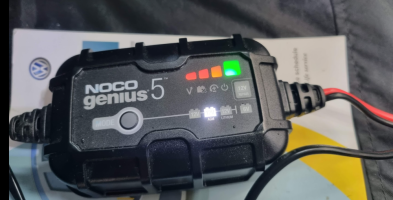
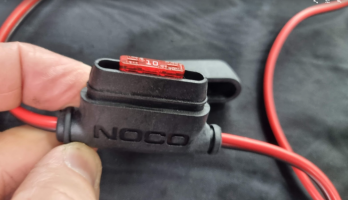
and to make things super easy were adding in the NOCO 12v plug adapter:

its fused at 5A and plugs into the charger, . . . . this then enables us to plug into the vans 12v sockets.
on the T6 the sockets are connected direct to the battery, so can be used to charge via them,
but you need to make sure the Charger Amps is between 1-8A as running 10A through this type of connector will make it get hot.
so 8A is generally considered the max to use this port . . . .
were using a 5A charger . . . so fine.
the van has been sitting for a day or so, so we should have a starter battery around 80% SOC.
and my LB that connected via a RENOGY DC50S dc-dc charger.
(I've dissabled the Ablemail AMT2-12 for this test)

we start with this:
we start by plugging in the charger into the 12v socket:
(on this van we have the OEM Factory LB fitted, that means that the LOWER socket is connect to the STARTER battery . . . and the TOP socket is connected to the LB)
so for this test we are plugging into the LOWER SOCKET which is connected to the STARTER battery.

next up we power on the ECOFLOW and the Charger. . .

we can see as the charger starts we are drawing 83W as its starts to charge the battery . . .

this is the setup. . . .

++++++++
a few hours later we see this. . . .
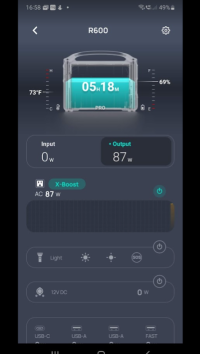
the ECOFLOW app shows its down to 69% and still delivering 87W to the charger.
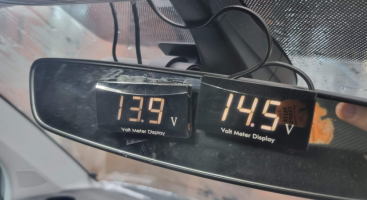
checking the BM2 battery monitors we can see that both the starter and Leisure battery are showing that they are charging. . . . as the voltage is rising and above both batterys rest voltage
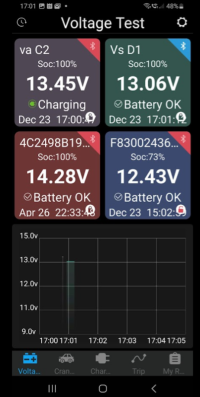

we call this AUTO VSR, (both batterys being charged from one charger)
what's happening is that the NOCO charger is charging the starter battery. . . .
as the starter battery voltage rises the RENOGY DC-DC charger automatically turns on and starts to charge the Leisure Battery.
you can see this on the voltage plots above.
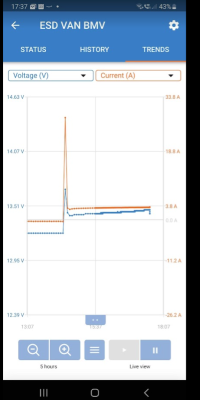
having a look at the Victron Smart Shunt on the LB we can see that out of the 87W going out the ECOFLOW, 44W are going to the LB, so 44W is going to the starter battery.
at this point the LB is 96% SOC and rising

here is the smart shunt showing the LB plot over time . . .

+++++++++++++++
so while the test is running - what do we expect to happen?
well we know the van keeps the starter battery at 80% SOC,
for a standard AGM battery we have 1000Wh,
++++++++++++++++++++++++++++++++
(W=V*A)
(12v AGM battery 90Ah = 1080 Watt-Hours)
assuming SLA 50% DOD
1080Wh / 2 (50%) = 540wh usable power in the starter battery
1080Wh / 100 * 20 = 216Wh this is the expected 20% power to raise the starter battery from 80% SOC to 100% SOC.
++++++++++++++++++++++++++++++++
this means we can expect to use 216Wh to fully charge the starter battery ( From our 700Wh available in the ECOFLOW)
but we also need to factor in the Leisure battery, that is now being charged via the RENOGY DC_DC . . . charger,
that's around 96% SOC atm . . . . .
the battery is a ROAMER SB230 from @RoamerBatteries

 roamer.com
it has a capacity of 230Ah (2944Wh) - so 10% will be around 294Wh.
+++++++++++++++++++++++++++++++++
that means we are expecting to use up the 216Wh for the starter battery and 294Wh for the leisure battery, so around 500Wh is to top up both batterys.
(were using rough maths here and not factoring in % conversion loses and efficiency losses )
basically im expecting the ECOFLOW River to dump all its capacity into charging both van batterys over the first 24hrs. . .
then i can recharge to the ECOFLOW tomorrow . . . and start a new charge cyle back in the van.
at that point im expecting the ECOFLOW to run a lot conger as both batterys will be fully charged, meaning that the charger should be in float mode.
lets see what happens - and how long we can keep this up.
+++++++++++++++++++++++
.

right so its winter / xmas 2022 so the van will be layed up for a while. . .
possibly 2 weeks or more. . .
so this time i thought i would demo the Mobile EHU method using a Portable Power Pack and mains charger.
this is what we are going to use . . .

I've fully charged the ECOFLOW River Pro 600 . . . .
its 720Wh capacity. ( your see why this numberr is important later)


+++
next up we have the charger . . .
im going for a small smart charger for this test,
The NOCO Genius 5A Smart will do the trick,

and to make things super easy were adding in the NOCO 12v plug adapter:

its fused at 5A and plugs into the charger, . . . . this then enables us to plug into the vans 12v sockets.
on the T6 the sockets are connected direct to the battery, so can be used to charge via them,
but you need to make sure the Charger Amps is between 1-8A as running 10A through this type of connector will make it get hot.
so 8A is generally considered the max to use this port . . . .
were using a 5A charger . . . so fine.

the van has been sitting for a day or so, so we should have a starter battery around 80% SOC.
and my LB that connected via a RENOGY DC50S dc-dc charger.
(I've dissabled the Ablemail AMT2-12 for this test)

we start with this:

we start by plugging in the charger into the 12v socket:
(on this van we have the OEM Factory LB fitted, that means that the LOWER socket is connect to the STARTER battery . . . and the TOP socket is connected to the LB)
so for this test we are plugging into the LOWER SOCKET which is connected to the STARTER battery.

next up we power on the ECOFLOW and the Charger. . .

we can see as the charger starts we are drawing 83W as its starts to charge the battery . . .

this is the setup. . . .

++++++++
a few hours later we see this. . . .
the ECOFLOW app shows its down to 69% and still delivering 87W to the charger.

checking the BM2 battery monitors we can see that both the starter and Leisure battery are showing that they are charging. . . . as the voltage is rising and above both batterys rest voltage


we call this AUTO VSR, (both batterys being charged from one charger)
what's happening is that the NOCO charger is charging the starter battery. . . .
as the starter battery voltage rises the RENOGY DC-DC charger automatically turns on and starts to charge the Leisure Battery.
you can see this on the voltage plots above.
having a look at the Victron Smart Shunt on the LB we can see that out of the 87W going out the ECOFLOW, 44W are going to the LB, so 44W is going to the starter battery.
at this point the LB is 96% SOC and rising

here is the smart shunt showing the LB plot over time . . .

+++++++++++++++
so while the test is running - what do we expect to happen?
well we know the van keeps the starter battery at 80% SOC,
for a standard AGM battery we have 1000Wh,
++++++++++++++++++++++++++++++++
(W=V*A)
(12v AGM battery 90Ah = 1080 Watt-Hours)
assuming SLA 50% DOD
1080Wh / 2 (50%) = 540wh usable power in the starter battery
1080Wh / 100 * 20 = 216Wh this is the expected 20% power to raise the starter battery from 80% SOC to 100% SOC.
++++++++++++++++++++++++++++++++
this means we can expect to use 216Wh to fully charge the starter battery ( From our 700Wh available in the ECOFLOW)
but we also need to factor in the Leisure battery, that is now being charged via the RENOGY DC_DC . . . charger,
that's around 96% SOC atm . . . . .
the battery is a ROAMER SB230 from @RoamerBatteries

Roamer - Premium LiFePO4 Lithium Leisure Batteries Campervans & Boats
"Roamer SMART4, XTREME & HOME: 12V-48V LiFePO4 leisure batteries for campervans, motorhomes & boats. 100Ah-460Ah, Bluetooth BMS, 10-year warranty."
it has a capacity of 230Ah (2944Wh) - so 10% will be around 294Wh.
+++++++++++++++++++++++++++++++++
that means we are expecting to use up the 216Wh for the starter battery and 294Wh for the leisure battery, so around 500Wh is to top up both batterys.
(were using rough maths here and not factoring in % conversion loses and efficiency losses )
basically im expecting the ECOFLOW River to dump all its capacity into charging both van batterys over the first 24hrs. . .
then i can recharge to the ECOFLOW tomorrow . . . and start a new charge cyle back in the van.
at that point im expecting the ECOFLOW to run a lot conger as both batterys will be fully charged, meaning that the charger should be in float mode.
lets see what happens - and how long we can keep this up.
+++++++++++++++++++++++
.


Last edited:
+++++++++++++++++++++++
parts used:
+++

++++
ECOFLOW River Pro is now superseded to :
ECOFLOW River 2 MAX

+++

++++

+++
other kit installed already:
ROAMER SB230 LB

 roamer.com

and the Renogy DC-DC

+++++++
parts used:

+++

++++
ECOFLOW River Pro is now superseded to :
ECOFLOW River 2 MAX

+++

++++

+++
other kit installed already:
ROAMER SB230 LB

Roamer - Premium LiFePO4 Lithium Leisure Batteries Campervans & Boats
"Roamer SMART4, XTREME & HOME: 12V-48V LiFePO4 leisure batteries for campervans, motorhomes & boats. 100Ah-460Ah, Bluetooth BMS, 10-year warranty."

and the Renogy DC-DC

+++++++
Last edited:
Similar threads
- Replies
- 4
- Views
- 678
- Replies
- 3
- Views
- 183
- Replies
- 38
- Views
- 2K
- Replies
- 45
- Views
- 3K

