Barn door Reversing Camera Retrofit -- How I Done It --
This is how its works:
*******************************************************************
At the time of ordering the van i was told i could not have the RVS CAM option as it was only for tailgate models . . . . yeh right what-ever i thought,
A quick look over at the T6F shop only presented me with a tailgate version
Home page
. . . . so i took to google (this was over a year ago now!).
which led me to this:
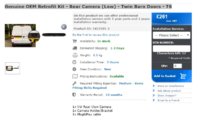
Genuine OEM Retrofit Kit - Rear Camera (Low) - Twin Barn Doors - T6
***************************************************************************
NEW VW T6 - Rear View Camera KIT - With Guidance Lines - Retrofit -
See behind your car with rear view camera.
A camera at the back of your car shows you what's behind to make reversing safer and easier. Or rear view camera lets you spot any obstacles behind your car - even moving ones - quickly and easily, thanks to the rear view camera.
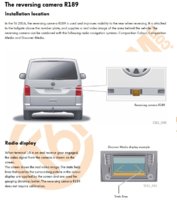
The camera starts working as soon as you put your car into reverse gear. It shows the area behind your car on your radio or radio navigation system display offering you a clear reversing image with easy-to-follow guidelines. Superimposed graphic lines guide you to the optimal steering lock, guaranteeing fuss-free, smooth parking.
Using the rear view camera means you'll be able to manoeuvre quickly and easily, even into the most difficult parking space. It also alerts you to low-down obstacles which parking sensors cannot always detect. The reversing camera is also a great help when you're hitching up a trailer.
Compatible with Head Unit:
Composition Media
Discover Media
Discover Media Plus
Note:
After installation you need to code the system.
Please contact your local VW dealer or workshop with diagnostic software ( VCDS or ODIS ).
***********************************************************************************************
The kit arrived after a week or so, which induced a new rear plastic assembly including the rear camera module . . . . . . but it was OEM black plastic! . . . . This was then resprayed with the Reflex Silver paint and Laqure i had left over from doing the Sportline Spoiler job.
while that pant was drying . . . . i run in the loom.
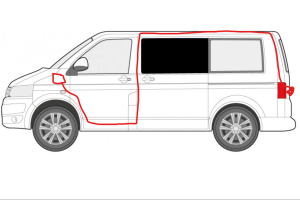
it was a case of removing the rear door inner paneling and taking out the lock carrier assembly.
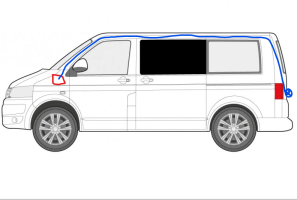
The new camera loom run through the existing door loop into the D-Pillar void and up to the top corner above the roof panel . . . i used the larger rubber bungs that cover the tailgate door-loop holes and a route to drop a draw wire down and fish the cable up.
Next it just follows the roof loom above the ceiling panel up to the bulkhead, above the Cabin ceiling and down behind the A-Pillar.
By now the Paint had dried so the newly painted rear door plastic was swapped over which included the 2x number plate lights.
Two connections were required at the rear which were a body ground and Reverse light signal. . . .
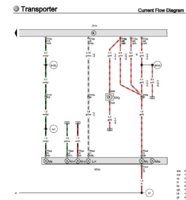
a quick look over here showed me i needed to splice into the rear right light cluster loom: the Brown for ground and Green/Black for Reverse signal.
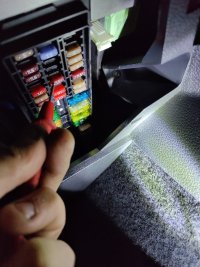
Moving up front i needed to insert a new fuse pin into the SC18 fuse box for the ignition switched +12v and the two video wires into the SatNav quad block.

after taking half the dash apart to get to the fuse box . . . . . .
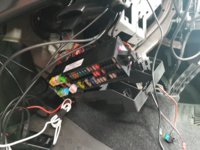
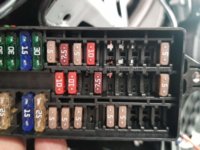
i realized that there was NO power-bar on the feed side of the fuse block . . .It was just empty plastic . .!

But I found some empty fuse locations just across . . . SC35-37 i think.
more info here > VW T6 Fusebox - Fusebox/Fuse Chart SC - Lower Dash Fusebox Listings
The red wire already had a fuse crimp connector on it . . . . . .
I had also got some more from the forum shop over here > Four Genuine Volkswagen Crimp Connectors For Stereo Quadlock / Fusebox
so while i had the fuse box out i added some extra fuses to replace the "piggy-back" fuses i had been using.
it was just a case of removing the rear protective fusebox cover and sliding out the pink locking tab. . . . . new fuse inserts added i moved on. (remembering to note the new fuse postitions and what they done)
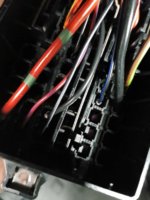
The video feed wired into the back of the RADIO QUADLOCK CONNECTOR on the blue block, pins 6 & 12.
more info here > Discover Media connector block pinouts
just unclip the locking tab to remove the blue block from the quadlock and then unclip the pin-lock . . . . then push the new pins intoplace and refit.
Next was a Bit of VCDS coding . . . . .
a quick look here > VCDS Module Coding List/Guide
and here > Reverse Camera Coding?
led me to the coding (highlighted by @Deaky ):
*****************************************************
PDC Module 10 Byte 00
Head unit Module 5F Byte 19
Just tick the two boxes that say RVC install
*****************************************************
All done . . . .so next was a quick test before putting everything back together . . .
The PDC works as normal when you select it . . . . But when going into reverse the screen changes to show the rear camera with guide line and a smaller PDC graphic over to the left.

.

.

There are also settings that can be changed like Colour,Contrast & brightness.

So all looks good. about half hour later all the panel were back in-place and it was job done.
overall time . . . . Hmm, well about 3/4hours - but thats been on/off over the last 12mnths.
there are loads more pics . . . . but i need to find them first. =]

This is how its works:

*******************************************************************
At the time of ordering the van i was told i could not have the RVS CAM option as it was only for tailgate models . . . . yeh right what-ever i thought,
A quick look over at the T6F shop only presented me with a tailgate version
Home page
. . . . so i took to google (this was over a year ago now!).
which led me to this:
Genuine OEM Retrofit Kit - Rear Camera (Low) - Twin Barn Doors - T6

***************************************************************************
NEW VW T6 - Rear View Camera KIT - With Guidance Lines - Retrofit -
See behind your car with rear view camera.
A camera at the back of your car shows you what's behind to make reversing safer and easier. Or rear view camera lets you spot any obstacles behind your car - even moving ones - quickly and easily, thanks to the rear view camera.
The camera starts working as soon as you put your car into reverse gear. It shows the area behind your car on your radio or radio navigation system display offering you a clear reversing image with easy-to-follow guidelines. Superimposed graphic lines guide you to the optimal steering lock, guaranteeing fuss-free, smooth parking.
Using the rear view camera means you'll be able to manoeuvre quickly and easily, even into the most difficult parking space. It also alerts you to low-down obstacles which parking sensors cannot always detect. The reversing camera is also a great help when you're hitching up a trailer.
Compatible with Head Unit:
Composition Media
Discover Media
Discover Media Plus
Note:
After installation you need to code the system.
Please contact your local VW dealer or workshop with diagnostic software ( VCDS or ODIS ).
***********************************************************************************************
The kit arrived after a week or so, which induced a new rear plastic assembly including the rear camera module . . . . . . but it was OEM black plastic! . . . . This was then resprayed with the Reflex Silver paint and Laqure i had left over from doing the Sportline Spoiler job.
while that pant was drying . . . . i run in the loom.
it was a case of removing the rear door inner paneling and taking out the lock carrier assembly.
The new camera loom run through the existing door loop into the D-Pillar void and up to the top corner above the roof panel . . . i used the larger rubber bungs that cover the tailgate door-loop holes and a route to drop a draw wire down and fish the cable up.
Next it just follows the roof loom above the ceiling panel up to the bulkhead, above the Cabin ceiling and down behind the A-Pillar.
By now the Paint had dried so the newly painted rear door plastic was swapped over which included the 2x number plate lights.
Two connections were required at the rear which were a body ground and Reverse light signal. . . .
a quick look over here showed me i needed to splice into the rear right light cluster loom: the Brown for ground and Green/Black for Reverse signal.

Moving up front i needed to insert a new fuse pin into the SC18 fuse box for the ignition switched +12v and the two video wires into the SatNav quad block.

after taking half the dash apart to get to the fuse box . . . . . .

i realized that there was NO power-bar on the feed side of the fuse block . . .It was just empty plastic . .!

But I found some empty fuse locations just across . . . SC35-37 i think.
more info here > VW T6 Fusebox - Fusebox/Fuse Chart SC - Lower Dash Fusebox Listings
The red wire already had a fuse crimp connector on it . . . . . .
I had also got some more from the forum shop over here > Four Genuine Volkswagen Crimp Connectors For Stereo Quadlock / Fusebox
so while i had the fuse box out i added some extra fuses to replace the "piggy-back" fuses i had been using.
it was just a case of removing the rear protective fusebox cover and sliding out the pink locking tab. . . . . new fuse inserts added i moved on. (remembering to note the new fuse postitions and what they done)

The video feed wired into the back of the RADIO QUADLOCK CONNECTOR on the blue block, pins 6 & 12.
more info here > Discover Media connector block pinouts
just unclip the locking tab to remove the blue block from the quadlock and then unclip the pin-lock . . . . then push the new pins intoplace and refit.
Next was a Bit of VCDS coding . . . . .
a quick look here > VCDS Module Coding List/Guide
and here > Reverse Camera Coding?
led me to the coding (highlighted by @Deaky ):
*****************************************************
PDC Module 10 Byte 00
Head unit Module 5F Byte 19
Just tick the two boxes that say RVC install
*****************************************************
All done . . . .so next was a quick test before putting everything back together . . .
The PDC works as normal when you select it . . . . But when going into reverse the screen changes to show the rear camera with guide line and a smaller PDC graphic over to the left.

.

.

There are also settings that can be changed like Colour,Contrast & brightness.

So all looks good. about half hour later all the panel were back in-place and it was job done.
overall time . . . . Hmm, well about 3/4hours - but thats been on/off over the last 12mnths.
there are loads more pics . . . . but i need to find them first. =]


Last edited:


