Yeah it should be fine to relocate the wiring to the dimmer switch. Insulation tape over the small hole will be fine. You could also fit a second set as suggested, the only issue with that is that there isn’t a second hole pre-cut in the dash to fit a second set. You’d need to cut a second hole but assuming your are happy to do so that is an option. I’ve actually ordered a set of sticky LED strip lights to do something similar but stick them on rather than cut some holes. They haven’t arrived yet so don’t know how practical this will be. They’re stuck in China stillThanks mate , final question.
I’ve already fitted them to the connector under the glove box, would I be able to just remove the connection and re fit to the dimmer switch? Just worried I’ve spliced into them using the connectors Travelin-Lite supplied and they will be cut, I presume if I just put insulation tape over the exposed parts it should be ok? If not, I may just buy another set and have them set so they come on white when I open and the others
are on red while driving.
Cab Ambient "mood Lighting" Under-dash - How I Done It -
- Thread starter Dellmassive
- Start date
Just adding extra to this.
I've used these tiny bluetooth controllers for my RGB strips in the rear of the van. No reason why they wouldn't also work on footwell RGB lights.
Some people report flickering to do with the PWM. The flicker fix is to use a mossfet driver.
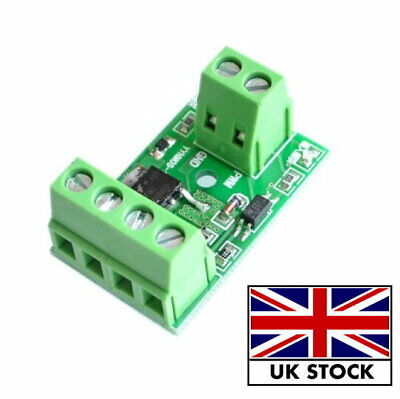
Mossfett trigger driver £4.80

RGB LED Bluetooth controller. £6.99

Wiring diagram

I've used these tiny bluetooth controllers for my RGB strips in the rear of the van. No reason why they wouldn't also work on footwell RGB lights.
Some people report flickering to do with the PWM. The flicker fix is to use a mossfet driver.
Mossfett trigger driver £4.80
3-20V Mosfet MOS Transistor Trigger Switch Driver Board PWM Control Module TOUS | eBay
PWM: signal input port (connects MCU IO ports, PLC interface, DC power). Input Signal: 3-20V PWM signal. PWM Frequency: 0-20KHz. GND: signal negative port. OUT+: output port positive (connects device positive).
www.ebay.co.uk
RGB LED Bluetooth controller. £6.99
Wiring diagram
Does any one know if this is the same for a 6.1?My T6 has got the courtesy white lights in the footwell. I’ve bought the travelin lite sets as I fancy having them light up red. Is it easy to swap the built in ones for the travelin lite ones? And where the hell are the torx screws to remove the footwell trim cover? There’s bugger all space between the front seat and the dash for me to get in and have a look!
Can I connect the LEDs straight in to the ambient circuit or does it need any thing else doing?
I put mine straight in, dead simple. Cut the existing plugs off, soldered on the travelinlite loom. Bonus was the spare vw footwell lights fitted my side door opening step, a freebie!

Never one to leave something alone, I decided just using the red LEDs on that was a waste. So decided to try and use the white LEDs for the courtesy circuit.
Probably lots of ways that I could have done that, but I decided to replicate the existing circuitry with a bridge rectifier, which would mean isolating the existing circuit and adding some pins to connect up the new supply
I went about this by breaking the circuit tracks with a knife, which was made a bit trickier as the negative end of the diodes we're all connected together in a kind of ground plane on the LED side of the board.
Here's how it ended up:


I cleared around the holes where the connection pins are to make sure when I added the two new pins they didn't get connected to anything already on the board.
Then it was just a case of adding another bridge rectifier by gluing it to the board and connecting it up. Added two pins stolen from a right angle header pin either side of the existing ones. I also added another resistor to the red LED circuit as it was a bit bright for ambient lighting. The wiring is a bit of a dog's dinner as I was making it up as I went along, the second one was neater!


Finally wired up a lead, added some crimp connectors and inserting them into the existing plug from the kit. Picked up the courtesy light feeds from the step lights and bingo - white courtesy lights red ambient lights, all with one light fitting.


I've bought another kit now and am going to repeat this but fit them in the rear base of the front seats.
Probably lots of ways that I could have done that, but I decided to replicate the existing circuitry with a bridge rectifier, which would mean isolating the existing circuit and adding some pins to connect up the new supply
I went about this by breaking the circuit tracks with a knife, which was made a bit trickier as the negative end of the diodes we're all connected together in a kind of ground plane on the LED side of the board.
Here's how it ended up:
I cleared around the holes where the connection pins are to make sure when I added the two new pins they didn't get connected to anything already on the board.
Then it was just a case of adding another bridge rectifier by gluing it to the board and connecting it up. Added two pins stolen from a right angle header pin either side of the existing ones. I also added another resistor to the red LED circuit as it was a bit bright for ambient lighting. The wiring is a bit of a dog's dinner as I was making it up as I went along, the second one was neater!
Finally wired up a lead, added some crimp connectors and inserting them into the existing plug from the kit. Picked up the courtesy light feeds from the step lights and bingo - white courtesy lights red ambient lights, all with one light fitting.
I've bought another kit now and am going to repeat this but fit them in the rear base of the front seats.
360ian
Member
Hi @Big.mac a quick question on what you did a couple of years back...with the Travelin-lite kit did you tap into the brown wire on the back of the light switch on your t6.1 for the ground? I have bought the same kit and plan to install onto the ambient circuit but didn't know if I would need to run the brown wire down to the bolted earth in the drivers footwell instead? Sorry to write on such an old thread! Thanks in advance.I read through this thread and a couple of others over the weekend, ordered a set of the Travelin Lite footwell LEDs on Tues, they arrived yesterday and I fitted them today. I opted to connect them to the ambient circuit by hooking into the back of the dimmer switch and I’m very pleased with the result. They look great and the dimmer switch controls them nicely. £30 well spent. Very simple installation.
The one issue I had was that the Posi taps that are provided are a bit too large for the blue/grey ambient wire (but fit the brown well). First go the tap just pushed the wire to one side rather than piercing it. I solved this by wrapping a little tape around the wire before inserting into the tap. This made the wire sit more centrally and held it more firmly in the tap and it worked first attempt after doing this.
Hi there, yes as far as I can remember that’s what I did. However, my van is a T6 not a T6.1. I don’t know if this makes any difference or not.Hi @Big.mac a quick question on what you did a couple of years back...with the Travelin-lite kit did you tap into the brown wire on the back of the light switch on your t6.1 for the ground? I have bought the same kit and plan to install onto the ambient circuit but didn't know if I would need to run the brown wire down to the bolted earth in the drivers footwell instead? Sorry to write on such an old thread! Thanks in advance.
360ian
Member
Thanks for your reply. I’ll have a look at the wiring tomorrow and see what I can work out! Thank you!Hi there, yes as far as I can remember that’s what I did. However, my van is a T6 not a T6.1. I don’t know if this makes any difference or not.
Naybrains
New Member
Did you get sorted pal? I’m tackling mine this weekThanks for your reply. I’ll have a look at the wiring tomorrow and see what I can work out! Thank you!
LuckyBastard
New Member
Hi there. I hope i am doing this the right way (meaning. Posting my question in the correct category). Maybe someone could shed some light on my problem. I have only just acquired my T6 and have yet to get know the new vehicle. 1 Thing i dont understand is why the footwell lighting stays on and doesn't respond to any switch. Not the instrument cluster dimmer nor the switches for the interior light (reading lamps etc). So they turn on when i start my vehicle but there is no way of switching the off or dimming them?? I would like for them to go out during night driving because they are really bright. Thank you so much for trying to help me
LuckyBastard
New Member
Is there a way you could show me were to find or how tolocate the feed from the light switch?? Mine is wired so that they wont turn of with the ambient lighting system?? Would appreciate it greatly.And two years later...I did it too! Used the kit, picked up the feed from the light switch, dead easy!
View attachment 168543
Generally a bridge rectifier is used to convert AC to DC (well pulsed DC that you then smooth)
You don't strictly need one for an LED but a useful side effect is that it makes them not sensitive to reversing the connections (LEDs only light up when current is flowing one way as the D stands for diode)
Essentially what @Dripster did here was to chop the copper off the original board (both sides) such that they isolated the Red LED circuit, then added a new set of physical pins and rectifier so there are two electrically independent circuits on the same board.
A potentially easier method is to cut a bit of plasticard or similar board to the same size and mount 2 strips of RGBW led strip on it, and then connect to the R on one and W on the other.
Last edited:
That would work too, ambient can be quite dim and work well. You can get prewired "12v" LEDs quite easily that have a resistor soldered on and heatshrink done.
Similar threads
- Replies
- 2
- Views
- 911
- Replies
- 8
- Views
- 1K
- Replies
- 0
- Views
- 178
- Replies
- 7
- Views
- 884