You are using an out of date browser. It may not display this or other websites correctly.
You should upgrade or use an alternative browser.
You should upgrade or use an alternative browser.
What Have You Done To Your Van Today?
- Thread starter Daneeyre
- Start date
-
- Tags
- mod modification mods retrofit
Ok, my brain had been busy with this while I’ve been asleep.Ok thanks, I'm going to have to rethink my approach.
I jack one side up, undo the ARB clamp bolts on that side, drop the van down, jack other side up and undo the clamp bolts , drop van down and then fold ARB down out of the way.
I should then be able to jack one side at a time up and drop the hub low enough to free the spring. Sound like a plan? Working today but I think I might be able to finish early enough to have a go tonight

One other thought, is the front ARB going to cause me a similar problem if I want to wind them down a bit?
Twin Reimo Rails fitted by Three Bridges as my OCD would have a melt down with only one side. Actually really pleased with how it looks from the front.
Oh and they fitted a Thule roll out awny thing as well but I've had that fitted so it can be removed when not being used as Lady Mfwic said I wasn't allowed two, one on each side, so my OCD insisted on have it mounted on removable brackets.
Three Bridges did a great job and very friendly bunch there.

Spent more money killing time at Bicester Village than on the van.

Side note.
Yes that is a massive crack on the front screen, that was already there so nothing to do with the work carried out.

Oh and they fitted a Thule roll out awny thing as well but I've had that fitted so it can be removed when not being used as Lady Mfwic said I wasn't allowed two, one on each side, so my OCD insisted on have it mounted on removable brackets.
Three Bridges did a great job and very friendly bunch there.

Spent more money killing time at Bicester Village than on the van.

Side note.
Yes that is a massive crack on the front screen, that was already there so nothing to do with the work carried out.

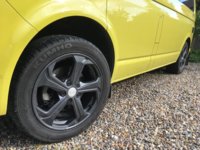
Those 18" Amarok wheel look sweet, I always think that's what should have been on all T6's from the factory. Like 18" DevonportsResults of a morning with Sonax Xtreme detailer. Surprised even with silver I managed to get some reflection in the paint work using it. This was with only one coat too.
View attachment 42252

Those 18" Amarok wheel look sweet, I always think that's what should have been on all T6's from the factory. Like 18" Devonports
Thanks @$immo . Daddy Devonports, I call them. Running with 245/50r18 tyres just now. Fractionally oversized (6mm) on the radius, just in an effort to fill out the arches a bit, without lowering. The ET45 offset and 30mm wider tyre means I'm not looking at spacers either. Donkey junior reckons it "Looks more aggressive Dad". Not convinced an orange monkey on the dash is compatible with "aggressive", but certainly think they give it a more purposeful and beefier looking stance than my ports. Will keep those for winter now.
Twin Reimo Rails fitted by Three Bridges as my OCD would have a melt down with only one side. Actually really pleased with how it looks from the front.
Oh and they fitted a Thule roll out awny thing as well but I've had that fitted so it can be removed when not being used as Lady Mfwic said I wasn't allowed two, one on each side, so my OCD insisted on have it mounted on removable brackets.
Three Bridges did a great job and very friendly bunch there.
Spent more money killing time at Bicester Village than on the van.
Side note.
Yes that is a massive crack on the front screen, that was already there so nothing to do with the work carried out.
View attachment 42567
My OCD couldn't cope with having a crack on just one side of the screen. I'd have to get out and smack the other side with a hammer.
Its been there a while, it started life as a 1 inch crack and I've watched it grow to become a big strong crack.My OCD couldn't cope with having a crack on just one side of the screen. I'd have to get out and smack the other side with a hammer.
I'm actually rather fond of it and can see it grow with every trip (I've named him Charlie). Twins would have been nice but I'm happy with 1
We are heading to Europe soon and Lady Mfwic has insisted I get it changed before we go so its being done next week.
I shall miss him.
Charlie!........Like, like, like, like, like.......LIKE!.....
Sitting on a train right now. Folk around me wondering why I'm crying and laughing at the same time.
Charlie Crack..... Brilliant!
Sitting on a train right now. Folk around me wondering why I'm crying and laughing at the same time.
Charlie Crack..... Brilliant!
Well i’ll be darned, never knew that 3bridges was so close!Twin Reimo Rails fitted by Three Bridges as my OCD would have a melt down with only one side. Actually really pleased with how it looks from the front.
Oh and they fitted a Thule roll out awny thing as well but I've had that fitted so it can be removed when not being used as Lady Mfwic said I wasn't allowed two, one on each side, so my OCD insisted on have it mounted on removable brackets.
Three Bridges did a great job and very friendly bunch there.
Spent more money killing time at Bicester Village than on the van.
Side note.
Yes that is a massive crack on the front screen, that was already there so nothing to do with the work carried out.
View attachment 42567
Surprised you managed to find anything decent to buy at Bicester Village. Local folks don’t bother with the place, but by Christ do the folk from the Far East love it!!! They used to bus them in front Marble Arch prior to the railway station opening that directly serves the shopping village.
The other passengers probably think you have your own Charlie Crack.Charlie!........Like, like, like, like, like.......LIKE!.....
Sitting on a train right now. Folk around me wondering why I'm crying and laughing at the same time.
Charlie Crack..... Brilliant!
It was full of Asian people but it has been like that for years.Well i’ll be darned, never knew that 3bridges was so close!
Surprised you managed to find anything decent to buy at Bicester Village. Local folks don’t bother with the place, but by Christ do the folk from the Far East love it!!! They used to bus them in front Marble Arch prior to the railway station opening that directly serves the shopping village.
Apparently it's the 2nd biggest tourist attraction in the UK after Lizzs' place to Asian visitors.
And Lady Pippa found plenty of things to buy, not anything she needed but that didn't stop her.
Looks class that fella, thought about getting the side bars done the same colour?
Looking good i do like a bit of bronze
Looks class that fella, thought about getting the side bars done the same colour?
That's the predicament i have now with my bronze wheels, don't know what to do with the side bars
Finally got round to a project I've been planning for a while. I have a waste water tank where the spare wheel would normally be and it drains with a large stopcock under the van
View attachment 40048
Well I'd seen a review a couple of years ago on tv or Youtube of some big motorhome that could be drained by pressing a switch in the cab. It even had a camera underneath so you could position yourself over the grate. Being into gadgets and liking the idea of using my 360 camera to get myself over the drain grate and press a button without having to grovel under the van in the rain, I decided this would be a future project. Got hold of a 12v solenoid valve off ebay and tested the principle with a battery and a hosepipe, then as usual for me, stuck it on a shelf for a year or two.
Finally revived and got it all fitted today. First problem was that pressing the neat little switch I'd got for it (with a nice blue light when it was switched on) didn't trigger the solenoid. After doing some troubleshooting, the problem turned out to be the switch which had a ridiculously high resistance, +12.6v in and +10.5v out! I checked the others that I bought at the same time, another 5 all in different colours, and they all did the same. So beware, this is the switch type
View attachment 40049
Anyway, after substituting with a different type of switch I got the correct voltage at the solenoid contacts. But the result is a failure. The pressure of the water in the tank is just not enough to get through the valve with any force. Unfortunately it's not like a gate opening to allow the water through, it has to push past a mechanism even when activated. So unfortunately when it's triggered all I get is a slow drip out of the end (yes I am over 50 so I'm used to it) like so
View attachment 40050
So what have I done to my van today? Absolutely nothing, I've put it all back to how it was
But the bits and pieces won't be wasted. Coming this summer, a project to make a solar powered, solar heated, recirculating water warmer for my grandaughter's paddling pool
Because I can never concentrate on only one thing, this project has been running concurrently with adjusting my B14s/ARBs but this time with total success
Although I did play with more off-the-wall options, such as the linear actuators, the answer was indeed an electrically operated ball valve as suggested by @Stay Frosty and @Dieseldonkey.
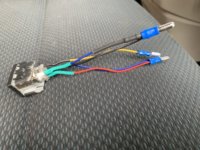
This requires a positive feed for each position (open and closed) as well as an earth, which wasn't a problem as I'd run multicore cable down to the waste outlet. It required a new SPDT switch to operate, and this time I opted for a 16mm one with blue illumination rather than 12mm, which took some modification of the switch blank to accomodate it. (Excuse the filthy seat, I'd been in and out alternating with moving the van and laying on the ground).

The issue with flow speed was solved by going for a 1" ball valve, which actually had the same internal bore as the normal 3/4" pipe, so the adapter required either side didn't reduce the internal diameter. Amazing result too, I measured the flow of a 3/4 full tank with the old manual tap to be 11 sec/litre - with the new electrically operated version it's 5.5 sec/litre, so the tank can be emptied in half the time. Might seem a waste of time to some people but little mods like this interest me.
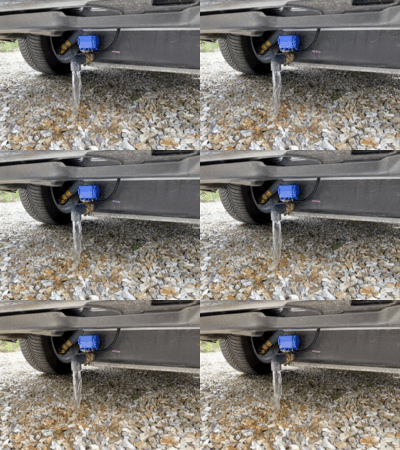
Anyway here it is in full flow, nice to solve a problem with total success
View attachment 42633

Last edited:
I've only just realised that's you on Instagram

Well either take them off (nice clean look) or get them colour matched. Your welcome I’ll happily spend your hard earned cashLooking good i do like a bit of bronze
That's the predicament i have now with my bronze wheels, don't know what to do with the side bars
I wish it was that easy, my problem being I've also got a set of silver wheels comingWell either take them off (nice clean look) or get them colour matched. Your welcome I’ll happily spend your hard earned cash
Similar threads
- Replies
- 0
- Views
- 664
- Locked
- Replies
- 0
- Views
- 190


