r00ps
Member
Hi,
I had the factory fitted aux battery ( under a single seat with swivel base ) fitted to my T6.1 with the intention of using it as a camper leisure battery. After getting less than impressive performance and reading about how the split charge relay is a pretty bad charging method I wanted to upgrade it with a DC-DC charger. after searching around the forum for a bit all I could find was instructions for installing from scratch and not much about upgrading an existing factory installation so I thought it would be useful to post my experience!
After reading various posts and looking at the options I decided to use a CTEK D250SE charger. I went with this as it seemed to be a popular choice due to cost, size, simplicity and the option of a solar panel input ( more on that later ). Reading the various posts I saw that it should be pretty much a direct swap for the existing split charge relay but was not sure if I would need any additional cables, connectors etc or how the ignition signal would work.
OK to work. After removing the passenger seat and this was my original installation:
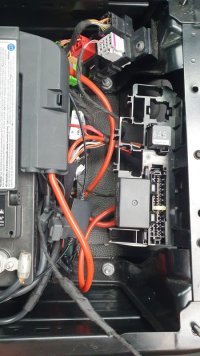
I disconnected both the main and aux batteries, and removed the split charge relay. This is the large cube with the two fat red leads running to it next to the aux battery.
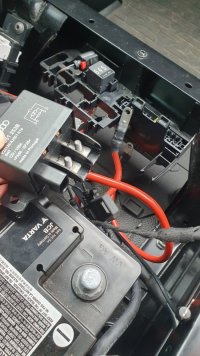
My plan was to simply directly replace the relay with the CTEK, however this where I ran into my first speed bump. The terminals on the CTEK are bigger than those on the relay and the factory leads would not fit! After a bit of head scratching and wondering if I would need to cut the cables and add new terminals, I decided to hack it by drilling out the connectors to fit the CTEK. I figured as the charger is limited to 20A this would be fine with the size of the connector even with the bigger hole. I'm more than happy to hear feedback about this course of action of course!
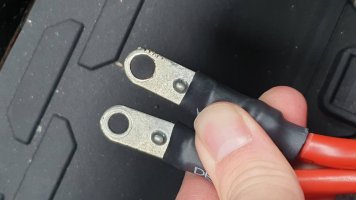
After this modification, the only additional cable I needed was a negative to run from the CTEK to the aux battery, which I got from ebay for a few quid. I removed the fuse and relay holders from the plastic mount to give me room to work and connected the main cables.
The next piece of the puzzle was the ignition signal. In the factory installation, this is provided with a small twin core cable to a connector on the split charge relay. I was not 100% sure how this works after reading various posts so I snipped off the connector and tested the voltages with the engine running. For an AGM battery the CTEK needs a chassis ground on the red/black wire and the 'engine running' signal on the red wire. On the factory wiring, I found that the 12v engine run signal was on the black wire and the brown wire was grounded to the chassis so I connected these as appropriate.
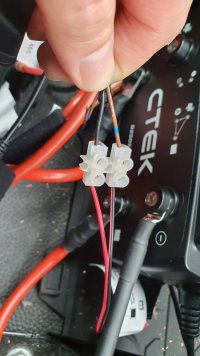
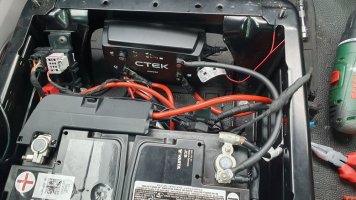
I connected the batteries back and ran a test. All was well, the indicators on the CTEK showed that it was charging the aux battery and the BM2 monitor confirmed this. So, how to mount it all? I decided to cut off the part of the plastic mounting where the old relay was held and attach a small piece of thin plywood to mount the CTEK.
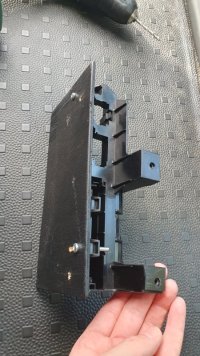
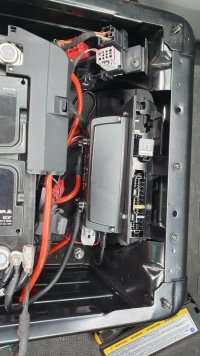
I attached the CTEK and put everything into place where it all fitted quite nicely.
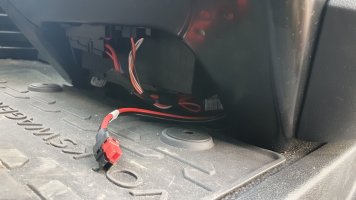
Now for the solar panel! Once more on ebay, I bought a cable with ring connectors to fit the CTEK terminals one end and a small Anderson connector on the other. I attached this to the appropriate terminals on the CTEK and placed the connector so it was acessible from under the front seat.
For the panel, I didn't want a permanent panel on the roof so decided to go with a 120w flexible, portable panel from Renology. I attach this to the roof via the mounting holes provided on the panel with some 40mm pot magnets and some thumb screws, again from ebay. This makes a very neat solution that works really well and can be removed and stored easily. The cable from the panel runs through the passenger window and under the air deflector to connect under the seat so it doesn't matter if it rains.
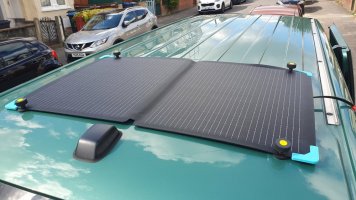
The resulting system now means I can run my fridge and other usual camping loads as much as I like and the CTEK charges the battery during the day from the panel if parked up or from the engine while driving around. Job done and very happy.
I had the factory fitted aux battery ( under a single seat with swivel base ) fitted to my T6.1 with the intention of using it as a camper leisure battery. After getting less than impressive performance and reading about how the split charge relay is a pretty bad charging method I wanted to upgrade it with a DC-DC charger. after searching around the forum for a bit all I could find was instructions for installing from scratch and not much about upgrading an existing factory installation so I thought it would be useful to post my experience!
After reading various posts and looking at the options I decided to use a CTEK D250SE charger. I went with this as it seemed to be a popular choice due to cost, size, simplicity and the option of a solar panel input ( more on that later ). Reading the various posts I saw that it should be pretty much a direct swap for the existing split charge relay but was not sure if I would need any additional cables, connectors etc or how the ignition signal would work.
OK to work. After removing the passenger seat and this was my original installation:

I disconnected both the main and aux batteries, and removed the split charge relay. This is the large cube with the two fat red leads running to it next to the aux battery.

My plan was to simply directly replace the relay with the CTEK, however this where I ran into my first speed bump. The terminals on the CTEK are bigger than those on the relay and the factory leads would not fit! After a bit of head scratching and wondering if I would need to cut the cables and add new terminals, I decided to hack it by drilling out the connectors to fit the CTEK. I figured as the charger is limited to 20A this would be fine with the size of the connector even with the bigger hole. I'm more than happy to hear feedback about this course of action of course!

After this modification, the only additional cable I needed was a negative to run from the CTEK to the aux battery, which I got from ebay for a few quid. I removed the fuse and relay holders from the plastic mount to give me room to work and connected the main cables.

The next piece of the puzzle was the ignition signal. In the factory installation, this is provided with a small twin core cable to a connector on the split charge relay. I was not 100% sure how this works after reading various posts so I snipped off the connector and tested the voltages with the engine running. For an AGM battery the CTEK needs a chassis ground on the red/black wire and the 'engine running' signal on the red wire. On the factory wiring, I found that the 12v engine run signal was on the black wire and the brown wire was grounded to the chassis so I connected these as appropriate.

I connected the batteries back and ran a test. All was well, the indicators on the CTEK showed that it was charging the aux battery and the BM2 monitor confirmed this. So, how to mount it all? I decided to cut off the part of the plastic mounting where the old relay was held and attach a small piece of thin plywood to mount the CTEK.

I attached the CTEK and put everything into place where it all fitted quite nicely.

Now for the solar panel! Once more on ebay, I bought a cable with ring connectors to fit the CTEK terminals one end and a small Anderson connector on the other. I attached this to the appropriate terminals on the CTEK and placed the connector so it was acessible from under the front seat.

For the panel, I didn't want a permanent panel on the roof so decided to go with a 120w flexible, portable panel from Renology. I attach this to the roof via the mounting holes provided on the panel with some 40mm pot magnets and some thumb screws, again from ebay. This makes a very neat solution that works really well and can be removed and stored easily. The cable from the panel runs through the passenger window and under the air deflector to connect under the seat so it doesn't matter if it rains.

The resulting system now means I can run my fridge and other usual camping loads as much as I like and the CTEK charges the battery during the day from the panel if parked up or from the engine while driving around. Job done and very happy.
Last edited:


