So... the camera lead is totally different than that required for the head unit connection and it turns out my camera is broken anyway! It appears when they decommission these vans they just tear stuff out as the wiring is a bit of mess - some of it was just hanging down and still live! There was a GPS aerial on the roof of mine, presumably for the tablet/computer fitted in the van for the driver - they left the aerial in for it, but cut the lead off so it's unusable!! Have stripped everything out and will start again!Thanks also missing the mirror on the one that's taken my eye but good to know that can be connected to a new head unit
You are using an out of date browser. It may not display this or other websites correctly.
You should upgrade or use an alternative browser.
You should upgrade or use an alternative browser.
First time builder- Orange Camper (ex RAC conversion)
- Thread starter Rockerverb
- Start date
-
- Tags
- build thread. rac van scotland
Episode 8 - Beginning the actual conversion
After a few sketchy window moments (I’ve scuffed my paintwork… with the jigsaw foot), it was time to move inside the van for some more lining.

we used that metallised bubble wrap as a bit of vapour protection.
i also bought new ply lining panels and some automotive carpet, and Mrs rockerverb and I spent the day with face masks, spray on glue and razor blades.
by mid afternoon, we had something resembling a half carpeted van! After taking out the old floor it looked a little something like this:

Time for some scrubbing with a bit of soap and bucket…
luckily this took a few attempts as the new ply and carpet had set us back a bit more money than I had expected!
before too long, we were back to soundproofing mode again:

Being the panel on the floor already being stiffened we went for cheaper dodo lining as the floor was going to have Mass loaded vinyl sheet as well as closed cell foam over it afterwards.
After a few sketchy window moments (I’ve scuffed my paintwork… with the jigsaw foot), it was time to move inside the van for some more lining.

we used that metallised bubble wrap as a bit of vapour protection.
i also bought new ply lining panels and some automotive carpet, and Mrs rockerverb and I spent the day with face masks, spray on glue and razor blades.
by mid afternoon, we had something resembling a half carpeted van! After taking out the old floor it looked a little something like this:

Time for some scrubbing with a bit of soap and bucket…
luckily this took a few attempts as the new ply and carpet had set us back a bit more money than I had expected!
before too long, we were back to soundproofing mode again:

Being the panel on the floor already being stiffened we went for cheaper dodo lining as the floor was going to have Mass loaded vinyl sheet as well as closed cell foam over it afterwards.
Episode 9 - shhhhhhh, part II
We bought some Mass loaded vinyl from Amazon, and being careful to have as few joins as possible ended up with it in one long strip with a few off cuts underlapping for total coverage:

woth this all cut ready, we then insulated the floor with more closed cell foam from kiravans:
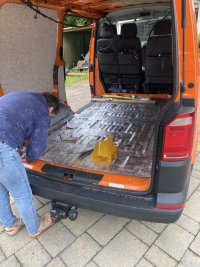
All back in and we had a much lower road noise, well insulated van!
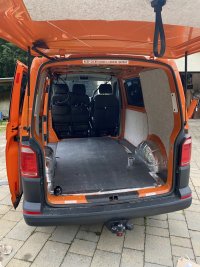
We bought some Mass loaded vinyl from Amazon, and being careful to have as few joins as possible ended up with it in one long strip with a few off cuts underlapping for total coverage:

woth this all cut ready, we then insulated the floor with more closed cell foam from kiravans:

All back in and we had a much lower road noise, well insulated van!

Episode 10 - A new Floor
The RAC flooring was a high quality, Melamine coated plywood. I made a pattern where the old winch was, and cut out some B&Q hardwood ply to fill in the gap:
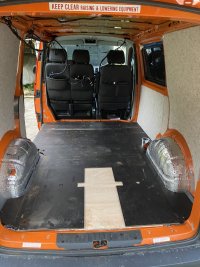
Whilst doing this however, changed my mind as the flooring had considerable amounts of oil in it and having spent so much on insulation, sound proofing and the van, it seemed like a bit of a 'half job'.
Two sheets of plywood from B&Q at a little under £80, a sharpie and a quick template drawn from the RAC flooring and we had a new floor! We sealed all the edges with a couple of coats of sealer but in total probably did the floor in about 3 hours of labour (with a bit of drying time)

On the same trip, we managed to pick up some stick on tiles in the clearance section for £14 per pack. 3 packs used (£42) and a couple more cans of trim fix later.... and this is what we had:
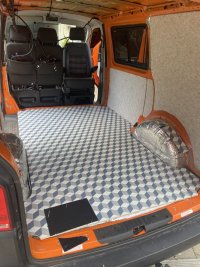
So... What did we learn in doing the floor? Well it cost a lot more than we planned; the MLV was cheap... but two more sheets of plywood, the closed cell foam and a box of dodo mat all added up. It was a few hundred quid all in all... Looked GREAT though compared to when we got it so I awarded myself 10 smug points.
The RAC flooring was a high quality, Melamine coated plywood. I made a pattern where the old winch was, and cut out some B&Q hardwood ply to fill in the gap:

Whilst doing this however, changed my mind as the flooring had considerable amounts of oil in it and having spent so much on insulation, sound proofing and the van, it seemed like a bit of a 'half job'.
Two sheets of plywood from B&Q at a little under £80, a sharpie and a quick template drawn from the RAC flooring and we had a new floor! We sealed all the edges with a couple of coats of sealer but in total probably did the floor in about 3 hours of labour (with a bit of drying time)

On the same trip, we managed to pick up some stick on tiles in the clearance section for £14 per pack. 3 packs used (£42) and a couple more cans of trim fix later.... and this is what we had:

So... What did we learn in doing the floor? Well it cost a lot more than we planned; the MLV was cheap... but two more sheets of plywood, the closed cell foam and a box of dodo mat all added up. It was a few hundred quid all in all... Looked GREAT though compared to when we got it so I awarded myself 10 smug points.
Did you sort those switches? And if so how hard a job .. cheersView attachment 165011
Sure… they also removed the left hand vent and had a tablet on a bracket. There foam stuffed in the hvac system to block the air flow.
im guessing it was so the hazard switch was still visible as that’s an mot requirement I think?
Not yet but I will just 3D print replacement buttons. Will share when I get around to itDid you sort those switches? And if so how hard a job .. cheers
Cheers, can they not just be put back where they should be?Not yet but I will just 3D print replacement buttons. Will share when I get around to it
I’d not even thought of that hahahaha!Cheers, can they not just be put back where they should be?
Just joined the forum after seeing your build thread, looking for inspiration, I’ll be keeping a close eye on it as I’ll soon be taking delivery of a soon to be Ex RAC T32.
She’s currently still in service, but is due to retire around Feb, she’ll go away for decommissioning and then come back to me. I’m being a bit cheeky and having a load of work done on her whilst she’s still part of the fleet. Just had new tyres, is currently at VW dealer having timing belt, water pump, egr cooler, turbo and pads & disks all round done.
If anybody want to know anything about the RAC stuff in the vans, by all means get in touch
Keep up the good work, looks awesome so far!
Welcome,Just joined the forum after seeing your build thread, looking for inspiration, I’ll be keeping a close eye on it as I’ll soon be taking delivery of a soon to be Ex RAC T32.
She’s currently still in service, but is due to retire around Feb, she’ll go away for decommissioning and then come back to me. I’m being a bit cheeky and having a load of work done on her whilst she’s still part of the fleet. Just had new tyres, is currently at VW dealer having timing belt, water pump, egr cooler, turbo and pads & disks all round done.
If anybody want to know anything about the RAC stuff in the vans, by all means get in touch
Keep up the good work, looks awesome so far!
haha nice one! see if you can get some alloys, new suspension, genuine LED light upgrade and an audio upgrade as part of decommissioning too?
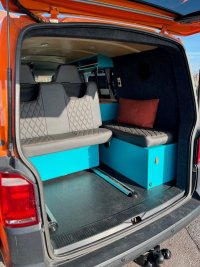
Here's mine, got it back a few weeks ago, had it professionally converted into a day/camper van with smart bed on rails for total flexibility. All work carried by The Soulful Explorer based in South Wales, Dom there was amazing, the quality of workmanship was incredible and he can do anything from just creating bespoke units to the full fit out. I haven't touched the exterior yet!!


Alloy wheels?! No chance! First thing I’m doing is repainting what she’s got, they’ve got a certain charm to them!Welcome,
haha nice one! see if you can get some alloys, new suspension, genuine LED light upgrade and an audio upgrade as part of decommissioning too?

with the floor in it was time to start laying out the van. We built it all to use eurocrates; they stack neatly, are a set size so actually work together and are sturdy. We’re also using 20mm x 20mm Aluminium extrusion to build something modular and flexible.
We ordered an Alpicool compressor fridge (waaaay too big… don’t get sucked in!) it’s nice, but far too big and caused issues with our home brew kitchen.
A bit of masking tape later and we were feeling hyper confident in our diy ability. TEN THOUSAND SMUG POINTS,
We got a bit side tracked with swivels and seats… having bought a rotating base for the driver from Rusty Lee, we rapidly learned that we really needed something more for the passenger seat, so a bit of forum browsing and we ended up buying a Vankraft adaptor, for £160ish i think.
at this point though I learned about ‘star sockets’… so a few quid later the van looked at a new low point (-10 smug points) :
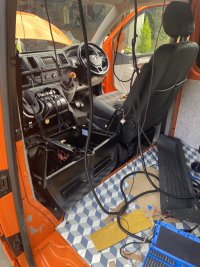
but…. Oh my goodness what an improvement!

we also made some wooden reinforcement for the seat back from 9mm ply. I work in a job where light weighting things is the default, so it has a few holes in it, which took about 30 percent of the weight out but still has holes too big for my body kiddos for to crack it.
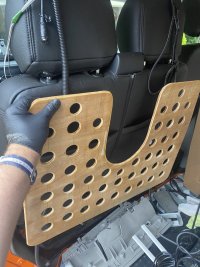
lovely bit of teak oil and sealed edges… even though it’s hidden… +3 smug points
at this point though I learned about ‘star sockets’… so a few quid later the van looked at a new low point (-10 smug points) :

but…. Oh my goodness what an improvement!

we also made some wooden reinforcement for the seat back from 9mm ply. I work in a job where light weighting things is the default, so it has a few holes in it, which took about 30 percent of the weight out but still has holes too big for my body kiddos for to crack it.

lovely bit of teak oil and sealed edges… even though it’s hidden… +3 smug points
Back to the kitchen!
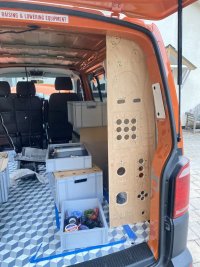
At this point i completely ignored my masking tape and built an electrical panel. I chose to build everything onto the back panel to be easily access, and simple to debug or modify in the future. I bought all the main kit (a 15 Victron charger, an mppt for solar, and a 240v consumer unit and hock up plug).
here is everything laid ou-
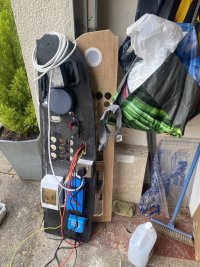
Once we made sure all the routing would work, i set to some wiring. (Forgetting to paint the panel it’s final colour…)
-500 smug points for paint.
-600 smug points for the fact I ignored my eurocrate layout… something that bit us badly later on

At this point i completely ignored my masking tape and built an electrical panel. I chose to build everything onto the back panel to be easily access, and simple to debug or modify in the future. I bought all the main kit (a 15 Victron charger, an mppt for solar, and a 240v consumer unit and hock up plug).
here is everything laid ou-

Once we made sure all the routing would work, i set to some wiring. (Forgetting to paint the panel it’s final colour…)
-500 smug points for paint.
-600 smug points for the fact I ignored my eurocrate layout… something that bit us badly later on
Similar threads
- Replies
- 9
- Views
- 1K

