Cab heater only blowing cold air
- Thread starter Forrest4799
- Start date
Mine just started misbehaving..... have taken black panel off but not sure how to remove that small holding bolt... is it a 5mm? (circled blue)The red arrow points to the black 3D printed arm. You have to remove the bolt to release it from the motor.
Its fiddly and a pain in the arse but doable without taking the dash out.
Theres another bolt around the corner (opposite the blue one) that was just loosened off, as to get to that you would need to remove more of the dash.
Hope this helps
View attachment 233613View attachment 233614
I noticed that the long lever (#2) doesn't move when changing temperature at the dial, yet the white part (#1) is moving. When manually moving part #3, temperature changes... Have made a small video but not sure how to upload it here so put it into YT, here is the link:

Thanks Tony, will WhatsApp you. Been struggling to get that motor off....2 and 3 won’t move as 1 which moves them is broken. The motor is held on by 2 5.5mm bolts.
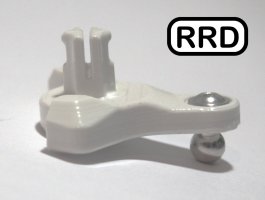
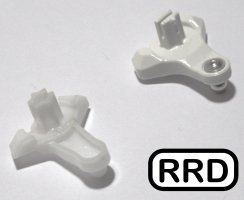
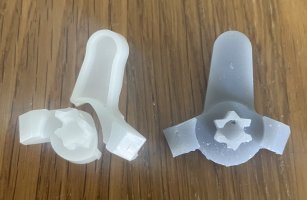
I can supply you the broken part (pic attached) contact me on 07880620367
Regards Tony
View attachment 272856
View attachment 272857
Hi all - I wanted to make you aware of a version of this heater linkage arm that I've designed which might help some folk. I'm a long serving senior mechanical design engineer and when this problem arose I did what I always do and come up with a solution! It's uber strong, vastly improved over the OE one, working beautifully, looks fab from every angle and the VW specialists that have used it to date are very happy.
I've posted it in the FOR SALE section so if you'd like to read more about it then visit here:
VW REPLACEMENT HEATER LINKAGE & INSTRUCTIONS
Any questions please get in touch


I've posted it in the FOR SALE section so if you'd like to read more about it then visit here:
VW REPLACEMENT HEATER LINKAGE & INSTRUCTIONS
Any questions please get in touch


Haven't been able to get a response.Finally got my heating controls fixed!
The issue was the white arm in the picture. One of the ends had snapped off.
Now replaced with a 3D printed one (black)View attachment 233109
I have spares so feel free to message me or email me (shepherdkai@hotmail.com) should anyone be in the same situation and need one!
Anyone else have luck in sourcing a replacement? Am located in Australia
Cheers JPR

Hi - I'm keen to help out. Coincidentally this part is on my list to design a replacement for after I've knocked out a couple of other designs I'm working on.Haven't been able to get a response.
Anyone else have luck in sourcing a replacement? Am located in Australia
Cheers JPR
View attachment 274890
I'd suggest that if you send me the broken one, I'll design a high quality replacement ASAP and send it back free of charge if you cover postage. The problem is you are in Australia and I'm in the UK so postage isn't cheap!
I designed the linkage shown above. This part would be a doddle in comparison.
Let me know if you are interested, no worries if not
I've broken mine and bought a replacement but while testing the new arm, I noticed that it swings from cold to hot when moving the dial from the bottom of cold to maybe 10% higher I assume by that the potentiometer has lost its place and I need to relearn the end stops?!
Note for future repairs:
Bolts to take the actuator out are 5.5mm this is the same a 7/32"
Might save someone buying a tool.
Does anyone have any tips on how to get the actuator back together? Myself my wife and my daughter have all tried to get the ball end of the new part into the arm. I've been at this for 8 hrs now and after modifying sockets and using a pry tool to get the broken piece out of the arm I'm totally stuck on how to get it back together.
Last edited:
Just completed my repair! Tips for anyone else trying it:

- I had to clip the ball and socket joint of the actuator bracket and arm together first before connecting the bracket and actuator together. It takes a LOT of pressure for your fingers given the awkward angle.
- Speaking of angle - I could just get into the bits by laying on my back with my legs hanging out of the drivers side door.
- I have no idea how anyone gets the hidden screw back in! I managed eventually by printing a modified ‘stubby’ 5.5mm socket (see photo). I could ‘just’ get my ratchet in then (the little draper one on Amazon).
- I had to set the ratchet to ‘neutral’ and use pressure to get a fraction of a turn out of the screw so it would bite before I could turn the ratchet back on and do a couple of clicks at a time with my fingertips.
- Finally I could swap back to my regular socket to nip it up.

Hi everyone,
First post! I’ve been looking through this thread as we’ve had a problem with our 2017 T6 Caravelle this week. Had a look up behind the dash only for the motor and linkage to fall out- looks like the previous owner has had a go as there were cable ties everywhere!
I now need a new motor as one leg has been snapped off, a replacement arm and also the bolts that hold the motor on?
Can anyone help with where to source a motor and the screws/bolts?
Thanks
Tim
Similar threads
- Replies
- 2
- Views
- 477
- Replies
- 4
- Views
- 1K
- Replies
- 8
- Views
- 2K
- Replies
- 11
- Views
- 4K


