Vanshades fitting video

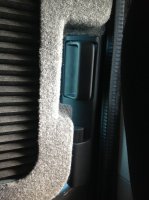
@andythom188 , good find, not as straightt forward on the Kombi rear doors with factory sliders.. You have to remove top and bottom rail trims to get the pod in there low enough, and then you have to make sure of the placement top and bottom, as they are deeper and also project a bit instead of being flush ..

The rear hatch, one you rmove the wiper motor trim, as its included on the pod. And make sure you line it up high enough that the top screw goes into the metal well.

They are worth the effort, just take your time with them.... I'm well happy with them, and everyone who sees them are impressed!
 
@andythom188 I can assure you that you will be impressed with them, I am and I've only seen @T6 Dave's photos. Just a further tip, try dry-fitting them first to make sure your happy with the alignment because it is too easy to Bush the bottom of the frame too far into the window reveal. You shouldn't see any of the van door frame when they are correctly aligned.
 
@andythom188 I can assure you that you will be impressed with them, I am and I've only seen @T6 Dave's photos. Just a further tip, try dry-fitting them first to make sure your happy with the alignment because it is too easy to Bush the bottom of the frame too far into the window reveal. You shouldn't see any of the van door frame when they are correctly aligned.
I've got 5 of the buggers to fit so alot of offering up to the window reveal making sure im happy with how they are positioned and have my impactor and fixings at hand, and jobs a good one :thumbsup:
 
@andythom188 you'll find that once you've done the first one that you get into the swing of it :thumbsup:. @T6 Dave did the hatchback as his first and then did his two sliders :whistle:. You may want to start with your two rear side windows, then the hatchback and then the ones with slide-openings, not forgetting the advice about top and bottom trim removal from the sliders, which sounds drastic but is essential especially on the sliding door(s) :thumbsup:
 
@andythom188 you'll find that once you've done the first one that you get into the swing of it :thumbsup:. @T6 Dave did the hatchback as his first and then did his two sliders :whistle:. You may want to start with your two rear side windows, then the hatchback and then the ones with slide-openings, not forgetting the advice about top and bottom trim removal from the sliders, which sounds drastic but is essential especially on the sliding door(s) :thumbsup:
Think that's the plan Dave's dad , do the 2 easy ones first rear quarter glass then rear hatch, then the tricky sliders
 
@andythom188. The video makes it look easy and it is once you're organised :thumbsup:. Good luck and looking forward to the pics and your report as to ease of fitting or any further tips and tricks:):):thumbsup::whistle:. I reckon you'll be finished within 3 hours :):whistle:.
 
If I can strip and rebuild warrior & challenger tank engines and transmissions think 5 vanshades shouldn't be to hard :eek: famous last words, I'm pretty hands on if I can find the time to do it, might even do it at work i get a hour for first break ;)
 
@andythom188. To a highly skilled engineer like yourself then 5 Vanshades in an hour - no problem :whistle::whistle::whistle:. Just remember to have clean hands before you start :D.
Man of many talents but no time to to anything major
Latex surgical gloves at the ready for operation vanshades
I enjoyed the job and was Monday to Thursday 37 hours with fri,sat, sun overtime I raked it in when gulf war was on. 18 hour shifts on Sundays
 
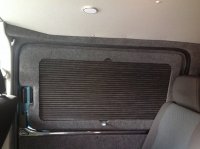
@andythom188 The gap on the slider door handles should be even top and bottom, the pod fits in tight to the rubber of the door opening, and follows the indent on the door pressing at the top and sides of the door window area.

Be careful how far in you put the lip of the shade at the bottom, the clearance if it's too far out means that when the shade is down, and you open the door, the handle of the shade will rub the rear quarter. The pod will also press against the seat back upper corner as well.

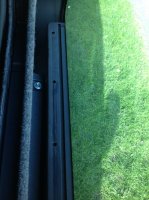
Best idea is to fit the bolts in the middle of the fixing point, so that if needs you can elongate the hole in the pod to give you some in/out adjustment if needed.

Hope this helps, will try to send you some pics if you want..

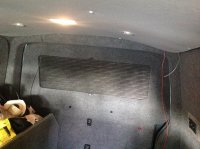
Be VERY careful with the rear pod, as the top screw is a "just" fit to the metal frame, easy to miss the frame if your not careful! Needs hatch open to get at it as well!

image.jpeg
 
@andythom188 The gap on the slider door handles should be even top and bottom, the pod fits in tight to the rubber of the door opening, and follows the indent on the door pressing at the top and sides of the door window area.

Be careful how far in you put the lip of the shade at the bottom, the clearance if it's too far out means that when the shade is down, and you open the door, the handle of the shade will rub the rear quarter. The pod will also press against the seat back upper corner as well.

Best idea is to fit the bolts in the middle of the fixing point, so that if needs you can elongate the hole in the pod to give you some in/out adjustment if needed.

Hope this helps, will try to send you some pics if you want..

View attachment 6592
Hey your a good lad thanks pal :thumbsup:
 
@andythom188 Here's a pic of it on the slider, need to move the back in slightly for the above reasons, but you can see the lip on the pic, and it's a "just " in the door aperture, if you don't remove the top and bottom sliding trims, the pod will sit on the door rubber at the top, and you will have a water leak..

image.jpeg
 
@andythom188 , this is a pic taken of one of the bottom fixing bolts to show that if in the middle, you can gain some adjustment if needed, otherwise you will be fooked!

On the Rear pod, make sure on the top bolt position, I cannot stress this enough, and it is hard, as you need the hatch open to fit it.

Not trying to scare, just that you need to take care, as once the holes are there then that's it..... So would rather cause people to think and ponder, than to blast ahead!

image.jpeg
 
@andythom188 They do look good though, and I'm glad that I did them...

Rear one is fitted with the two inner bolt holes that are in the plastic, as if you use the outer, it will sag away in the middle.. The inner ones pull it to the slight curve in the hatch inner that you will notice.. Then there are 4 small self tappers in the corners, but I haven't done those yet due to doing other bits... :thumbsdown::thumbsup:
 
@andythom188 Here's a messy pic of the rear pod, note the two black points are the bolts with the caps on them, the top one can't be seen, this is why to do this one you need to have the hatch open. You also need a bit extension on the drill to get at it, and make sure that it's in the right position for the bolt to go into the metal in the rear top brake light area... It is a "just" fit, as it goes through a boss on the back of the pod.

Hope all this has given you an insight mate, and sorry if I'm being "short"? Just shattered at the moment.. :thumbsdown::thumbsup:

image.jpeg
 
Back
Top