Solar Technology International

zoomequipped

New Member
Hi all,

Has anyone used the below company before? Solar technology international .

I am wanting a 150W+ semi flex panel with a rear junction box so I can fit flush onto the roof of my van, however I am struggling to find anywhere with a rear junction in stock, such as Photonics Universe etc.

does anyone have any experience/thoughts on the below, or any similar products they would recommend?


many thanks

 
I've heard of them.... but wow, they expensive.

£420 for a 150w panel !

Screenshot_20210312-140131_Chrome.jpg
 
Whats your setup?

What solar controller you looking at?

Whats the use case?

Whats the leisure setup?

Do you have a dc-dc and EHU?
 
It does seem quite expensive vs the 160W version at P.U for just over £300, hadn’t quite realised how much more until you pointed it out (thanks(

Van has 2x 100Ah batteries, an invertor, mains hook up. Main usage is the microwave via the inverter, fridge, lights, charging, water pump etc etc. Looking for something to allow us to extend our time away without EHU for as long as possible, without too big an outlay initially.

Not too sure on controller yet, was just going to order an MPPT with bluetooth, but not sure which one yet. (open to recommendation)

Thanks for your suggestions....

Not hugely keen on a mobile panel (we have a young baby so already trying to keep ‘luggage’ to a minimum)

The 2x 100W panels is an option, although ideally one larger panel would be my preference (less wiring up top, and only one hole to drill etc).

Slightly off topic..... the chap who had the van before me used a mobile panel from P.U, and I realised today the connections for this lead straight into the inverter, I.e. no charge controller. Is this even possible? It’s not something I am aware of, so assuming 8 can’t just hook up a new panel I buy into there.

thanks again
 
What about two of these 100w?..

Or...

Fit 1x100w on roof... then have a mobile 100w for when camping?


View attachment 107920

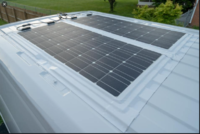
I’ve found a couple of the slimmer versions of these 100W panels, which I may be more keen as I could potentially install both side by side right at the back of the roof, and then cables will be slightly more confined to one area.

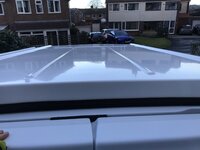
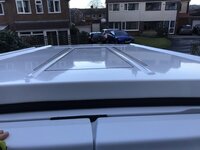
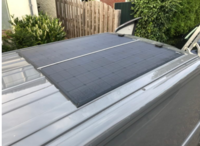
The only thing I’m slightly concerned about is the 2 ridges that run lengthways down the roof. Does this cause me an issue? I.e. surely the panel wouldnt be able to make contact with the main roof surface area along with the ridge? Or do you apply enough adhesive on the main (lower) area to fill that space? (Pic below)

thanks


35BF7397-9042-4571-82FE-EE474E93621A.jpeg
 
The only thing I’m slightly concerned about is the 2 ridges that run lengthways down the roof. Does this cause me an issue? I.e. surely the panel wouldnt be able to make contact with the main roof surface area along with the ridge? Or do you apply enough adhesive on the main (lower) area to fill that space? (Pic below)
Could be seen as an advantage, as some air circulation there will go some way to cooling the panels.

On the 1 fixed + 1 mobile idea - if you think about camping on a hot sunny day, you'd prefer the van parked in the shade, which isn't great for roof top panels. A mobile panel can be placed in the sun and moved to keep track of it - angling them towards the sun makes a significant difference to output. The panel I've bought is the same height as the furniture (kitchen pod), so disappears alongside it, behind the drivers seat.


Thanks for your reply. I will have a look at a few mobile panels and measurements etc. To see what I think. I am trying to keep luggage to a minimum, but as you say the mobile panel might have its benefits with positioning.

So for the roof, would you suggest one panel stuck down to both of those ridges, and then no adhesive anywhere else? The ridges are quite narrow so not sure how much hold that would give

thanks
 
So for the roof, would you suggest one panel stuck down to both of those ridges, and then no adhesive anywhere else? The ridges are quite narrow so not sure how much hold that would give

thanks
I've no experience with sticking them down, but no, you'd want adhesive bonding it between and either side of the ridges. I was just meaning that there'll be a gap alongside the ridges which will allow some air circulation.
Plenty of pics and info here, showing panels not bonded 'flat' - https://www.t6forum.com/threads/howve-you-installed-your-solar-panel.6493/
 
**************************************************
Dellmassive`s -- "how I Done It" -- Thread
**************************************************
Kit List And Stuff -- How I Done It & What I Use --
**************************************************
VIP Membership | VW T6 Forum - The Dedicated VW Transporter T6 Forum
************************************************
For Sale - Summer-weekend-t6f Limited Edition External Stickers
For Sale - T6F Flags
**************************************************
 
I've just pulled the trigger on these 10% discount (got the wife buy one on her account) not a bad price .... if they are any good... reviews seem alright.


No idea if they are any good, but 2 are coming tomorrow, given the weather won't be testing them any time soon! But will be pairing that with a Victron SmartSolar 75/15 MPPT controller and currently thinking of wiring in series. W per m2 efficiency seems good. The Voc is high at 25.9V but I am hoping the controller will take care of that.
Not a pro at solar like @Dellmassive ;) but if you guys are interested will post the results once the weather allows!

Edit: they also do Black ones which is actually what I went for to match me pop top

here is the Black version. ( not rear JB thou )


1615592518717.png
 
Thanks for the responses again.

I like the look of that one as slightly slimmer than some similar panels, which would be important if putting two alongside without it being too much of a squeeze

I do still like the thought of a rear box for neatness, however hear the arguments against (water ingress), I guess the ribs on the roof meaning the panel won’t sit perfectly flush also could increase the chances of this?

I’ve read lots of the forum pages but still not sure what’s the best approach with sticking it down. Am I best running a strip of adhesive down the two ribs, and then completely filling in the space between the two ribs with adhesive, deep enough to bond to the panel that would sit a cm or so above due to the rib heights? Or do I do lines on the lower non-rib section also, but just thick lines (again to make contact with the panel sitting slightly higher)

thanks
 
@zoomequipped as always its a game of compromises, do you want to pay the extra cost per W to get the rear JB or do you want to get the best £/W. To me its more important to get the £/W but still keeping the low profile, there are loads of panels out there not all made equal of course and cheapest isn't always best however I am backing that most of the efficiencies comes from the MPPT controller so would rather sink more money into that. Just make sure you size the MPPT correctly especially if going 2+ panels. and as long as the cabling rats nest is presentable and not dramatically increases the final van height I am happy. But that decision and compromise is totally a personal choice and what ticks your boxes.

In respect to neatness, agree the rear JB would be amazing from that point of view. You will have equal issues of water ingress on both cabling glands...if not sealed correctly it will leak, I wouldn't say one is better than the other in this regard. At the end of the day, you are puncturing a perfectly good roof, so same risks are present with both.

The main thing to work out is (if youre going two panel path) is how you neat up the Series/Parallel cabling. If youre going single panel then this is a non issue. To me I'm not sure if I want to have all 4 cables going below the roof line, or make the + and - link connection for my series run on the roof by cutting the cable to size and securing it on the roof and then only have the standard 2 cable drop into the PopTop then VAN.

I’ve read lots of the forum pages but still not sure what’s the best approach with sticking it down. Am I best running a strip of adhesive down the two ribs, and then completely filling in the space between the two ribs with adhesive, deep enough to bond to the panel that would sit a cm or so above due to the rib heights? Or do I do lines on the lower non-rib section also, but just thick lines (again to make contact with the panel sitting slightly higher)

I use Sikaflex 522 for sticking and sealing things on the camper and works fine. I am sure there are other bonding and sealing products around.
HANDLING AND FITTING MANUAL - Photonic Universe have made a cracking manual if you've not seen yet I've seen it posted somewhere on this forum before but cant remember original post probably @Dellmassive will know. But read this, it shows you the different methods for mounting. The biggest takeaway is DO NOT SEAL THE EDGES they explain reasons why. They mention 2 approaches to mounting with Adhesive towards the bottom and show you the adhesive pattern which avoids any air trappings between the panel and the roof. I think option 1 (fitting it like bathroom tiles by back buttering the underside of the panel and applying adhesive to the roof) would be hard to ensure no air is trapped since we all have ridges to think about, so option 2 is the only one where you can make sure that doesn't happen in my opinion.

Also take a look at the LenSun gallery, some great customer pictures around on that site with loads of mounting configurations to think about. And a lot of pictures to show you that the ridges on the roof are not much of a drama, to me it actually serves a good purpose to help pass air under the panels to cool them down a bit. Whether that really has any drastic impact I have no clue! But the theory surely makes it sound like it should haha :)

Sorry long post, but hope it helps answer some of your concerns fella, as I've literally just been going through all of this in my head last week haha.


EDIT:
@Dellmassive not sure if you've seen the new Victron MPPT calculator but its ace!! might be worth while adding it to your list of lists as I found that list so damn useful (thanks for all the effort by the way! I learn loads from your posts) MPPT Calculator - Victron Energy
 
Last edited:
@zoomequipped as always its a game of compromises, do you want to pay the extra cost per W to get the rear JB or do you want to get the best £/W. To me its more important to get the £/W but still keeping the low profile, there are loads of panels out there not all made equal of course and cheapest isn't always best however I am backing that most of the efficiencies comes from the MPPT controller so would rather sink more money into that. Just make sure you size the MPPT correctly especially if going 2+ panels. and as long as the cabling rats nest is presentable and not dramatically increases the final van height I am happy. But that decision and compromise is totally a personal choice and what ticks your boxes.

In respect to neatness, agree the rear JB would be amazing from that point of view. You will have equal issues of water ingress on both cabling glands...if not sealed correctly it will leak, I wouldn't say one is better than the other in this regard. At the end of the day, you are puncturing a perfectly good roof, so same risks are present with both.

The main thing to work out is (if youre going two panel path) is how you neat up the Series/Parallel cabling. If youre going single panel then this is a non issue. To me I'm not sure if I want to have all 4 cables going below the roof line, or make the + and - link connection for my series run on the roof by cutting the cable to size and securing it on the roof and then only have the standard 2 cable drop into the PopTop then VAN.


I use Sikaflex 522 for sticking and sealing things on the camper and works fine. I am sure there are other bonding and sealing products around.
HANDLING AND FITTING MANUAL - Photonic Universe have made a cracking manual if you've not seen yet I've seen it posted somewhere on this forum before but cant remember original post probably @Dellmassive will know. But read this, it shows you the different methods for mounting. The biggest takeaway is DO NOT SEAL THE EDGES they explain reasons why. They mention 2 approaches to mounting with Adhesive towards the bottom and show you the adhesive pattern which avoids any air trappings between the panel and the roof. I think option 1 (fitting it like bathroom tiles by back buttering the underside of the panel and applying adhesive to the roof) would be hard to ensure no air is trapped since we all have ridges to think about, so option 2 is the only one where you can make sure that doesn't happen in my opinion.

Also take a look at the LenSun gallery, some great customer pictures around on that site with loads of mounting configurations to think about. And a lot of pictures to show you that the ridges on the roof are not much of a drama, to me it actually serves a good purpose to help pass air under the panels to cool them down a bit. Whether that really has any drastic impact I have no clue! But the theory surely makes it sound like it should haha :)

Sorry long post, but hope it helps answer some of your concerns fella, as I've literally just been going through all of this in my head last week haha.


EDIT:
@Dellmassive not sure if you've seen the new Victron MPPT calculator but its ace!! might be worth while adding it to your list of lists as I found that list so damn useful (thanks for all the effort by the way! I learn loads from your posts) MPPT Calculator - Victron Energy
yeh the solar calculator is great . . . i was playing with it the other day.

ill add it to the main thread . .
 
Panels arrived packaging was good. Impressed with the build quality initially.
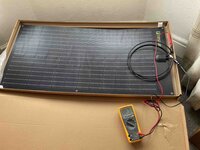
Couldn't help myself however, even though its miserable, a little bit of sun poked through so I got one panel by the window and it registered 20.67V...cant wait to put this through the controller. The missus and the dog aren't impressed mind! :rolleyes:

IMG_3702-squashed.jpg
 
Thanks for the replies. I thought I would give a bit of an update.

I've changed my mind in regards to the rear JB, mainly as I am nervous around cutting a larger sized hole in the roof, with the roof ridges meaning a completely flush fit will be difficult to achieve anyway.

I have ordered the below kit, and have a rough plan of fitting, which I have outlined below. If anyone fancies casting their eye over it, that would be really helpful, any tips and advice before I make a start when we get some dry weather would be really appreciated.


Photonic Universe 160W Solar (12V solar panels charging kits for caravans, motorhomes, boats, yachts, marine
Victron 75/15 Bluetooth MPPT
Waterproof Double Entry Gland (
)
Dual core extension cable (4mm)
6mm Cable for MPPT to Battery
A couple of inline 30A circuit breaker / fuses
(one for panel to MPPT, and one for MPPT to Battery)
Black Conduit
Electrical Tape
Spare pair of MC4 Connectors
(Dual core extension cable comes with one pair on already
TBC - Some Polycarb Corrugated Sheets to heighten the area between the 2 ridges along the roof to achieve a more flush/flat fit.
Sikaflex 252i (Read various artciles/forums about which one was best, settled on 252i)


So plan broadly is:
  1. Fit the MPPT and internal wiring first, so I can test the panel whilst off the roof before I drill any holes.
  2. Cut polycarb sheets to size to make one large flat area to stick the panel too
  3. Stick polycarb sheets down first and leave to set
  4. Stick panel on top of polycarb/ridge area (Any suggestions on whether I use a completely flat Sikaflex layer rather than lines, given that the polycarb sheet will be corrugated so will provide airflow under the panel anyway)
  5. Drill 2 holes for the cable entry beneath the gland, wire cables through, and then stick down the gland on top.
  6. Finalise internal wiring through the roof boards down into the wardrobe and into the MMPT which will be wired underneath.

My main concern is sticking the panel down to the roof, after looking at various forums and articles as suggested, I have settled on the below option.

I have tried to draw out below (badly) in black where I will place the Polycarb sheets, and then the panel will essentially sit across all of that area and sit nice and flat across the sheets/ridges..........thoughts?

Thanks again


unnamed (1).jpg
 
You might be over thinking it?

Most people would just build up a thick bead of adhesive to the same height as the two raised rails you have. (with a gap in middle like below) and just stick it down.

seal in the leading front edge to stop any wind lifting on motorway.

leave gaps in bonding for air to circulate and water to escape. (see below)

leave rear section open for above . . .


+++

get a layer of clear vinyl in the area of the panel and stick to that, (take van so sign writer or GRFX place and they can do it for you.) (clear, black, silver - whatever colour)

that way when its time to remove the panel the paint under the vinyl will be undamaged . . the adhesive will bond to the vinyl.


+++


this is the install guide for that panel . . .


Gluing with double-sided tape:

In general, gluing with double-sided tape is not recommended on curved surfaces because of the rebounding straightening force of the solar panel. If bonding with tape is required, it is best to use an industrial grade porous (“foam”) tape for this application. Applying the tape across the entirety of the underside of the solar panel will improve the bond quality. When gluing with double-sided tape: • Apply the tape onto the solar panel first, by “unrolling” it on the solar panel. Use a soft cloth or a roller to gently apply pressure onto the tape (protective film side) to dispel all air from between the tape and the solar panel. Take care not to force the solar panel to bend underneath. • If the length / width of the tape exceeds the solar panel, cut the tape carefully around the edges of the solar panel. • Remove the protective film and stick the solar panel down on a clean and dry surface, keeping the solar panel as straight as possible up. While sticking it down, gently apply pressure on the solar panel with a soft cloth or a roller to ensure that no air is trapped underneath the solar panel (2 people are recommended for the installation).


Gluing with adhesive Your chosen adhesive should be suitable for both the solar panel and the mounting surface. It should also be designed for outdoor applications (with a wide temperature range, UV light protection etc). Pay attention to the application temperature and drying time requirements. The mounting surface must be even, clean (use a degreasing agent) and dry. The installation must be carried out with care and precision, as this permanent method does not allow for repositioning. Warning! Although preparing the roof surface for better adhesion is permitted (e.g. by removing the old paint, grinding, using a primer etc), you must not use any sand paper or other sharp or abrasive tools on the underside of the solar panel.


+++

There are two main options for application of the adhesive: 1) Apply the adhesive to the underside of the solar panel in parallel beads broken in the middle of the solar panel. Depending on the application the edges of the solar panel can be sealed all the way round with the same adhesive at the end of the installation. 2) Cover the entire underside of the solar panel with a layer of adhesive, spreading it evenly with a trowel or a similar tool. The first option is recommended for smooth and even surfaces. If the surfaces are uneven (for example, roof ridges on a campervan) a larger contact area is recommended for adhesive and the second application option will be the best. For the default first application option, apply thick 10-12mm adhesive beads on the rear of the solar panel, in parallel to each other, as shown in the diagram and the photo below:


1615811711662.png1615811953428.png

.
 
examples . .

1615812050536.png1615812067433.png1615812091709.png1615812107560.png1615812117853.png1615812176843.png1615812213013.png


+++


have a look here ...


+++


example of vinyl wrap over bodywork.


1615812534382.png

1615812624498.png
 
Back
Top