My Flush Work/Reverse light solution

I wanted to add a utility, ditch and reversing light combo but as I have a tailgate the usual position on the roof rack was out because when the tailgate is up it blocks most of the light. Flush fitting LED lights off Amazon etc. would have been perfect but I have learnt from past experience most Chinese made lights are rubbish and create massive EMC/RF interference often wiping out signals from DAB, HF, VHF and UHF when on and as I run all of these frequencies in my vehicle, personal and emergency use I was not willing to take the risk and spend money on Chinese junk creating an issue I had in the post. Lazer Lamps are EMC protected and the fact I have never had any issues with Lazer Lamps made them my only option. The fitting options are however limited from Lazer Lamps as they don’t do a flush fitting light which would have been the perfect solution for the position I had in mind. Under the bumper was too low and anywhere else would have meant surface mounting them and that was not going to happen. So i taught myself CAD, made use of a friends 3d printer and came up with some made to measure flush fitting pods for the Utility 25 lights that allowed me to cut them into some plastic trim on my vehicle. Considering I have never done any CAD design before or 3d printed anything I am quite chuffed with the results. Two prototypes and then a final print later and I now have my Light Pods designed exclusively for the Lazer Lamp Utility 25. Wired on three way switch, on with reverse, always on and off.

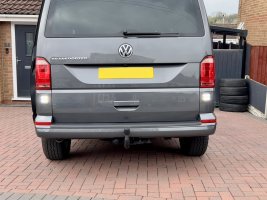
IMG_2950.jpeg

IMG_2945.jpeg
 
Superb. Appreciate the lengths you’ve gone to here. I have a similar headache with my sprinter camper rear doors. I don’t want to drill the roof.

Did you fill the print media with anything pre painting them?
 
Superb. Appreciate the lengths you’ve gone to here. I have a similar headache with my sprinter camper rear doors. I don’t want to drill the roof.

Did you fill the print media with anything pre painting them?
No, used JB Weld epoxy to stick them to the plastic panels and you can sand JB also it’s paintable, left a local body shop to do rest. Only prep I did was sand everything smooth and then ran a scotch pad over the lot. Print is in abs
 
I wanted to add a utility, ditch and reversing light combo but as I have a tailgate the usual position on the roof rack was out because when the tailgate is up it blocks most of the light. Flush fitting LED lights off Amazon etc. would have been perfect but I have learnt from past experience most Chinese made lights are rubbish and create massive EMC/RF interference often wiping out signals from DAB, HF, VHF and UHF when on and as I run all of these frequencies in my vehicle, personal and emergency use I was not willing to take the risk and spend money on Chinese junk creating an issue I had in the post. Lazer Lamps are EMC protected and the fact I have never had any issues with Lazer Lamps made them my only option. The fitting options are however limited from Lazer Lamps as they don’t do a flush fitting light which would have been the perfect solution for the position I had in mind. Under the bumper was too low and anywhere else would have meant surface mounting them and that was not going to happen. So i taught myself CAD, made use of a friends 3d printer and came up with some made to measure flush fitting pods for the Utility 25 lights that allowed me to cut them into some plastic trim on my vehicle. Considering I have never done any CAD design before or 3d printed anything I am quite chuffed with the results. Two prototypes and then a final print later and I now have my Light Pods designed exclusively for the Lazer Lamp Utility 25. Wired on three way switch, on with reverse, always on and off.

View attachment 197546

View attachment 197548
Thats a superb solution! Could you maybe share the 3D print file?
 
I wanted to add a utility, ditch and reversing light combo but as I have a tailgate the usual position on the roof rack was out because when the tailgate is up it blocks most of the light. Flush fitting LED lights off Amazon etc. would have been perfect but I have learnt from past experience most Chinese made lights are rubbish and create massive EMC/RF interference often wiping out signals from DAB, HF, VHF and UHF when on and as I run all of these frequencies in my vehicle, personal and emergency use I was not willing to take the risk and spend money on Chinese junk creating an issue I had in the post. Lazer Lamps are EMC protected and the fact I have never had any issues with Lazer Lamps made them my only option. The fitting options are however limited from Lazer Lamps as they don’t do a flush fitting light which would have been the perfect solution for the position I had in mind. Under the bumper was too low and anywhere else would have meant surface mounting them and that was not going to happen. So i taught myself CAD, made use of a friends 3d printer and came up with some made to measure flush fitting pods for the Utility 25 lights that allowed me to cut them into some plastic trim on my vehicle. Considering I have never done any CAD design before or 3d printed anything I am quite chuffed with the results. Two prototypes and then a final print later and I now have my Light Pods designed exclusively for the Lazer Lamp Utility 25. Wired on three way switch, on with reverse, always on and off.

View attachment 197546

View attachment 197548
That looks brilliant. Almost factory!
 
Back
Top