How to Install Side Step Light

sam_ul

New Member
I am currently converting a PV to a Camper and bought a raised step from Kiravans with a light but I have no clue how to connect this light?
I am guessing I would need to go from one of the courtesy lights above the passenger side and down the B column under the the step trim. However the light that comes with the step is yellow with a connector on each end. And my original courtesy light has two wires. So I have no clue how this connects, whether both ends go into my new light and I break it to create two wires then connect each end to the original courtesy light?
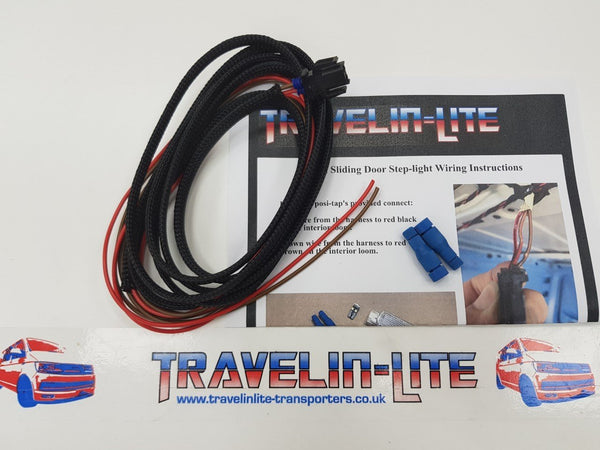
I have added an image of the wire and what was included.

Thanks in advance!Screenshot 2023-04-02 at 10.29.34.png
 
I am no help but am also wondering the same. When mine goes in to get it's seat and floor fitted they are putting in the deeper step so am wondering how to wire it. I have read the other posts about it but am still unsure.
IMG_20230406_105056.jpg
I found this wire taped up in the wiring loom and am presuming this is the courtesy light to go with another taped up at the rear. But this isn't long enough as it is. Do you just extend it with a wire that comes with the step?
 
If you are doing a complete self build Camper, you could do with a cheap multimeter. It doesn't need to be capable of measuring current, just voltage. The light above your cabin, which comes on when you open the door. Pull this out to reveal the connecting wires. They won't be red (live) and black (neutral) so you can remove one wire and then check with the multimeter black connected to bare metal, and the multimeter red to each wire in turn. The 'live' to the bulb will show ~12volts.

You need to splice into this live wire and take it down the B pillar to the step well. Then connect that live extension to the step light. You need to take the other side on the bulb to a neutral near the step light. This could be as simple as a self tapper into the vehicle skin with a star washer on.

You need to take the extra light, in the step well, off in parallel so that you are not reducing the voltage to the second light, otherwise you risk two very dim lights. Excuse the very crude sketch, I'm on my phone.

sketch-1680810488424.jpg
 
You must use the -ve wire from the courtesy loom, this is the one that turns the light on and off. If you connect to the body of the van, the light will stay on and not operate with the door.

look for these colour wires

red/black +ve
brown/red -ve
 
I am no help but am also wondering the same. When mine goes in to get it's seat and floor fitted they are putting in the deeper step so am wondering how to wire it. I have read the other posts about it but am still unsure.
View attachment 194945
I found this wire taped up in the wiring loom and am presuming this is the courtesy light to go with another taped up at the rear. But this isn't long enough as it is. Do you just extend it with a wire that comes with the step?
That is the cargo light feed, there might be 3 wires in it, use the two I’ve mentioned above. Just extend both to your new step light
 
I stand corrected! Thanks for pointing out my wrong assumption Deaky!
No worries, there isn’t really a neutral in 12v either :p It’s negative or ground
 
So just cut the connector off tape up the third wire and extend the other two? Sorry if this is obvious @Deaky but I have no idea about electrics and am trying to figure that bit out now to sort all the other electrics out I need for the van! Does anyone recommend a good idiots guide to camper electrics?
 
So just cut the connector off tape up the third wire and extend the other two? Sorry if this is obvious @Deaky but I have no idea about electrics and am trying to figure that bit out now to sort all the other electrics out I need for the van! Does anyone recommend a good idiots guide to camper electrics?
Yes, exactly that :thumbsup:
 
So just cut the connector off tape up the third wire and extend the other two? Sorry if this is obvious @Deaky but I have no idea about electrics and am trying to figure that bit out now to sort all the other electrics out I need for the van! Does anyone recommend a good idiots guide to camper electrics?
Remember to cut each wire separately though, otherwise you’ll blow a fuse :laugh:
 
Last edited:
Our pop top fitters ran an extension from the cargo courtesy circuit down into the step area for us so that bit is sorted. I bought the kombi step and light from Transporter HQ but it didn't come with any plug. Probably because it's supposed to be a replacement kit rather than as an upgrade from normal PV step. (Didn't even have the black back to light) Starting to wish I'd bought someone else's kit now. :confused:

Does anyone have the part number or link to where I can get just the square plug I need to connect my cables into this light?
Many thanks.
20230525_222603.jpg

20230525_222644.jpg
 
Our pop top fitters ran an extension from the cargo courtesy circuit down into the step area for us so that bit is sorted. I bought the kombi step and light from Transporter HQ but it didn't come with any plug. Probably because it's supposed to be a replacement kit rather than as an upgrade from normal PV step. (Didn't even have the black back to light) Starting to wish I'd bought someone else's kit now. :confused:

Does anyone have the part number or link to where I can get just the square plug I need to connect my cables into this light?
Many thanks.
View attachment 200248

View attachment 200249
Did you get the part number in the end? I'm in the same situation as you
 
Did you get the part number in the end? I'm in the same situation as you
No. I bought the travellin lite wire kit. Although it wasn't in the pictures on the website it came with two light units (with black back pieces) plenty of spare cable and two led upgrade bulbs which was an unexpected bonus. All delivered for £15. Well impressed.

 
1686765929508.png
I guess the part number is just the shell - suitable repair wires probably sold separately.

Additionally on right side VW is using an angled casing which snaps over the connector shell
1686766610327.png
1686766656356.png
 
Back
Top