How do you measure coilover height?

cy294

Senior Member
VIP Member
T6 Guru
Had Stance+ fitted and yes I know it is a budget coilover and there are better ones out there which are more superior. However, how do you measure the ride height. I know with lowering springs they are either 40 or 50 mm but how do you know with coilovers.

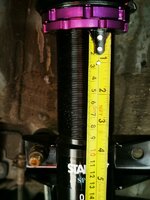
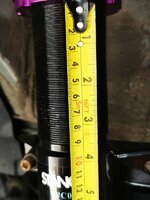
This is a picture I have taken and the measurement is from the bottom lip to the bottom of the locking collar. So what ride have I got. It probably is a really simple answer, but I am new to this game.

Pics below and TIA.

IMG_20200721_112228.jpg

IMG_20200721_112132.jpg
 
Ride height is measured from the center on the hub to the top of the wheel arch lip with the vehicle on the ground with the suspension 'settled'. -40mm springs will give a ride height of 40mm lower than stock, but this doesn't mean that the springs are 40mm shorter. They compress at different rates and not necessarily at a linear rate. The same applies with coilovers. Moving the adjustable spring platform by say 40mm, won't result in a 40mm drop from where it was when you started.

So to answer your question, the only way that you can work it out is to measure the ride height with them set at their highest setting, then wind them all the way down to see what the difference is, then compare these results to the stock ride height.
 
Thanks for the replies. If I need to adjust them, do both sides have to be jacked up at the same time or can I do a side at a time?
 
You can do them all individually, indeed you can do them all different heights if you feel the need (This is the basis of 'Flat Flooring' only the adjustments are made with each wheel on a scale so the corner weights can be seen and adjusted via the spring loadings) but you may have problems getting the rears into a place where the spring tension has been released enough to allow the collar to be moved without having both wheels off the ground at the same time, 1) for the dampers to be unbolted at the bottom to allow the suspension arm to drop far enough to release the spring, 2) for the anti roll bar to not be under tension and make 1) difficult to achieve
The front wheel (or should I say Body) height is almost a direct one to one ratio, the amount you lower the spring collar is pretty much how much you lower the body, the spring bottom mount is almost at the end of the suspension arm so the hub is close to where the spring acts upon.
The rear adjustment is off by some margin due to the spring location being inbetween the hub and the fulcrum point of the suspension arm mount, you need to reduce the amount of turns on the rear spring collar relative to the amount you have turned the front collars to achieve the desired height.
Set the rears first then it's easy to adjust the fronts to get the same gap, not so easy the other way round, but be aware any loading in the rear will drop the rear gap more so than the front so you may have to raise the rear height when empty to account for carrying a load and having the van look right when it is doing so.
Thanks for the in-depth reply. So just to confirm, if I'm happy with the rears. Can I then jack up the front one side at a time and adjust? I.e. jacking up the driver side front shell won't put too much pressure on the passenger front wheel?
 
Thanks for the in-depth reply. So just to confirm, if I'm happy with the rears. Can I then jack up the front one side at a time and adjust? I.e. jacking up the driver side front shell won't put too much pressure on the passenger front wheel?
Actually has the opposite affect . If you crank up the driver side spring adjuster you will increase the weight on the Drivers Side !!
 
Actually has the opposite affect . If you crank up the driver side spring adjuster you will increase the weight on the Drivers Side !!
Thanks as always for your reply. It just seems strange when you jack up one side, I automatically thought pressure goes to the opposite.
 
@CRS Performance @cy294 I could be totally incorrect but I think you are talking about 2 different things.
I read it that @cy294 is talking about jacking up the van taking the wheel off to adjust the coilover whilst the other front wheel is on the floor. If so Yes thats possible.
And @CRS Performance is talking about after the adjustment has been don and the weight of the van on all 4 wheels.
 
OOPPPPPS Yes i am certainly talking about the raising of a Coil over spring platform . this increases weight on that corner .

BUT if you jack up the sill with a jack you should also find that the opposite side lifts a little which obviously means less weight on the opposite side .
 
I measure between end of threads and top of collar and then make both sides the same, If you get really into flat flooring there are all sorts of things to consider.
I have a set of scales in my garage to do my Caterham, I did a friends one time, checked tyre pressures were right before I started, and needed to change camber settings which meant a new set of joints for the top wishbones, finished off the cornerweights the next day and took it out for a test drive, it kept pulling to one side under braking, turns out he had a slow puncture in one front wheel that threw the balance off, so had to redo it once we'd pumped the tyre back up again.
 
Thanks all for your replies. I really do appreciate everyone's posts and shows what a great forum this is and what such friendly people you all are and willing to help those who you have never met. Thank you.
 
@cy294 i fitted some stance + coilovers 2 weeks ago and just adjusted To what looked right on 20” wheels. This is mine lowered with still about 30/40mm left to go on the front if I wanted.

671FE12F-F87E-420F-95CC-EBDB60D530AA.jpeg
 
Remember, once you have set your desired height, take it to an alignment place to make sure everything is pointing in the right directions before you head off on your holidays.
 
Remember, once you have set your desired height, take it to an alignment place to make sure everything is pointing in the right directions before you head off on your holidays.
Will you still need to do this if you have only adjusted a few mm?
 
Cost of alignment check Vs Cost of a new set of (Front or Rear or Both) tyres then an alignment check??:unsure:
 
Back
Top