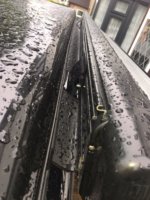
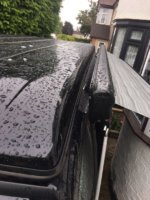
Which is the best way to fit a Fiamma Awning Rain Guard Lower

TeresaE

Member
T6 Pro
Hi all

We had a Fiamma 45s canopy fitted to our converted Transporter, which is great except in rain. We have been looking into fitting something in the gap to stop this.
We have found a Fiamma awning rain guard lower which is supposed to prevent this problem. Have any of you guys have experience of using this product or can recommend anything else.
Hubby did try using pipe lagging which worked up to a point (light rain). It's couldn't cope with a downpour.
Many thanks
T
 
Are you trying yo stop the the rain falling between the van and the awning.
If so, I fitted the Fiamma rain guard, pretty easy. Can take pics if you need.

I've also found out how to silence the rattles from the casing if upu are interested.
 
Hi Oldrat
Yes we are trying to stop the rain falling between the van and the awning. We would be interested in pics, as unsure as to how and where it would fit.
Hubby fitted pipe lagging around the feet of the awning when it is in its casing to stop the noise. If you have another way please share.
Many thanks
T
What noise from legs/feet - ours clip in to the case and I've not noticed any rattles??
 
This is the stuff that I used,
Linky
(This was the cheapest place that I found too.)

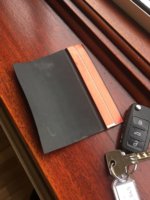
It arrives in a 3m(?) length coiled up in a box.

RenderedContent-417BBC8C-81AD-4C9F-8521-DA7ECD209D84.JPG
This pic shows the adhesive strip under the red tape on this off cut

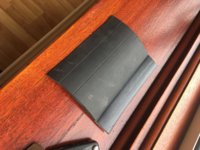
RenderedContent-D703C3C4-FB2B-4840-9A74-346B33939175.JPG
The other side

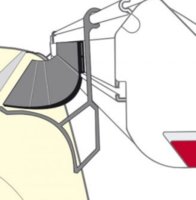
IMG_3124.jpg

This is how it fits. My awning case actually sits a couple of inches lower down.

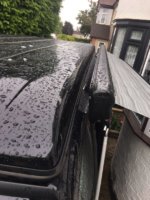
RenderedContent-09CD8E6E-E12D-42FD-84CA-84265F39B0BF.JPG

Just like this.
 
RenderedContent-EBDDA031-8D1A-4F66-9F7F-F0C22FCB3708.JPG RenderedContent-09CD8E6E-E12D-42FD-84CA-84265F39B0BF.JPG It's simple to fit but a tad fiddly so you need two pairs of hands.
1. Measure the distance between the brackets.
2. Cut a length to that size. I used heavy duty scissors and got a neat edge. Be careful to cut at 90 degrees.
3. Clean the paint surface as per instructions using their wipe.
4. Raise the pop top and offer the guard up to see how it'll sit.
Tip- I pressed the 6" offcut into place so I could see how much of a U shape was needed and where the edge would sit.
5. Peel the edges of both tapes back about 5 cm. and pull them under the bottom so they trail downwards.
6. With your assistant offer the guard up (its long and needs lining up) and when it is sitting nicely press the sticky down.
7. Then with it all nicely lined up, peel both strips downwards and along as your assistant presses the sticky all the way along behind you.

Repeat with the front and back, there's plenty, but cuting to the required length.

NB - the inner edge sits easily under the pop top with no undue probs so far.. I'll trim the rubber guard could to butt up to the pop top if needed.


So far it works a treat woth minimal leakage through the bracket area.

Good luck.
Ratty
:thumbsup:
 
Wonder if my rain guard is somehow acting as a buffer as I've definitely not noticed any rattles when driving?
I found that it was the knuckle joints at the top of the legs that were rattling the most.

BTW, 'er indoors has hearing like Radar from M.A.S.H. Peace has now been restored in ratty towers. :thumbsup:
 
As above, you guys are having to fix something that for me has never been a problem. I've just been out to have another look - legs fit snug in the plastic clips with feet up tight against the outside edge and no movement in the knuckles - wonder if the setup varies fractionally from awning to awning and/or if the fitted position affects the amount of wind buffeting, etc.??
 
View attachment 12793 View attachment 12792 It's simple to fit but a tad fiddly so you need two pairs of hands.
1. Measure the distance between the brackets.
2. Cut a length to that size. I used heavy duty scissors and got a neat edge. Be careful to cut at 90 degrees.
3. Clean the paint surface as per instructions using their wipe.
4. Raise the pop top and offer the guard up to see how it'll sit.
Tip- I pressed the 6" offcut into place so I could see how much of a U shape was needed and where the edge would sit.
5. Peel the edges of both tapes back about 5 cm. and pull them under the bottom so they trail downwards.
6. With your assistant offer the guard up (its long and needs lining up) and when it is sitting nicely press the sticky down.
7. Then with it all nicely lined up, peel both strips downwards and along as your assistant presses the sticky all the way along behind you.

Repeat with the front and back, there's plenty, but cuting to the required length.

NB - the inner edge sits easily under the pop top with no undue probs so far.. I'll trim the rubber guard could to butt up to the pop top if needed.


So far it works a treat woth minimal leakage through the bracket area.

Good luck.
Ratty
:thumbsup:

Hi Ratty,
Quick question how do you get on with it when cleaning the van? Hubby is concerned that he wouldn't be able to clean that area easily?
Many thanks T ;)
 
In short Teresa, I don't know. I've not cleaned the van since I fitted the seal.

Can't see any real problems though as I use a step ladder for the roof anyway.
 
In short Teresa, I don't know. I've not cleaned the van since I fitted the seal.

Can't see any real problems though as I use a step ladder for the roof anyway.

Thank you Ratty. I'm sorry to be a pain but I have another question o_O . Our awning kicks out from the van at the back. Does your do the same, and in which case how far beyond the back bracket did you fit the seal? :rolleyes:
Thank you again
Teresa
 
View attachment 12793 View attachment 12792 It's simple to fit but a tad fiddly so you need two pairs of hands.
1. Measure the distance between the brackets.
2. Cut a length to that size. I used heavy duty scissors and got a neat edge. Be careful to cut at 90 degrees.
3. Clean the paint surface as per instructions using their wipe.
4. Raise the pop top and offer the guard up to see how it'll sit.
Tip- I pressed the 6" offcut into place so I could see how much of a U shape was needed and where the edge would sit.
5. Peel the edges of both tapes back about 5 cm. and pull them under the bottom so they trail downwards.
6. With your assistant offer the guard up (its long and needs lining up) and when it is sitting nicely press the sticky down.
7. Then with it all nicely lined up, peel both strips downwards and along as your assistant presses the sticky all the way along behind you.

Repeat with the front and back, there's plenty, but cuting to the required length.

NB - the inner edge sits easily under the pop top with no undue probs so far.. I'll trim the rubber guard could to butt up to the pop top if needed.


So far it works a treat woth minimal leakage through the bracket area.

Good luck.
Ratty
:thumbsup:


Nice one Ratty, they say a picture paints a thousand words. Been looking for a decent view of this and even Fiamma don't even seem to manage it. Your picture now gives me the confidence to go and buy this. Cheers!!
 
View attachment 12793 View attachment 12792 It's simple to fit but a tad fiddly so you need two pairs of hands.
1. Measure the distance between the brackets.
2. Cut a length to that size. I used heavy duty scissors and got a neat edge. Be careful to cut at 90 degrees.
3. Clean the paint surface as per instructions using their wipe.
4. Raise the pop top and offer the guard up to see how it'll sit.
Tip- I pressed the 6" offcut into place so I could see how much of a U shape was needed and where the edge would sit.
5. Peel the edges of both tapes back about 5 cm. and pull them under the bottom so they trail downwards.
6. With your assistant offer the guard up (its long and needs lining up) and when it is sitting nicely press the sticky down.
7. Then with it all nicely lined up, peel both strips downwards and along as your assistant presses the sticky all the way along behind you.

Repeat with the front and back, there's plenty, but cuting to the required length.

NB - the inner edge sits easily under the pop top with no undue probs so far.. I'll trim the rubber guard could to butt up to the pop top if needed.


So far it works a treat woth minimal leakage through the bracket area.

Good luck.
Ratty
:thumbsup:
I’m about to attach one of these strips to my campervan. Have you had to trim the rubber strip to make it narrower and have you had any leakage into pop top?
 
I’m about to attach one of these strips to my campervan. Have you had to trim the rubber strip to make it narrower and have you had any leakage into pop top?
I don’t recall having to cut down the rubber strip, but it’s just a rubber sheet, easy enough if you decide you need to.

No leakages.

It’s a mod that’s well worth doing.
 
Back
Top