Got this to do soon.
You are using an out of date browser. It may not display this or other websites correctly.
You should upgrade or use an alternative browser.
You should upgrade or use an alternative browser.
Newbie Camper Conversion
- Thread starter OllieGBR
- Start date
-
- Tags
- build thread.
So the next step didn’t quite go as planned. The Planar instructions are generic nature and not vehicle or boat specific.
I’d read a few entries on the form where others had installed diesel heaters.
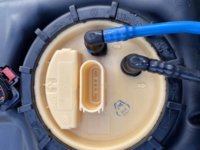
So after removing the take , it’s then easy to remove the fuel sender until by using a small piece of wood and tapping the locking ring anti-clockwise.
Take a picture so you remember the fuel-pipe orientation

So I watched the Kiravans YouTube video of his diesel heater, and drilled a 6mm hole in the middle of the small box that’s stamped into the top of the sender unit.
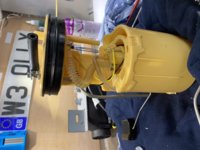
I needed a 10mm hole, (the instructions said 16mm), for my pipe to fit. Kiravans also recommended cutting the pick-up pipe to 190mm. However one of the comments referred to Webasco and their instructions state 170mm otherwise the pick-up will be below the vehicles now pick-up proving the potential scenario of you running the tank empty!


What Kiravans don’t either require or miss out is the need to put a bend in the pipe to offset the lower part of the fuel sender.
Once I’d put this Ned in I lost around 1omm. So very annoyed, but I’m no expert and realising I’ll continue to make mistakes on this journey.
So two options, drill a hole into the actual diesel tank (as recommended by the instructions), or put this in as is and see how it goes. I really didn’t want to be drilling into the fuel tank, so it’s in there and I can always get a new pick-up pipe at a later stage.

The under-trays were fifthly so washed these and gave them a good coat of ACF50, along with the fuel tank.

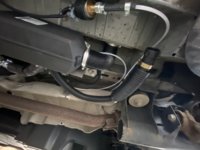
Connected the fuel line and clipped this into existing pipe clips and refitted the fuel tank.
Once back in place I ran the fuel line behind the heat shield over to the drivers side of the van.
Next job was to route the tow bar electrics up into the engine bay.
I routed this under all the trays, adding these each individually and zip tying along the way. I didn’t bother bringing the three wires into the passenger seat base, opting to solder the two wires together as instructed and kept the loom under the van.
Fo the life of my I can’t find the grommet that supposed to exist under or around the brake master cylinder. That’s a job for next weekend.
I’d read a few entries on the form where others had installed diesel heaters.
So after removing the take , it’s then easy to remove the fuel sender until by using a small piece of wood and tapping the locking ring anti-clockwise.
Take a picture so you remember the fuel-pipe orientation

So I watched the Kiravans YouTube video of his diesel heater, and drilled a 6mm hole in the middle of the small box that’s stamped into the top of the sender unit.
I needed a 10mm hole, (the instructions said 16mm), for my pipe to fit. Kiravans also recommended cutting the pick-up pipe to 190mm. However one of the comments referred to Webasco and their instructions state 170mm otherwise the pick-up will be below the vehicles now pick-up proving the potential scenario of you running the tank empty!


What Kiravans don’t either require or miss out is the need to put a bend in the pipe to offset the lower part of the fuel sender.
Once I’d put this Ned in I lost around 1omm. So very annoyed, but I’m no expert and realising I’ll continue to make mistakes on this journey.
So two options, drill a hole into the actual diesel tank (as recommended by the instructions), or put this in as is and see how it goes. I really didn’t want to be drilling into the fuel tank, so it’s in there and I can always get a new pick-up pipe at a later stage.

The under-trays were fifthly so washed these and gave them a good coat of ACF50, along with the fuel tank.

Connected the fuel line and clipped this into existing pipe clips and refitted the fuel tank.
Once back in place I ran the fuel line behind the heat shield over to the drivers side of the van.
Next job was to route the tow bar electrics up into the engine bay.
I routed this under all the trays, adding these each individually and zip tying along the way. I didn’t bother bringing the three wires into the passenger seat base, opting to solder the two wires together as instructed and kept the loom under the van.
Fo the life of my I can’t find the grommet that supposed to exist under or around the brake master cylinder. That’s a job for next weekend.
So I’ve had a few weeks away with work so this weekend I was determined to get the girl back on terra firma.
I finished off routing the harness for the new detachable tow-bar from PFJones deciding not too try and find the mystical grommet under the brake master cylinder and options to roosters it alongside the 240v cable into the passenger footwell using the coat hanger method

Wiring up the rest of the battery side was relatively easy - the same can’t be said for the three wires you need to splice into the two connectors under the dash of the drivers side. There’s little room and it’s delicate.
Anywho- it’s in and I’m not sure if I can test out until it’s been programmed by VW, so onto finishing off the Planer diesel install.

Getting all of the gubbings into such a small space meant I needed to take my time and plan accordingly. Sometimes this meant re-routing cables and pipework. It’s neatly packed in and I made some minor adjustments to the exhaust so the cover wasn’t fouling.


The tank was almost empty and my pick-up pipe isn’t quite long enough to reach the bottom of the tank so a quick road test was in order.
Amazingly, the heater managed to run on it’s third attempt after a lot of coughing during the second. The heat generated is impressive and the pump when warmed up is quiet.

I used a temporary setup for testing.
Packed all the wiring neatly away for another two weeks as I’m off again.
RIB bed arrives a week on Friday - I’m assuming I can install it without the floor down, then remove again for floor fitting.
I finished off routing the harness for the new detachable tow-bar from PFJones deciding not too try and find the mystical grommet under the brake master cylinder and options to roosters it alongside the 240v cable into the passenger footwell using the coat hanger method

Wiring up the rest of the battery side was relatively easy - the same can’t be said for the three wires you need to splice into the two connectors under the dash of the drivers side. There’s little room and it’s delicate.
Anywho- it’s in and I’m not sure if I can test out until it’s been programmed by VW, so onto finishing off the Planer diesel install.

Getting all of the gubbings into such a small space meant I needed to take my time and plan accordingly. Sometimes this meant re-routing cables and pipework. It’s neatly packed in and I made some minor adjustments to the exhaust so the cover wasn’t fouling.


The tank was almost empty and my pick-up pipe isn’t quite long enough to reach the bottom of the tank so a quick road test was in order.
Amazingly, the heater managed to run on it’s third attempt after a lot of coughing during the second. The heat generated is impressive and the pump when warmed up is quiet.

I used a temporary setup for testing.
Packed all the wiring neatly away for another two weeks as I’m off again.
RIB bed arrives a week on Friday - I’m assuming I can install it without the floor down, then remove again for floor fitting.
Great write up Ollie. It's great to see so many images of work that I intend to carry out soon.
One question about the use of ACF-50 though is that it's not a long lasting corrosion inhibitor. It's great stuff but a more waxy product may be a better bet for long term protection?
One question about the use of ACF-50 though is that it's not a long lasting corrosion inhibitor. It's great stuff but a more waxy product may be a better bet for long term protection?
I use it regularly on my Motorbike and here I'm only using it on the plastics.Great write up Ollie. It's great to see so many images of work that I intend to carry out soon.
One question about the use of ACF-50 though is that it's not a long lasting corrosion inhibitor. It's great stuff but a more waxy product may be a better bet for long term protection?
Craig T6
New Member
I keep checking in with the progress Ollie and looks like things are moving forward nicely. Great photos and write up’s. Our T6 went in to the converters this week (Jack’s Shack), so am slightly apprehensive as to how its doing - wish the they’d offered me time lapse video progress...Lol.
Hope the cold weather doesn’t hamper your progress onto the next stage..
Hope the cold weather doesn’t hamper your progress onto the next stage..
I bought a specific knife that window fitters use to remove the glue.
(Photo upload not working for some reason)
I removed the trim and then set about cutting into the glue from inside the van.
It’s a laborious process, however once you get some leverage and can ‘prop’ the window open, you have easier access to cutting the rest of the glue out.
Get help to hold the window as you cut the final tendrils of glue away.
(I should have taken some pictures).
It wasn’t as difficult as I imagined, and probably took an hour.
Nice job that.View attachment 61303
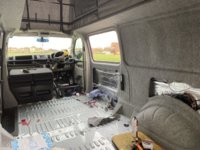
With some help I managed to get all the carpet in today. I also replaced the sliding window which didn’t turn out to be as painful as I anticipated.
I now need to order a ply panel set and hidden clips to finish off the inside. Still waiting for my bed since 3rd January.
Also can you post a link to the knife on Amazon? - might be a useful thing to have!
https://www.amazon.co.uk/gp/product/B000ROBCOM/ref=ppx_yo_dt_b_asin_title_o04_s00?ie=UTF8&psc=1Nice job that.
Also can you post a link to the knife on Amazon? - might be a useful thing to have!
Wow, is it made of gold, that is an expensive knife.
alangiff3
New Member
I bought a specific knife that window fitters use to remove the glue.
(Photo upload not working for some reason)
I removed the trim and then set about cutting into the glue from inside the van.
It’s a laborious process, however once you get some leverage and can ‘prop’ the window open, you have easier access to cutting the rest of the glue out.
Get help to hold the window as you cut the final tendrils of glue away.
(I should have taken some pictures).
It wasn’t as difficult as I imagined, and probably took an hour.
Were you able to re use and re bond the sliding window you removed?
I had a replacement window, however the glass came off cleanly and it’s easy to remove the old bonding material. I can’t see any reason why you couldn’t reuse it.Were you able to re use and re bond the sliding window you removed?
Wow, is it made of gold, that is an expensive knife.
OK, so the feckin window is now leaking It appears I didn’t apply enough glue or squeezed the window on with too much pressure.
It’s had lots of testing with all the rain.
I’ve applied a temporary fix, which unbelievably is working;

It will have to come out again and be re-bonded. I was tempted by just applying sealant to the top gap, but it will only bug me!
This evening I had a go at carpeting one of the 5mm ply liners I made.
I used a heated 8mm drill bit to burn out the holes for the hidden clips


It didn’t require much heat either, and did a very neat job!

I used extended length clips, I’m not sure about them as at some angles you can see the head of the clips protruding through the carpet. I’ve ordered some of the recommended white versions from Megavanmats, arriving for the weekend. I’ll see what the difference is and might change this panel.

It’s had lots of testing with all the rain.
I’ve applied a temporary fix, which unbelievably is working;

It will have to come out again and be re-bonded. I was tempted by just applying sealant to the top gap, but it will only bug me!
This evening I had a go at carpeting one of the 5mm ply liners I made.
I used a heated 8mm drill bit to burn out the holes for the hidden clips


It didn’t require much heat either, and did a very neat job!

I used extended length clips, I’m not sure about them as at some angles you can see the head of the clips protruding through the carpet. I’ve ordered some of the recommended white versions from Megavanmats, arriving for the weekend. I’ll see what the difference is and might change this panel.

You're doing a grand job, mistakes will be made - but you are learning a lot. I didn't trust myself to do this so went the paid route so 'good on ya' for doing it yourself!
Similar threads
- Replies
- 9
- Views
- 1K
- Replies
- 26
- Views
- 3K


