Leisure Battery help please

I will have a proper look when I'm back, I hate it when someone is alarmed by how it's connected, as I didn't do it, so you 'trust' it to be as it should. Looking at the van it looks like these extra wires come directly from the Sargent unit, but looking through the manual for the Sargent unit I cannot imagine/think why it should be? Unless this is how the Sargent is connected to the vehicles starter battery possibly?
I'm the kinda guy that will potentially take this all out when I get home and redo it correctly but also don't want to be doing something for the sake of it, if it's not right, it's wrong.
Thanks all for your advice so far.
There's no need to be alarmed just yet. After all it's beein working without incident since you've had the van. It depends what the Sagent is using the blue and brown for. I suspect they're monitoring wires and if so maybe that's fine if not exactly professional but if the Sargent is using them for load then the wire gauge is inadequate.
I guess looking at the Sargent manual and the pins those wires are connected to will confirm monitor or load.
 
If you are considering changing battery as your current lead acid based then definitely consider LiFePo.

Don't buy cheap, make sure it's reputable brand and has decent freezing point cut off built in.

They are more expensive but will last 10 years (not 2 or 3) and will give you twice the usable capacity (can discharge to around 10% not 50% safely)

On the downside things you need to consider:

All your chargers need to be lithium capable, your solar, your DC-DC and your EHU. If you are moving from an "all in one" with a basic fixed voltage PSU and split charge relay then you need to factor in a DC-DC charger and an EHU charger.

Also check your supply cabling capacity if you intend using the higher charging rates, though most of the DC-DC chargers folks use can be down rated.

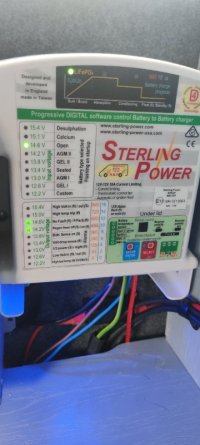
The Sterling units aren't that bad but the config settings and displays whilst running can be very confusing as they are used to show many different things. If considering upgrading to LiFePo make sure yours has the Lithium option h as it was added to the design the indicator is actually in the charge display at the top of it's capable.

On the upside the forum collective have helped quite a number of vans do similar so there are a number of threads on the subject.
 
Ok, apologies for the long update coming.....
Leisure battery removed - wow they're a easy thing to get out the gap ain't they!! Battery tested and failed after attempting a full charge/load cycle on the bench - as expected thanks guys.
Anyway I decided to find out more about the wiring by removing the Sargent unit, wow, what a messy way to wire it up! Including what I can only imagine was an earth that had been forgotten about and added to the exterior body of the Sargent casing! This must explain the random bleeps from the control panel I got on a daily basis?
I have now added a battery lead direct to the chassis, and moved the 5 separate earth's that was on the earth stud, separated them into 'load' and 'charging' ring terminals and gone directly to the new AGM battery. Also worth noting at this point that although the solar unit was setup for AGM battery, the failed battery I have removed was a normal flooded lead acid battery.
The 2 rogue blue and brown wires in the Sterling unit come from the Sargent unit and I identified them as engine running signal wires needed in the Sargent - I think, it's just a simple way by picking the feed from the vehicles starter battery by the looks of it.
One concern I have had is the vast use of wago connectors - is this normal and ok?

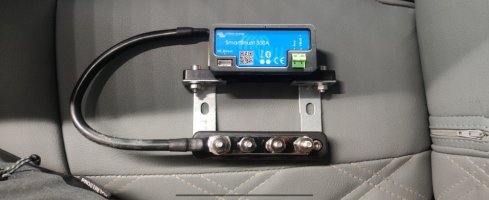
I have a Victron shunt battery monitor arriving tomorrow, just to be certain, do I leave the charging wiring earths direct to the battery and just connect the load earths to the Victron monitor?

Thanks all for the advice, much appreciated as always!

Oh, setting the Sterling for AGM seems like an impossible task and has me ready to purchase a Victron B2B unit next! Is there any way that actually works to change to AGM charge voltages? It shows AGM1 and AGM2 options but the LEDs never get to that panel for some reason, just move up and down the lower panel so I have just left it alone for now!

Screenshot_2025-04-22-23-51-31-82_965bbf4d18d205f782c6b8409c5773a4.jpg

Screenshot_2025-04-23-00-11-37-54_965bbf4d18d205f782c6b8409c5773a4.jpg

Screenshot_2025-04-23-00-11-52-70_965bbf4d18d205f782c6b8409c5773a4.jpg
 
So long as the cables are prepared well nothing wrong with WAGO type connectors, so long as they are using the ones designed for stranded cable and not the solid cable ones. They look like the lever clamp ones so should be fine.

Using mains cable is interesting but at least they seem to have been (mostly) logical with it if they are using earth as ground - the big risk here is with a mixed 240v 12v install the chance of confusing the two voltages on the same cable types is pretty high.

With the Sterling units you have to study the manual carefully to trigger the setup modes and change it - you have to hold the 2 buttons for a very specific time period.
 
I have a Victron shunt battery monitor arriving tomorrow, just to be certain, do I leave the charging wiring earths direct to the battery and just connect the load earths to the Victron monitor?

No!

You only have one connection to the battery negative terminal - That is the Shunt.

The charging cables and all of the loads ( and chassis earth if you're using it for leisure battery ) go to the load side of the shunt.
 
Easiest way to get shunts right is to do it like all the vehicle manufacturers do.

Connect everything but the battery negative to the chassis.

Then connect the battery negative to the chassis via the shunt.

Then everything goes via the shunt because all circuits go via the chassis, through the shunt and back to the battery.
 
Sorted with the shunt thanks all!

Sterling panel, with it running looks like this, is this right for AGM battery?

IMG_20250423_180227.jpg
 
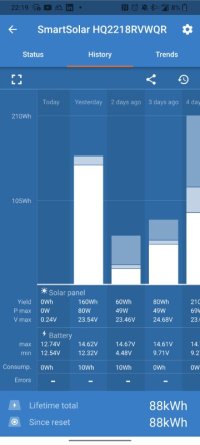
Fitted the shunt all is well, only thing I have noticed tonight is no charge from solar panel showing? Is this from battery etc being disconnected and reconnected today before I checked on the app possibly? Fuse is good, can read battery voltage with a multimeter at the Victron MPPT?

Screenshot_2025-04-23-22-19-31-87_30b6efbd53acd6f273baafa7ca03da38.jpg

Screenshot_2025-04-23-22-20-18-54_30b6efbd53acd6f273baafa7ca03da38.jpg

Screenshot_2025-04-23-22-21-41-56_965bbf4d18d205f782c6b8409c5773a4.jpg

Screenshot_2025-04-23-22-22-09-91_965bbf4d18d205f782c6b8409c5773a4.jpg
 
Isn’t that showing Lithium?
Not necessarily - this is why I don't like these chargers, critical indicators are used for multiple things.

If you remove power from the charger so it restarts it should show the battery config for around 10 seconds.

You will then see the battery type as a flashing indicator in the top set of indicators UNLESS it is LiFePo in which case the "LiFePo/Bulk" indicator in the top display will flash (basically they added LiFePo support in software to an existing design but didn't have enough indicators so had to use one of the charge state ones - making this bloody confusing IMHO)

During normal running (which I think this is if they are not flashing) the "LiFePo/Bulk" indicator is showing that charger is in the bulk phase of charging. The other indicators show 14.6v incoming (so I assume engine is running and alternator charging) and between 14.2-14.6v on the output (which seems about right for AGM)
 
Looks like you’ve lost a connection from your solar panel to the smart solar. Has the PV -ve input to the smart solar been disturbed in your re wiring?
 
Sorted the solar, had to disconnect the solar cables and output cables from the unit, reattached and hey presto solar is charging again 👍
All in all what turned out to be a drama in the Lakes has ended up with a much tidier install, monitoring of the leisure battery and made me happier looking at my Victron app!
All that's left is to relocate the MPPT controller underneath the board and replace the Sterling B2B charger and I will also gain a nice big cupboard
Thanks all for the advice 😃
 
Oh and pick up all the bits of wiring insulation, tape and the vast array of clips, screws and tools I have in the van still!!
 
  • Like
Reactions: CAB
Apologies but continuing on with this, I have decided to also install a Victron mains charger, and as much as I thought I would simply use one of the mcb's on the Sargent unit, I can't work out where I am meant to pick up the output on the Sargent? The 240v output connector on the back has 3 sets of outputs, 1 for each MCB, but I can't see where they all go? I only have 1 240v socket and a fridge so surely that would leave the 3rd free? Do I need to strip the Sargent down and pick up from the MCB internally or will the 3rd output be tied up somewhere possibly? Or should I look at repining the output connector to the new charger? I see many posts about connecting mains chargers but am still non the wiser on this one which makes me think i am overthinking the job!
Thanks again for any advice 🙂
 
I presume you’ve done the scream test of turning off the MCBs and seeing what doesn’t work afterwards …..
 
Yeah, one MCB does 1 socket and fridge, othé MCB does one other socket - kinda strange as both sockets are next to each other so I have paired the sockets to 1 MCB, moved the microwave to the other MCB leaving one spare, only issue I have is there's no output pins on the 240v connector for the 3rd MCB
 
Back
Top