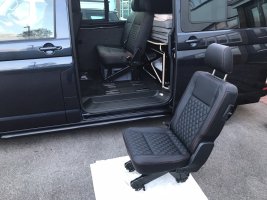
Continuing the mission to turn my T6.1 Kombi into the ultimate Swiss Army Van, today was the day that my Rusty Lee single swivel seat base arrived. This is for the front passenger single seat. I’m not planning to fit one to the drivers seat - don’t think I’ll need it, don’t want to compromise on the raised driving position, don’t want to muck about with hand brake lowering kits.
Why did I choose the Rusty Lee option? 2 reasons really…
1. The RIB/Kiravans version seems quality, but from what I understand, when you spin it around, it doesn’t lock in the rear facing position. Boo. They’re also way more money (at the time of posting), and the latch for the swivel is on the side of the base (Rusty Lee is on the front), so if you drop the seat adjuster height to the lowest setting once you’ve spun the seat around you’re hitting and distorting the grey plastic seat base. Yes you could Dremmel this problem away. But if you don’t have to because there’s an alternative, why would you?
2. Did m’research and they get good reviews. I don’t necessarily trust ‘influencers’ blindly but watched a couple of ‘Tube’ vids and liked what I saw, and THQ and Combe Valley Campers seem to rate ‘em as did a few kind folks on here after I asked a couple of q’s. Thanks gents, you know who you are.
Unpacking the box, have to say, pretty impressed with the quality - it’s a reassuringly weighty thing, with nylock nuts all over, good welds and a good job on the powder coating. The base of the unit is a good 5mm steel plate. Solid thing. Like the way x3 of the 4 base plate bolt holes have a little wiggle room in ‘em to ease fitting
There were no instructions though, so posting this in case it helps someone else. I’m sure this will be teaching many on here to suck eggs, but it would have helped me, so here we go…
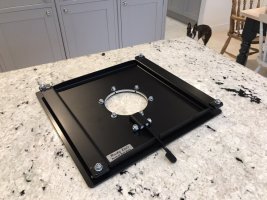
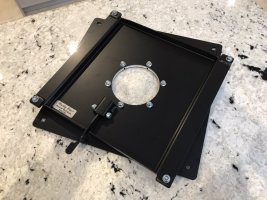
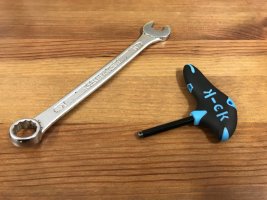
Tools for the job? Couldn’t be more basic - a 13mm spanner (you’ll want one with the circular closed end), and a 5mm Allen key (if you’ve got a stubby one that’ll help, but not essential)…
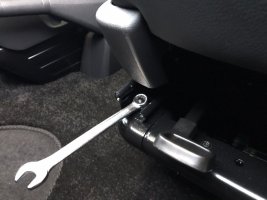
First job, slide the front passenger seat all the way back, and tackle the nuts on the front of the seat rails (you’ll want to use the closed end of your 13mm spanner for this). The bolts are captive, so no need to worry about the underside. The bolts stay in place and stick up out of the seat base - you’ll use these to locate the Rusty Lee swivel when you get to that stage…
Next, worth removing the single rear passenger seat from your 2+1 rear Kombi set-up, and folding down the seat upright on the double rear bench seat. This will give up you the space you need for the job…
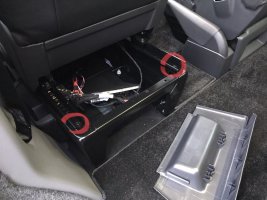
Then, slide the seat all the way forward, and again, just a 13mm closed ended spanner needed for the rear fixings (bolt tops on the rear, with captive nuts on the underside of the base). These ones…
After that, go and hide your keys somewhere, because when you disconnect the airbag connection on the underside of the seat, you don’t want to be turning the ignition on until you’ve reconnected the airbag (else you’ll likely log a fault code).
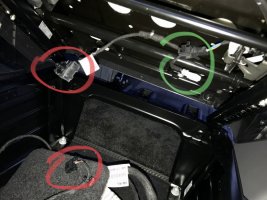
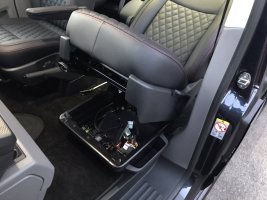
The connector under the seat that you want to unplug is shown in the pic below (circled in red, and shown disconnected). I have heated seats, but you don’t need to disconnect either of the connector blocks circled in green. This pic was taken looking under the rear of the seat before I realised the easiest way to disconnect the airbag connector block was by tilting the seat back (after you’ve freed it from the seat base on all 4 corners) and accessing the connector block from the front as shown in the second pic below…
At this stage you can now lift the front passenger seat out - I found the easiest way to do this was to stand in the walk-through between the driver and passenger seat and lift it up and onto your folded down rear bench seat (lying on it’s back - worth putting a sheet between them).
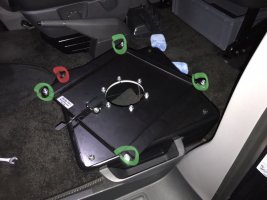
Next, you can fit the swivel base. First you need to turn the swivel base slightly to give you easy access to the bolt holes that will secure it to the seat base. It’s bloody stiff, but don’t worry, it will spin freely once fitted. I did take the opportunity however to spray both the swivel mechanism and the seat height adjuster mechanics under the seat with some GT85 before fitting, because why not. There is one round bolt hole and x3 elongated square bolt holes (to give you a little wiggle room for locating it in place). Locate it with the round hole in the position circled red in the pic below. Use the original seat fixings (nuts on front, bolts on back), to secure the swivel base to the seat base using your 13mm spanner. Then, leaving the swivel base in the slightly turned position shown below, remove the fixings that will secure the swivel base to your seat (circled in green in the pic below). 5mm Allen key underneath and a 13mm spanner on top to remove…
Now you can lift the passenger seat back onto the swivel base. Secure the swivel base to the seat runners using the Allen bolt and a washer on the underside, then another washer and 13mm nut on top, on each corner. Top tip at this point, only lightly engage each 13mm nut onto the thread of the Allen bolts on ALL 4 corners before you start to tighten them up, then go around each corner in turn, tightening each one little by little until all 4 are nice and tight. This will help you both easily locate the swivel base on each corner and ensure even tightness of all 4 fixings.
And you’re done
Best way to operate the swivel seat is to jack the height adjuster up to its highest setting (this way you won’t rub against the plastic seat base trim when you’re turning the seat), and slide the seat right forwards on the runners before turning. Easy as pie this way. Once the seat is turned and locked in place, drop the seat height and slide it back for max legroom. Reverse the procedure to turn it forwards again.
Then sit back, and relax in your throne
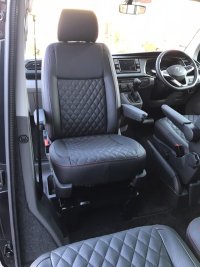
Hope this helps someone. Really easy to do - took about 40 minutes including taking a few photos along the way.
Oh, one last thing to mention, the rear seat base plastic cover won’t fit with the swivel base in place. So your options are to either Dremmel the top off it to get it to fit, or buy yourself and aftermarket cover that fixes on with magnets. No biggie either way, but worth mentioning. I’ll probably do the latter.
Why did I choose the Rusty Lee option? 2 reasons really…
1. The RIB/Kiravans version seems quality, but from what I understand, when you spin it around, it doesn’t lock in the rear facing position. Boo. They’re also way more money (at the time of posting), and the latch for the swivel is on the side of the base (Rusty Lee is on the front), so if you drop the seat adjuster height to the lowest setting once you’ve spun the seat around you’re hitting and distorting the grey plastic seat base. Yes you could Dremmel this problem away. But if you don’t have to because there’s an alternative, why would you?
2. Did m’research and they get good reviews. I don’t necessarily trust ‘influencers’ blindly but watched a couple of ‘Tube’ vids and liked what I saw, and THQ and Combe Valley Campers seem to rate ‘em as did a few kind folks on here after I asked a couple of q’s. Thanks gents, you know who you are.
Unpacking the box, have to say, pretty impressed with the quality - it’s a reassuringly weighty thing, with nylock nuts all over, good welds and a good job on the powder coating. The base of the unit is a good 5mm steel plate. Solid thing. Like the way x3 of the 4 base plate bolt holes have a little wiggle room in ‘em to ease fitting

There were no instructions though, so posting this in case it helps someone else. I’m sure this will be teaching many on here to suck eggs, but it would have helped me, so here we go…


Tools for the job? Couldn’t be more basic - a 13mm spanner (you’ll want one with the circular closed end), and a 5mm Allen key (if you’ve got a stubby one that’ll help, but not essential)…

First job, slide the front passenger seat all the way back, and tackle the nuts on the front of the seat rails (you’ll want to use the closed end of your 13mm spanner for this). The bolts are captive, so no need to worry about the underside. The bolts stay in place and stick up out of the seat base - you’ll use these to locate the Rusty Lee swivel when you get to that stage…

Next, worth removing the single rear passenger seat from your 2+1 rear Kombi set-up, and folding down the seat upright on the double rear bench seat. This will give up you the space you need for the job…

Then, slide the seat all the way forward, and again, just a 13mm closed ended spanner needed for the rear fixings (bolt tops on the rear, with captive nuts on the underside of the base). These ones…

After that, go and hide your keys somewhere, because when you disconnect the airbag connection on the underside of the seat, you don’t want to be turning the ignition on until you’ve reconnected the airbag (else you’ll likely log a fault code).
The connector under the seat that you want to unplug is shown in the pic below (circled in red, and shown disconnected). I have heated seats, but you don’t need to disconnect either of the connector blocks circled in green. This pic was taken looking under the rear of the seat before I realised the easiest way to disconnect the airbag connector block was by tilting the seat back (after you’ve freed it from the seat base on all 4 corners) and accessing the connector block from the front as shown in the second pic below…


At this stage you can now lift the front passenger seat out - I found the easiest way to do this was to stand in the walk-through between the driver and passenger seat and lift it up and onto your folded down rear bench seat (lying on it’s back - worth putting a sheet between them).
Next, you can fit the swivel base. First you need to turn the swivel base slightly to give you easy access to the bolt holes that will secure it to the seat base. It’s bloody stiff, but don’t worry, it will spin freely once fitted. I did take the opportunity however to spray both the swivel mechanism and the seat height adjuster mechanics under the seat with some GT85 before fitting, because why not. There is one round bolt hole and x3 elongated square bolt holes (to give you a little wiggle room for locating it in place). Locate it with the round hole in the position circled red in the pic below. Use the original seat fixings (nuts on front, bolts on back), to secure the swivel base to the seat base using your 13mm spanner. Then, leaving the swivel base in the slightly turned position shown below, remove the fixings that will secure the swivel base to your seat (circled in green in the pic below). 5mm Allen key underneath and a 13mm spanner on top to remove…

Now you can lift the passenger seat back onto the swivel base. Secure the swivel base to the seat runners using the Allen bolt and a washer on the underside, then another washer and 13mm nut on top, on each corner. Top tip at this point, only lightly engage each 13mm nut onto the thread of the Allen bolts on ALL 4 corners before you start to tighten them up, then go around each corner in turn, tightening each one little by little until all 4 are nice and tight. This will help you both easily locate the swivel base on each corner and ensure even tightness of all 4 fixings.
And you’re done
Best way to operate the swivel seat is to jack the height adjuster up to its highest setting (this way you won’t rub against the plastic seat base trim when you’re turning the seat), and slide the seat right forwards on the runners before turning. Easy as pie this way. Once the seat is turned and locked in place, drop the seat height and slide it back for max legroom. Reverse the procedure to turn it forwards again.
Then sit back, and relax in your throne


Hope this helps someone. Really easy to do - took about 40 minutes including taking a few photos along the way.
Oh, one last thing to mention, the rear seat base plastic cover won’t fit with the swivel base in place. So your options are to either Dremmel the top off it to get it to fit, or buy yourself and aftermarket cover that fixes on with magnets. No biggie either way, but worth mentioning. I’ll probably do the latter.
Last edited:
