It may sound simple, but this is the first step in some other guides I'm going to post about removing barn doors, and there are a couple of nuggets of knowledge to share here.
How to remove ply-lining
The plylining is screwed onto the van using screws, so you just remove with a screwdriver. The useful things to know are the following:
How to remove wheel arch plylining box
If you just need to remove the box over the wheel arch, use these steps:

Unscrew all the screws on the face of the box and remove the piece of ply. It will break the sealant where it meets the floor.

Then unscrew the two screws inside above the wheel arch and the rest of the box can be pulled away from the wall. It will break the seal with the wall.
Simply reverse the steps to refit. Then I guess you'd want to reseal where the box and wall meet with some sealant.
How to remove the plylining on a wall of a T6 panel van
If you don't want to remove the box separately, you can remove the whole wall complete with box, as follows:

Simply reverse the steps to refit. Then I guess you'd need to reseal the floor with sealant.
How to remove door lining cards (T6 plylined panel van)
The lining cards (grey hardboard) are held on with panel pins/clips (not sure of the term!). They appear to be unscrewable with a hex or perhaps torx driver, but in my experience that doesn't work reliably, so it's just as efficient to pry up the pin with a trim tool and screwdriver, and pull the pin out by hand. They don't break and you can simply push them back on when you're ready to refit (hooray!)


The door handle trim prevents the door lining card from coming away from the near side rear (n/s/r) barn door, so follow this step:
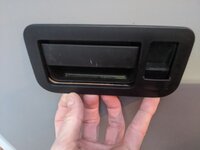
How to remove the barn door interior handle trim
The trim around the barn door interior handle removes by sliding it upwards and then it pops off. No tools required, and there are no clips to break

Simply push on and slide back down to refit.
How to remove ply-lining
The plylining is screwed onto the van using screws, so you just remove with a screwdriver. The useful things to know are the following:
How to remove wheel arch plylining box
If you just need to remove the box over the wheel arch, use these steps:

Unscrew all the screws on the face of the box and remove the piece of ply. It will break the sealant where it meets the floor.

Then unscrew the two screws inside above the wheel arch and the rest of the box can be pulled away from the wall. It will break the seal with the wall.
Simply reverse the steps to refit. Then I guess you'd want to reseal where the box and wall meet with some sealant.
How to remove the plylining on a wall of a T6 panel van
If you don't want to remove the box separately, you can remove the whole wall complete with box, as follows:
- Unscrew all the screws on the wall plylining, except the box
- Unscrew the lowest two screws on the box face (see picture below which shows the floor mounts - there are no screws holding the ends of the box to the brackets, so you can lift off the box once the front face is off, or even just by removing the lowest two screws)
- The wall and box can be pulled off the floor which will break the seal with the floor, but the seal between the box and the wall will remain intact

Simply reverse the steps to refit. Then I guess you'd need to reseal the floor with sealant.
How to remove door lining cards (T6 plylined panel van)
The lining cards (grey hardboard) are held on with panel pins/clips (not sure of the term!). They appear to be unscrewable with a hex or perhaps torx driver, but in my experience that doesn't work reliably, so it's just as efficient to pry up the pin with a trim tool and screwdriver, and pull the pin out by hand. They don't break and you can simply push them back on when you're ready to refit (hooray!)


The door handle trim prevents the door lining card from coming away from the near side rear (n/s/r) barn door, so follow this step:
How to remove the barn door interior handle trim
The trim around the barn door interior handle removes by sliding it upwards and then it pops off. No tools required, and there are no clips to break

Simply push on and slide back down to refit.
