Ex RAC T6 wiring strip out

Managed to get the main battery positive out from the wing by removing the passenger side wheel arch lining and pulling in a different angle.

Removed the headlining and removed the towing light switches and cables. Also managed to get the reverse camera cables out. The red and black wires were cut, the trigger wire runs to the reversing light I think. Then there’s coax to the two cameras. I don’t need a forward looking camera. Just now need to work out how to wire this in for power and from where.

I’ve another positive from the battery that must go to the relays 643 and 100. Not tackled them yet as they are disconnected.

Removed radio and found the comms cables cut off, so I can pull those from the floor.

One annoying thing is that cab light doesn’t work when doors open.
 
Well done........Fun isn.t it?.........have you managed to knock something or loosen a wire/s that feeds the internal light when you removed the headliner?....In regards to the coax/cameras, mine had the wire's been cut in a couple of places(no logic to doing this) and then tucked away or taped up.

I have since replaced the head unit from Travelin Lite RCD360+, this allows me to have apple play along with the option to install a reversing camera and run through the stereo, thought it was best to start fresh as I have upgraded the speakers using Alpine SPC-108T6 to which have been designed for the T6.

While I think of it, if you have the seats removed it may be and idea to remove the bracket that the bulk head attaches to! I found using a angle grinder worked better than the original hammer and bolster
 
It’s type 2 fun!

I think the cab light was a sticky switch. Taking it down again and jiggling everything and adding contact cleaner got it working.

The bulkhead attachments are next, I’ve removed top 2 that bolt on. The bottom floor one by drilling the welds and wiggling. Now it’s the pillar ones to go

I did want to keep the tow bar and fear I might have removed its wiring at the rear. Will need to trace it from the socket and see if it’s cut.

Doesn’t it attach to relay 643 under the passenger seat, which isn’t powered now.

I’m also considering tapping the rear view camera power from the cab light if can work out the wires.
 
That's a result then, simple fix. I still have the tow bar attached, yet I am still uncertain whether I wish to keep it or not! and you could be correct regarding the relay yet I have removed pretty much everything.
The rear view mirror camera sounds like an option, there may be on here a wiring loom diagram for an RAC van.
 
Well done. What did you leave. I’m still not sure about the relays and the towing electrics.

I’ve drilled out the tack welds on the bulkheads and got them all out. A good day.
 
I’ve got a pop top booked in for October. Need to insulate and carpet line. New floor then kitchen and bed. Electrics I’m not so sure about yet.

You?
 
Sounds good, I decided against the pop top…due to the cost etc.
I would like a day/leisure van, just like the flexibility off the idea I can remove stuff if need be.
Even looked into hammock fixings, not sure of its an idea i would roll with though.
Considered a roof tent also, yet increases the height dramatically.
First things first the floor/ seats, possibly going down the route off Ford Custom seats/seat rails solely because they are available at sensible prices.
 
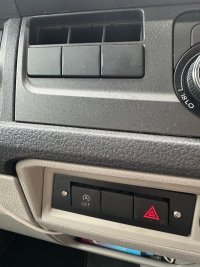
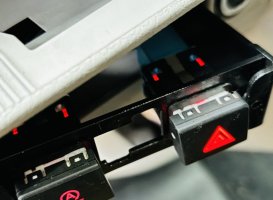
Has anyone managed to relocate these buttons back to their original spaces? Just had most of the trim off but still can’t find whatever is securing the metal box in place

IMG_2976.jpeg

IMG_2975.jpeg
 
Yep, it's actually pretty straightforward, took about 20 mins;
  • Using a trim tool you need to carefully remove the facia that surrounds the head unit and has the middle vents incorporated into it - the head unit stays in place
  • There is a small nut that holds that unit the RAC black unit in place (don't worry about those two little screws on the front, they don't actually do anything!). The nut is at the back an can be accessed now you have freed up the vent space - it will all become clear once the facia is off!
  • If you undo the nut you should be able to carefully push/pull that black box out - be careful as you only want to slide it out enough to get access to the back of the buttons to disconnect the wires (which just have a clip you need to push in) - blue connector for the start stop and white for the hazards
  • The front of the buttons will just pop off with a trim tool and you can slide the whole black unit out and you have your mini shelf back!
  • Relocate the cables to their original positions above and then connect them to the backs of the buttons in the original factory position
  • Replace the facia surround and job done!
Thank you soo much!!!
 
Yep, it's actually pretty straightforward, took about 20 mins;
  • Using a trim tool you need to carefully remove the facia that surrounds the head unit and has the middle vents incorporated into it - the head unit stays in place
  • There is a small nut that holds that unit the RAC black unit in place (don't worry about those two little screws on the front, they don't actually do anything!). The nut is at the back an can be accessed now you have freed up the vent space - it will all become clear once the facia is off!
  • If you undo the nut you should be able to carefully push/pull that black box out - be careful as you only want to slide it out enough to get access to the back of the buttons to disconnect the wires (which just have a clip you need to push in) - blue connector for the start stop and white for the hazards
  • The front of the buttons will just pop off with a trim tool and you can slide the whole black unit out and you have your mini shelf back!
  • Relocate the cables to their original positions above and then connect them to the backs of the buttons in the original factory position
  • Replace the facia surround and job done!
How did you get the nut at back out? I tried a socket and it won’t fit, tried a spanner and didn’t have enough room.
 
How did you get the nut at back out? I tried a socket and it won’t fit, tried a spanner and didn’t have enough room.
Ended up taking all the lower dash out to access mine, as I couldn’t get to it from the top either
 
For anyone trying to do this, here’s what I did. Removing the head unit didn’t give me quite enough room. The metal surround for the buttons RAC put in, is held by an 8mm nut and I just couldn’t get to it. Wasted a lot of time tbh. Removing the glove compartment (6 screws I think) provides more room but I still found it was taking up time, so I took the whole bottom dash covers off. It’s reasonably quick and there’s a good video on you tube. I used a bit of tin foil under the gear handle screw in case it fell. I could then easily undo the retaining nut.

To get the switch cables out I needed to pop the ashtray pocket out. It has two stubborn lugs, one at each side. So with a trim tool and pushing from the back it pops out.

Push the switches out and disconnect the cables. Then relocate the cable to the upper bank of switches. And voila!

IMG_6691.jpeg

IMG_6690.jpeg

IMG_6696.jpeg

IMG_6697.jpeg

IMG_6694.jpeg

IMG_6691.jpeg

IMG_6699.jpeg

IMG_6698.jpeg
 
Back
Top