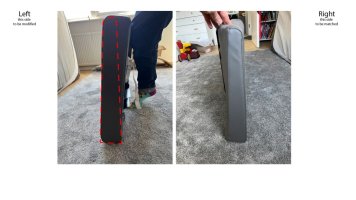
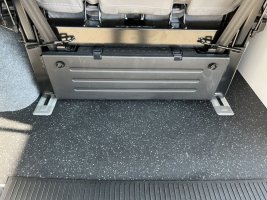
Who did yours? I think Exploria were fibbing when they said they would do it to all seats fitted now as the one currently in their showroom doesn't slide back past the wheel arch.I believe it was the same as suggested, and they took the seat out to do it - you don't want swarf sticking to your lining!
You are using an out of date browser. It may not display this or other websites correctly.
You should upgrade or use an alternative browser.
You should upgrade or use an alternative browser.
California Seat/bed - Range Of Movement Rearwards
- Thread starter Shaun Witts
- Start date
Colin angle-grinded away the metal frame on the base and I can slide mine all the way back. I can categorically say that the bed foam and grid/frame is unchanged as I have the seat dismantled at the moment, there's enough clearance to slide over the wheel arch... Unless/until you sound deaden and carpet line, which I haven't

Edit: just checked and evidently it was hacksawed!

Edit: just checked and evidently it was hacksawed!
Last edited:
No need to make a mess with an angle grinder, it’s a relatively easy job with a hacksaw.Colin angle-grinded away the metal frame on the base and I can slide mine all the way back. I can categorically say that the bed foam and grid/frame is unchanged as I have the seat dismantled at the moment, there's enough clearance to slide over the wheel arch... Unless/until you sound deaden and carpet line, which I haven't
This mod is well documented on the Forum elsewhere……..just finding it being the problem.
I reckon there are two versions of the bed in that case, as other forums are hit and Miss with whether a modification to the base of the seat is needed, and even Richard at Kernow was a bit miffed when I said about the bed catching the arch.Colin angle-grinded away the metal frame on the base and I can slide mine all the way back. I can categorically say that the bed foam and grid/frame is unchanged as I have the seat dismantled at the moment, there's enough clearance to slide over the wheel arch... Unless/until you sound deaden and carpet line, which I haven't
View attachment 134332
I know this is a big purchase so, while I was testing replacement headrest ideas I took the foam back out with me.
The limiting factor for my seat to go all the way back is actually the front trim of the seat, not the frame. The frame slides over the wheel arch because the frame pivots at the front, so there is enough tolerance without modifying the frame. The scrapes on my wheel arch are where I have recently used the seat without the foam and covers on, so it's been metal against metal.
Essentially, the seat rides over the wheel arch as it slides.
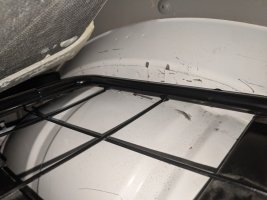
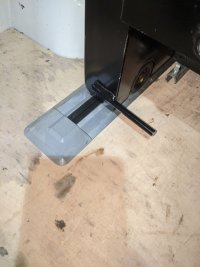


@Andysmee thanks for the pics, really helpful. I have also suspected there were 2 types; those that needed the seat base frame bending up and those that don't.
I've cut the box section, just the seat base bending to do.
Mine is now carpeted and deadened and is hitting the wheel arch at the seat base.
Your pic of the seat foam shows the angle I would need to cut so thanks for that.
I could probably ride mine fully back with it pivoting like you say, although that would probably end up wearing on the carpet so will give that a miss I think
N/S

O/S
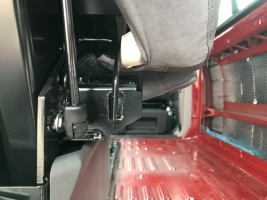
I've cut the box section, just the seat base bending to do.
Mine is now carpeted and deadened and is hitting the wheel arch at the seat base.
Your pic of the seat foam shows the angle I would need to cut so thanks for that.
I could probably ride mine fully back with it pivoting like you say, although that would probably end up wearing on the carpet so will give that a miss I think
N/S

O/S

It flares up (matching my foam, above)Does your seat-base frame flare up on the offside, @Andysmee, or is it completely flat?
and thanks to @Andysmee's guide to help me get this far - I followed steps 1-5 stopping at pig-ring removal for the time being [GUIDE] How to remove a T6 California double rear bench/bed covers and retrim
If I had to modify the foam I would start without modifying the cover, maybe just put the cover back on and see how much slack there is in the cover. It then becomes a problem like "taking in the waist on a pair of trousers" i.e. just cutting some flags into the cover and stitching back together.
I haven't modified the seat pad to go over the wheel arch, the seat grid/frame just rides over it with some wear (since the frame pivots at the front of the seat), which I expect to be taken by the carpet lining for long enough not to be a problem, and can also replace a piece of carpet
I haven't modified the seat pad to go over the wheel arch, the seat grid/frame just rides over it with some wear (since the frame pivots at the front of the seat), which I expect to be taken by the carpet lining for long enough not to be a problem, and can also replace a piece of carpet
Good work. How did you get that part off the rest of the seat? Cheers.Update: I’ve had my metal seatbase modified to match the angle on right hand side.
Seat now goes right to the back of the van Clearing the wheel arch.
A bonus is that the foam and upholstery probably don’t need trimming.
It feels like a LWB in there now
View attachment 150369
View attachment 150370
View attachment 150371
View attachment 150372
View attachment 150373
View attachment 150374
View attachment 150375
Good work. How did you get that part off the rest of the seat? Cheers.
Which part, the metal seatbase?
These guides were both helpful:

How to dismantle rear bench seat fabric.
I could have posted this in the video section how to, but it's no video. After 11 years of use without seat covers, on the last trip to Millau, after a nice hike, we got into a thunderstorm. By the time we got to the van, we were all soaking wet. Too bad the light grey fabric doesn't go along...

[GUIDE] How to remove a T6 California double rear bench/bed covers and retrim
Ever wish you never started something? Well, this is a candidate for it. I didn't take as many pictures as I used to, as I'm familiar with tearing down seats now, but this had some new challenges. Removing the covers should be easy but they are simply not made to be removed, compared to all...
Similar threads
- Replies
- 8
- Views
- 3K
- Replies
- 6
- Views
- 3K
- Replies
- 4
- Views
- 611
- Replies
- 3
- Views
- 394
- Replies
- 1
- Views
- 1K


