12v Lithium Leisure Battery Box 138Ah 1766Wh -- How I Done It --

Dellmassive

T32 204 DSG LWB SLN PV MY18 & T30 SWB KMB MY67
VCDS User
Moderator
VIP Member
T6 Master
12v Lithium Leisure Battery Box 138Ah 1766Wh -- How I Done It --
It's about time that I got this long-overdue project sorted out.
The missing parts are on order and completion is in sight . . . . . . . . ready for the Post Pandemic 2020 Camping Trips (Hopefully)

This is where it started.
p1
1588618565308.png

a rough sketch on a bit of paper & an idea. . . . . . That was born out of frustration from last years camping trip.
Last year at Rutland T6F summer camp i run out of power . . . . =[
I had a 12v 100Ah AGM Extreme leisure battery to run all the Camping gear, and 100W of solar.
But due to the weather and other things, we run out of power.

20190720_124856.jpg


The idea being that the AGM SLA battery had 100Ah capacity . . . . but we could only use the top 50% DOD (depth of discharge) so only 50Ah to use . . . which we did.
So moving forwards I decided that instead of taking 2x 100Ah SLA AGM big heavy batteries . . . . . . I try one Lithium / Lifepo4.
I've got a second Valence 12v 138Ah 1766Wh Lithium Lifepo4 battery, that I plan to use.
So that will be more capacity than both the 100Ah AGM`s together, in less space and weight. , , , but still portable in a single box

The plan is to use this battery.

1588619348526.png

with:
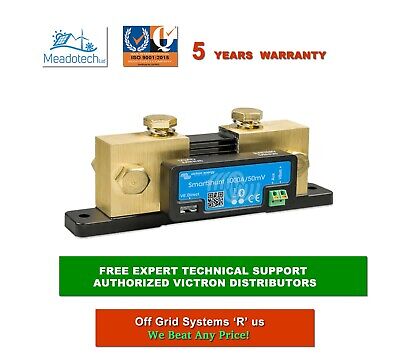
Victron Shunt Bluetooth monitoring.
Victron Low voltage disconnect,
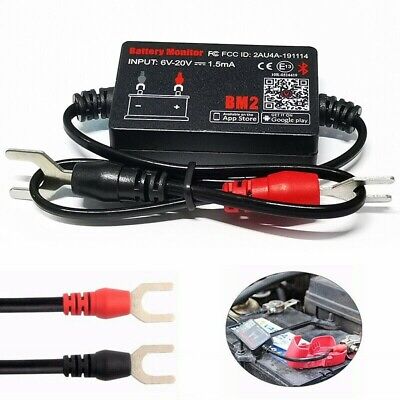
BM2 voltage monitoring,
USB QC 3.0 + USB-C PD,
Fusebox,
10A 12v outlets,
50A Anderson outlets,
240v inverter,
switch panel,

Charging will be:
EHU charger,
solar mppt,
DC-DC input,

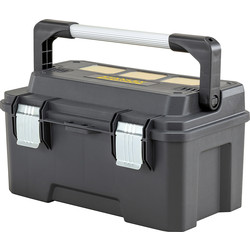
maybe in a box like this . . . .

1588619376208.png

Now the collection of bits are almost complete . . .

1588618611033.png

So this will be a kind of Build-Thread as we go through it. (maybe a video)

TBC . . . . . . . .
 
Last edited by a moderator:
pt2

the parts have steadily been rolling in, so it was time to start putting things together . . . . .

i quickly realized that the Black battery box was going to be way too small.

i wanted to fit the 12v panel, victron smart protect, victron smart shunt, fuse block and terminal blocks all inside . . . . so needed something larger and stronger.

A quick mooch around B&Q lead me to this . . . .

20200522_144340.jpg

a Stanley Fat-Max toolbox, Heavy Duty, rubber weather seal, solid locking catches and beefy handle.

20200522_144343.jpg
20200522_145526.jpg20200522_145529.jpg

i did look at the roller boxes, but decided they would be too big . .

roughly laying out the 12v on masking tape. . . .


20200522_145707.jpg


i drilled the corners . . . and used tin-snips to cur out the sides . .

20200522_150126.jpg


the 12v panel dropped in nicely . . .


20200522_150613.jpg


at this point i got carried away and forget to photo all the steps . . . =]


but i had used self tapper screws on the panel (just for now) , and drilled out two more 30mm holes for another two sockets.

20200522_152142.jpg

crimped on a few cable ends and made up a few leads.

were using a Smart Shunt for battery monitoring, allong with a BM2 - obviously.

and a Smart protect that will disconect the loads when the battery gets low, but also acts as a Bluetooth on/off switch isolator.

20200522_160257.jpg

i went for the 65A one, ill use the 100A elsewhere.

20200522_164211.jpg


missed more pics, so next we have the box .

20200522_170831.jpg

the 12v panel in the middle. . . which has a 12v socket, voltmeter, and twin 2.1A USB. (plug 5x switches for whatever)

20200522_170837.jpg

over on the left we have another 12v socket and another dual USB, but QC3.0 spec.

20200522_170842.jpg


it all packs into the box like this . .

20200522_170959.jpg


i then decided i wanted to add a 50A anderson plug lead to it for charging . . . . . so i did.

then got out the Noco GB15000 15A charger on Li mode (14.2v bulk, 13.8v float) . . .

20200522_171708.jpg

which showed 75% for ages . . . . the Smart shunt was showing a 15A charge that was dropping down to 4A.

20200522_171714.jpg


so i moved over to the Victron 12/30 blue smart 30A charger . . . . which immediately made a difference . . . delivering 20A the battery voltage started to rise . . .

Plugging in the Battery to the laptop and running the BMS software we can see the 20A charge and the battery rise to 99.61% SOC before the charge current rolled off.

20200522_183826.jpg20200522_183806.jpg20200522_183853.jpg20200522_183849.jpg
 
Last edited:
pt3

testing. . . .

it was time to start plugging things in . . . USB charger for the phone, another battery pack . . . anything i could find . .

20200522_191529.jpg

i grabbed a 60W (45w PD + 15w usb) plug in charger and plugged the the ALLPOWERS 372 battery bank . . .

which showed a 45w charger rate via the USB-C PD adapter . . .

20200522_192404.jpg20200522_192407.jpg

after about 5mins the problems started . . . . . the 60W plug in charger was getting HOT . . .

as part of the build i had already used a battery box divider "4mm plastic sheet" between the Lithium battery and the 12v panel and conections etc to protect from heat . . . . but this plug was HOT !!!

i grabbed the Thermo Flir to see what was going on . . . the socket and plug were hot.

flir_20200522T194333.jpg


and on the backside we can see the heat from the socket as well as the cable connecting the socket . . .

flir_20200522T194614.jpg

this also showed a problem with the 12v panel and the way it comes wired from the shop . . .

flir_20200522T194619.jpg


the 12v panel is wired in a daisy-chain back to the side, so all the loads are ultimately connected to the one +12v and 0ve neg.

this is fine for small power draws, but no good for larger current draws . . . !

so i will need to re-wire the panel.

Ill have to seperatly cable each 12v socket back to the fused block.

ill have to seperated the common negs, and take back to the ground block.

ill solder/heatshirnk the 12v sockets for better conection to reduce heating.

while the Thermo Cam was out you can see the charger in effect:


Heres the Victron 12/30 delivering 20A . . .


flir_20200522T184211.jpg

via the 50A anderson conector on 10AWG cable . . .

flir_20200522T184319.jpg

the 50A inline midi fuse shows heating . . . . basically every join in the link generates heat . . .


flir_20200522T184448.jpg

here you can follow the current flow by the heat trail, from the charger, via the smart protect, to the fuse, up to the battery +, then out the - battery, to the smart shunt. and back out of the feed cables to the charger.

flir_20200522T184509.jpg


on the APP side. we have the Battery protect . . . . showing battery voltage of 13.3v.

and the master load on/off virtual switch (my isolator)


Screenshot_20200522-171224.jpg

in the setting you can spec the shut off limits . . . in this case 11v.

Screenshot_20200522-172322.jpg

The Smart Shut shows the SOC, voltage and current floe in/out.

100% SOC


Screenshot_20200522-171330.jpg

being charged . . . . . . .

11.7A going in . . .

Screenshot_20200522-171658.jpgScreenshot_20200522-172005.jpg


23A going in from Victron charger


Screenshot_20200522-183401.jpg


and the BM2 readouts . . . .


Screenshot_20200522-185956_Battery Monitor.jpgScreenshot_20200522-190004_Battery Monitor.jpg
 
Last edited:
  • Like
Reactions: mmi
pt4

mods and reworks required as per testing results above.

new fuse block and power distribution blocks have been ordered.

ill show the changes here:


TBC . . .
 
Last edited:
pt5


Parts list . . .


what i used to make the box going here . . .


TBC: . . . .
 
Last edited:
just realized something else i need to change . .. . .

I've taken the +12v feeds for the BM2 and Smart Shunt from the +12v fuse block . . . . . . .

which is after the Smart Protect - (effectively the on/off switch)

so when turning the Box "ON" this morning all my previous data has been cleared . . . .

No Bm2 history and the Shunt has reset to 100% SoC . . . . =[

Screenshot_20200524-075102.jpgScreenshot_20200524-075312_Battery Monitor.jpg


Screenshot_20200524-075320_Battery Monitor.jpg
Screenshot_20200524-075339.jpg


ill need to re route the +12v feeds for the BM2 and Smart Shunt to the other side of the Smart Protect switch, so they are live 24/7.
 
  • Like
Reactions: mmi
today was the day . . . .

i finally had a chance to re-work the box . . .

first of all i decided to cut some plt wood to make some separation sections . . .

1594406523417.png

which will go here like this . . . (to keep the battery seperate from any hot wires or conections.

1594406574628.png

.

next up was to re-wire the switch panel . .

1594406752322.png

.

i went with a new 60A main fuse, feeding a MIDI fuse block . . .

and a 50A fused link to the main Anderson plug . . .

1594406865640.png

.

now all of the switches and sockets are individually linked . . .


1594406924508.png

.

i decided to go with a ATC blade fusebox for all the +/- connections from the front panel, then 2 fat feed cables to the main power blocks . .


1594407007831.png

.

the fuse.box sits in the front section . . .

1594407069930.png

.

the main feeds were conected to the MIDI fuse block . . .

1594407112948.png

..


i cut a second piece of ply wood as a second seperastor . . . . this time to split the main positive and negitive sections.

the negative section has the Smart-shunt and Neg buss-bar, white the positive section has the LVD battery protect and the fuseblock.

1594407236535.png

.


and the main charge point via the 50A anderson . . . .


1594407300885.png

.


from the front we now have this . . .


1594407334975.png

.
1594407371387.png

.

powerup test . . .

1594407412927.png

.
1594407429783.png

.

charging up with the Victron 12/30 . . . . showing 24.2A charge rate . . .


1594407490350.png

.

next up was the discharge test . . . . trying to max it out . . .


1594407527204.png
1594407547382.png
.


Temp check - we are now much better, keeping under 25DegC . . .

1594407600831.png1594407615867.png1594407630046.png
 
parts and kit list:

Stanley FatMax Pro Cantilever Toolbox 20"


1594413995190.png

.


1594414105077.png


.

blade fuses:


.

1594414163859.png

..

MIDI Fuses:


1594414224848.png

.


.

1594414264996.png

.

crimps


1594414338241.png
.


.

1594414368711.png


.

Victron battery protect 65A


1594414448763.png.

...

Victron smart shunt . .


.

1594414809642.png

..


1594414870110.png


..


1594414932622.png


.


1594415047775.png


..


1594415141701.png.

..


1594415236413.png

..


1594415344374.png


..


1594415377959.png

..


1594415426999.png

..


1594415464272.png

..


1594415910770.png


.


1594415971196.png


.

power meter


4-Way 1X 4AWG In 4X 8AWG Out Power/Ground Cable Splitter Distribution Block,


**************************************************************


4mmSQ red cable for single wire runs and fused at 15A

4mmSQ black cable for ground connections


8awg silicone red/black for Anderson leads.

8awg pure copper for battery to main blocks


***********************************************************
 
Last edited:
Battery Box Charging - EHU


TBC . . .
 
Battery Box Charging - SOLAR


started doing some tests with the 50W and 100W panels . . .


then just through 420W at it . . . . . .


20200712_093044.jpg20200712_093059.jpg20200712_095742.jpg20200712_144402.jpg20200712_144407.jpg20200712_145052.jpg20200712_163134.jpg20200712_191647.jpg20200712_191705.jpg


TBC . . .
 
Last edited:
Lets see your Battery Boxes and mobile power solutions . . . . . . . .


Post Below -->
 
Hi @Dellmassive You’ve stirred my imagination regarding portable battery solutions ...Only just started on the solar journey and it’s first real test is at summer camp ...we are hoping to use the panels at home not just camping , so a mobile battery setup that is stand alone and perhaps can be integrated into the vehicle system ( may be a piggyback scenario ) being a day‘ish van not a lot of places to hide stuff.....so if it’s ok we could have a chat soon over a beer ( you might have sell tickets could be a queue) :laugh:
 
another MOD . . . .

we realised the other day testing the box in the garden that the black plastic of the carry box was getting very hot in the strong direct sun light (absorbing the summer sunshine . . . which is not great for the internal electrics and battery . . .

i looked everywhere for a Generator tent / cover, but nothing seemed to do what i wanted , , , ,

so i thought i would make my own one . . . Project - Box sun shield . . .


...

This is what i used,


1594757880337.png

.


this is how I've cut it to fit . . .


20200713_190153.jpg20200713_190201.jpg20200713_190219.jpg20200713_190413.jpg20200713_190440.jpg20200713_190445.jpg20200713_190557.jpg20200713_190612.jpg
 
Fantastic thread and a journey I started on last year. I bought a lot of the same stuff from Amazon but ended up going camping too many times to really get going. I’ve was using 2x 100w panels on 1x 100Ah Leisure battery with Victron MPPT and an 87w on a spare AGM battery.
I bought a wheeled Stanley box for the kit, to give me room for my tools and other bits and bobs ;)
With all the Covid stuff I’ve not done much this year but your post has really made me want to get cracking!!
I do want to change my two batteries for a single LifePo4 battery to save on space and weight but there are so many to choose from starting around £350 and up to £1500 for a 100Ah. Any advice on battery and thanks for providing such a detailed setup :thumbsup: :thumbsup:
 
The Power Boxes done a stellar job at T6F Summer camp this year.

they run all the Disco Tent, Lights, phone & Tablet charge and helped with the fridges when in transport. . .


T6-Logo.og.png
Summer Weekend T6F Meet
Summer Weekend T6F Meet 17th-19th July 2020 * UPDATE * June 24th 2020 - Booking confirmed. Revised location: Brook Meadow Lakeside farm holiday campsite see here for start of new details: Summer Weekend T6F Meet...
www.t6forum.com
www.t6forum.com


T6-Logo.og.png
12v Lithium Leisure Battery Box 138Ah 1766Wh -- How I Done It --
12v Lithium Leisure Battery Box 138Ah 1766Wh -- How I Done It -- It's about time that I got this long-overdue project sorted out. The missing parts are on order and completion is in sight . . . . . . . . ready for the Post Pandemic 2020 Camping Trips (Hopefully) This is where it started. p1...
www.t6forum.com
www.t6forum.com


pics:


20200716_080816.jpg

20200716_202053.jpg

20200716_202105.jpg

20200716_220337.jpg

20200717_092000.jpg

20200717_092505.jpg

20200717_092718.jpg


**************************************************
Dellmassive`s -- "how I Done It" -- Thread
**************************************************
Kit List And Stuff -- How I Done It & What I Use --
**************************************************

20200717_092720.jpg
 
Back
Top