Solar Panel Adhesive

That's all cool with me. I'm not trying to start a massive discussion but I think you have all taken my comments out of context.
I basically said flexible panels are more prone to overheating and are more statistically prone to failure overtime for this reason. I'm sure you won't have any issues in the first few years.

The main issue is how much more inefficient they become as temperature increases. This is a fact and there are correction factors for a decrease in efficiency as the temperature of the panel increases. On a plus side when you start going negative the efficiency increases. I think its about -0.5%per degC above 25 degC. All panels are speced at 25 DegC, industry standard.

I'm no solar panel expert but I take my advice from a company that are a Victron main dealer and have been installing panels on canal boats for years. They won't fit flexible panels for the above reasons, hence neither will I.
 
No, I wasn't disagreeing with you at all. In fact, if you read the info that I have offered for years, my preference has always been for rigid glass panels, but when the market demands the flexi type you have to try to offer something of good quality and that is what the ones that I linked to are, as distinct from the cheapo, last for 10 months ones.
 
The most popular panels appear to be from Photonic Universe, who give a 20 year warranty with glued-on flexible panels. Everyones experience is different, I've several cheap-as-chips panels that are still working well after 10 years, one is a small, very early panel that must be 25 years old now.
Cheers
Phil
 
This any good?

Sika 252 Caravan Adhesive 300ml

Sika 252 300ml - A High Quality Multi Purpose Polyurethane Adhesive, Bonds Well to a Variety of Substrates

Sika 252 is the recommended choice for installing solar panels to the roof of a caravan or motorhome. If you are intending to install a solar panel with the Sika 252 it is essential to prep and prime the surfaces before bonding, this will ensure that the best result is obtained. For any advice on this please call our sales team.

Product benefits:

  • 1-C formulation
  • Elastic
  • Can be overpainted
  • Good gap filling properties
  • Capable of withstanding high dynamic stresses
  • Vibration-damping
  • Non-corrosive
  • Electrically non-conductive
  • Bonds well to a wide variety of substrates
Sikaflex-252 is suitable for structural joints that will be subjected to dynamic stresses. Suitable substrate materials are timber, metals, particularly aluminium (incl. anodized components), sheet steel (incl. phosphated, chromated and zinc plated components), metal primers and paint coatings (2-c systems), ceramic materials and plastics.

Avaliable colours:

  • Black
  • White


SikaFlex 521 Adhesive 300ml - White

https://adsupply.co.uk/sika-252-car...&utm_source=Adrac&utm_medium=ppc&utm_content=

*******************************************************

SikaFlex 552 Adhesive 300ml - White

SikaFlex 552 Adhesive 300ml - White

Sikaflex® -552 is an excellent quality assembly adhesive. Ideal for securing solar panels to the roof of your shed, caravan, motorhome or boat with its durable rubber-like formula. Completely weather and ageing resistant, this high-performance adhesive is great for bonding a variety of materials without the need for priming. Odour, silicone and PVC free this fantastic adhesive can be easily painted over for a neat finish.

  • Benefits: Will help to secure a panel to a variety of roofs and mounting brackets.
  • Application: Use with DIY solar panels.
  • Quality: Created by the world leading adhesive manufacturer Sikaflex.

*********************************************************

Sikaflex 221 Multi Purpose Sealant

The Sikaflex221 is a strong sealant that can be used in a variety of situation including bathrooms, windows, caravans and much more.

  • Benefits: Will help to secure a panel to a variety of roofs and mounting brackets.
  • Application: Use with DIY solar panels.
  • Quality: Created by the world leading adhesive manufacturer Sikaflex.

Sikaflex 221 Multi Purpose Sealant


.
 
I’ve just had Sikaflex 252 confirmed by Sika Uk as suitable for binding semi flex panels to the van roof.
Recommended prep is abrade paint with scotchbrite and use sika 205 Aktivator to clean/activate both surfaces, leaving to dry for 10mins before applying adhesive.

They also don’t make 252 i anymore and i quote “any available will be out of date and should not be used”
 
Semi Flexible Solar panel bonding to the Van roof; here goes...

Having spent way too much time searching here and You Tube and anywhere else I've finally decided how I'm going (this weekend hopefully!) bond my semi flexible panels to the van roof.

First I've bought quality rugged panels with internal aluminium substrate for strength and heat conduction, they are 1550m long by 510mm wide (150W each) & will be going on the rear part of the roof longitudinally and side by side and connected in series.

Things I've considered, though maybe not completely resolved...

  1. Mechanical stresses; It seems to me that some flexibility must be retained in the bonding so that differential expansion etc can be accommodated. My chosen adhesive retains flexibility but needs some bead thickness to do so. To ensure I have consistent height of bead, I'll be including a rubber spacer Green in the pics below (it is actually some ribbed rubber matt that I happen to have around and is 3.5mm thick). These spacers will have a central gap to allow the voids to breathe.
  2. Thermal issues; I've seen much talk of high temperature actually killing the cells (I know the heat decreases there efficiency), but in a former life I've seen Silicon PV cells used at temperatures way above 100C in flight critical applications, I personally think that it's the induced mechanical stress that breaks stuff. There'll be plenty of heat from the sun on the panel but the rubber mat & subsequent, though small air gap below will at least limit the heat being conducted up from the lovely hot metal roof.
  3. Bonding; lots of recommendations for Sika 252, so I asked Sika UK and they confirmed it is suitable for this job, but as I said in previous post, they did recommend using their (not cheap) cleaner/activator to ensure a good bond. Shown in red on the picture; I'll put on a triangular bead which is 7mm High (2x the intended finished bead thickness) and 10mm wide at the base, this will give a nominal 10mm wide bead after installing. I'll also be putting some conical piles in the "roof trenches" to give a little support but allow air movement.
  4. Edge sealing; the panel is just a tad wider than the top face of the ridges, actually the edges will be above the point where the roof starts to rise for the ridge; I plan to fill these overhangs and seal the entire edge, providing a bit of a ramp at the leading edge to make sure that 70mph head wind can't get underneath. But to let it breath & let out any water that gets, in I'm using some thin wall SS tubes (actually bits of reusable drinking straws) at the Outer (and therefore lower) edges of the "trenches" these will be front and rear. I'll probably use SikaFlex EBT for the edge sealing as it stays flexible and is more a sealant than a glue, its also much cheaper...
  5. Cable Entry; I've decided to keep the cables toward the front of the van, this gives a shorter run to the MPPT under the drinkers seat and if the unthinkable happens and the panel bond breaks down, then hopefully the cables will at least keep the panel up there till I can stop. The lumpy mouldings that seem common on campers are a bit big for my "stealthy" look, so I looked at the marine sector and found some small low profile IP68 units. Index Marine SE1B, see pic.
I'll welcome any thoughts on this plan, especially on the things that I haven't thought of!!

Cheers

The rubber mat spacers, I'll probably put them in the other way up, i.e. ridges down over.
IMG_1246.jpeg

Panel location (this is a dummy panel made from Protex corrugated plastic sheet) note the neat 20mm high cable entry glands
IMG_1243.jpeg
Preview of PDF:
FCA0A07D-F391-49A9-8C70-0BED6A79802A.jpeg
 

Attachments

  • Solar panel install.pdf
    23.2 KB · Views: 8
Last edited by a moderator:
I’ve gone for a more solid spacer

The only thing I would be careful of is to make sure you do not prevent the adhesive being able to flex.

Obviously with the fixed ribbed roof you will not be able to leave side openings as I did so make sure you keep your vent pipes clean. It is surprising how much grime can build up.
 
Good point; Thanks.
Those SS straws came with a cleaning brush so that’ll be joining the van cleaning kit.
Being able to move is why I’m putting the spacer ribs down to the roof, should move on the paint.
 
Though 180W from 2x150W panels is a bit disappointing on a full sun day at ~13:00…
 
Though 180W from 2x150W panels is a bit disappointing on a full sun day at ~13:00…
what panels have you got?

have you space in your battery bank for the charger to be in Bulk mode? ( turn on all loads, and drain down battery bank to 50% soc)

the let the charger loose.
 
Though 180W from 2x150W panels is a bit disappointing on a full sun day at ~13:00…
Don’t forget that the panel rating is the absolute maximum that the panel can produce. So on midsummer’s day at solar noon, with the panels angled towards the sun so they are perpendicular to the sun’s rays & they are cool enough so not to be current limited, you just might manage to achieve the rated output. It’s a bit like car manufacturer’s fuel consumption figures. You’ll never achieve them in the real world. This is why when folks say they are fitting a 100W panel because they’ve calculated their load & 100W is enough, I have a secret smile. I’d be happy with 50% of the rated output, especially in the UK. Our panel is rated at 160W, the best we’ve had was 135W and that was midsummer on a cloudless day in Portugal, with the roof up & facing the sun.
 
Yeah I know about the ratings and angles, I was only expecting to hit maybe 200W (ie 2/3) which it did a little later.
At the time my house system, angled well to the sun was hitting 2750 of possible 3000W
However with the sun sinking low they’re still pumping out 90W… 2 panels in series :thumbsup:

what panels have you got?

have you space in your battery bank for the charger to be in Bulk mode? ( turn on all loads, and drain down battery bank to 50% soc)

the let the charger loose.
The panels are…

It was about 80% at the time and was in bulk mode.
I later found I’d made a bad connection in the wiring (one of the terminals wasn’t fully inserted into its housing)
I just used the Multiplus to run the vac to clean out the van (still feels weird that) it’s on the limit of the Multiplus and pulled the battery down again a bit & I’ve had the fridge/freezer running hard all afternoon.
Just need to give it more time
 
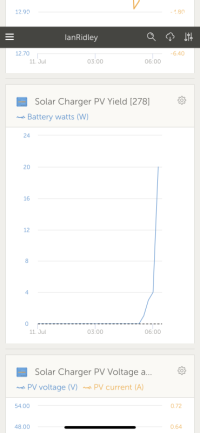
off to a good start to the day… 4W before the sun came up over the neighbours roof and up to 20 as soon as it did! And still so low that one panel was at about 85deg to the sun due to the van roof curvature.
It’s gonna be a long charging day…

9DC49D52-E202-409B-B1F0-EF34C31A222A.png
 
Yeah I know about the ratings and angles, I was only expecting to hit maybe 200W (ie 2/3) which it did a little later.
At the time my house system, angled well to the sun was hitting 2750 of possible 3000W
However with the sun sinking low they’re still pumping out 90W… 2 panels in series :thumbsup:


The panels are…

It was about 80% at the time and was in bulk mode.
I later found I’d made a bad connection in the wiring (one of the terminals wasn’t fully inserted into its housing)
I just used the Multiplus to run the vac to clean out the van (still feels weird that) it’s on the limit of the Multiplus and pulled the battery down again a bit & I’ve had the fridge/freezer running hard all afternoon.
Just need to give it more time
So looking at the spec of those panel's....

2x in series should give you (max)


36.4v @ 8.2A (298.48w)

Standard test conditions of 1000w per meter squared
....

They don't state the power efficiency % but do show the 5% +- range.
.....


Solar panel specifications:

Peak power: 150W
Maximum power voltage: 18.2V
Maximum power current: 8.24A
Open circuit voltage: 21.4V
Short circuit current: 8.74A
Power allowance range: +/- 5%
Solar Panel Dimensions: 1550 x 510 x 4 mm
Weight: 4.45 kg
2 x 0.9m of high quality single core solar cable (4mm² cross section)
Male and female MC4 compatible connectors


.....
 
Back
Top